Okta SSO and Provisioning
| To simplify user access to Bright, you can configure Single Sign-On (SSO) integration with your Okta application. Either the OIDC or SAML protocol can be used to enable Okta SSO. You can also take advantage of Okta provisioning feature to automatically synchronize users and groups between your Okta application and Bright organization. The provisioning integration is built around an industry-standard protocol known as SCIM (System for Cross-domain Identity Management). This protocol is design for user management across multiple applications. It allows you to easily provision (add), deprovision (delete) and update (map) user data across multiple applications at once.
|
|
You can set up SCIM provisioning in Okta to automatically add the Okta application users and groups to your organization in the Bright App. The added users will be able to access the Bright App using Okta SSO.
Bright supports the following attribute mappings for SCIM provisioning:
userNameemailemailTypedisplayName
Enabling Okta SSO via OIDC protocol
Features
Okta integration with Bright allows users to link their Okta accounts with their Bright accounts and sign in to the Bright app via Okta SSO, using the SP-initiated flow.
Step-by-step configuration guide
To enable Okta SSO for your Bright organization, follow these steps:
- Log in to Okta.
- Browse for the preconfigured Bright Security integration app in the Okta catalog and add it to your applications.
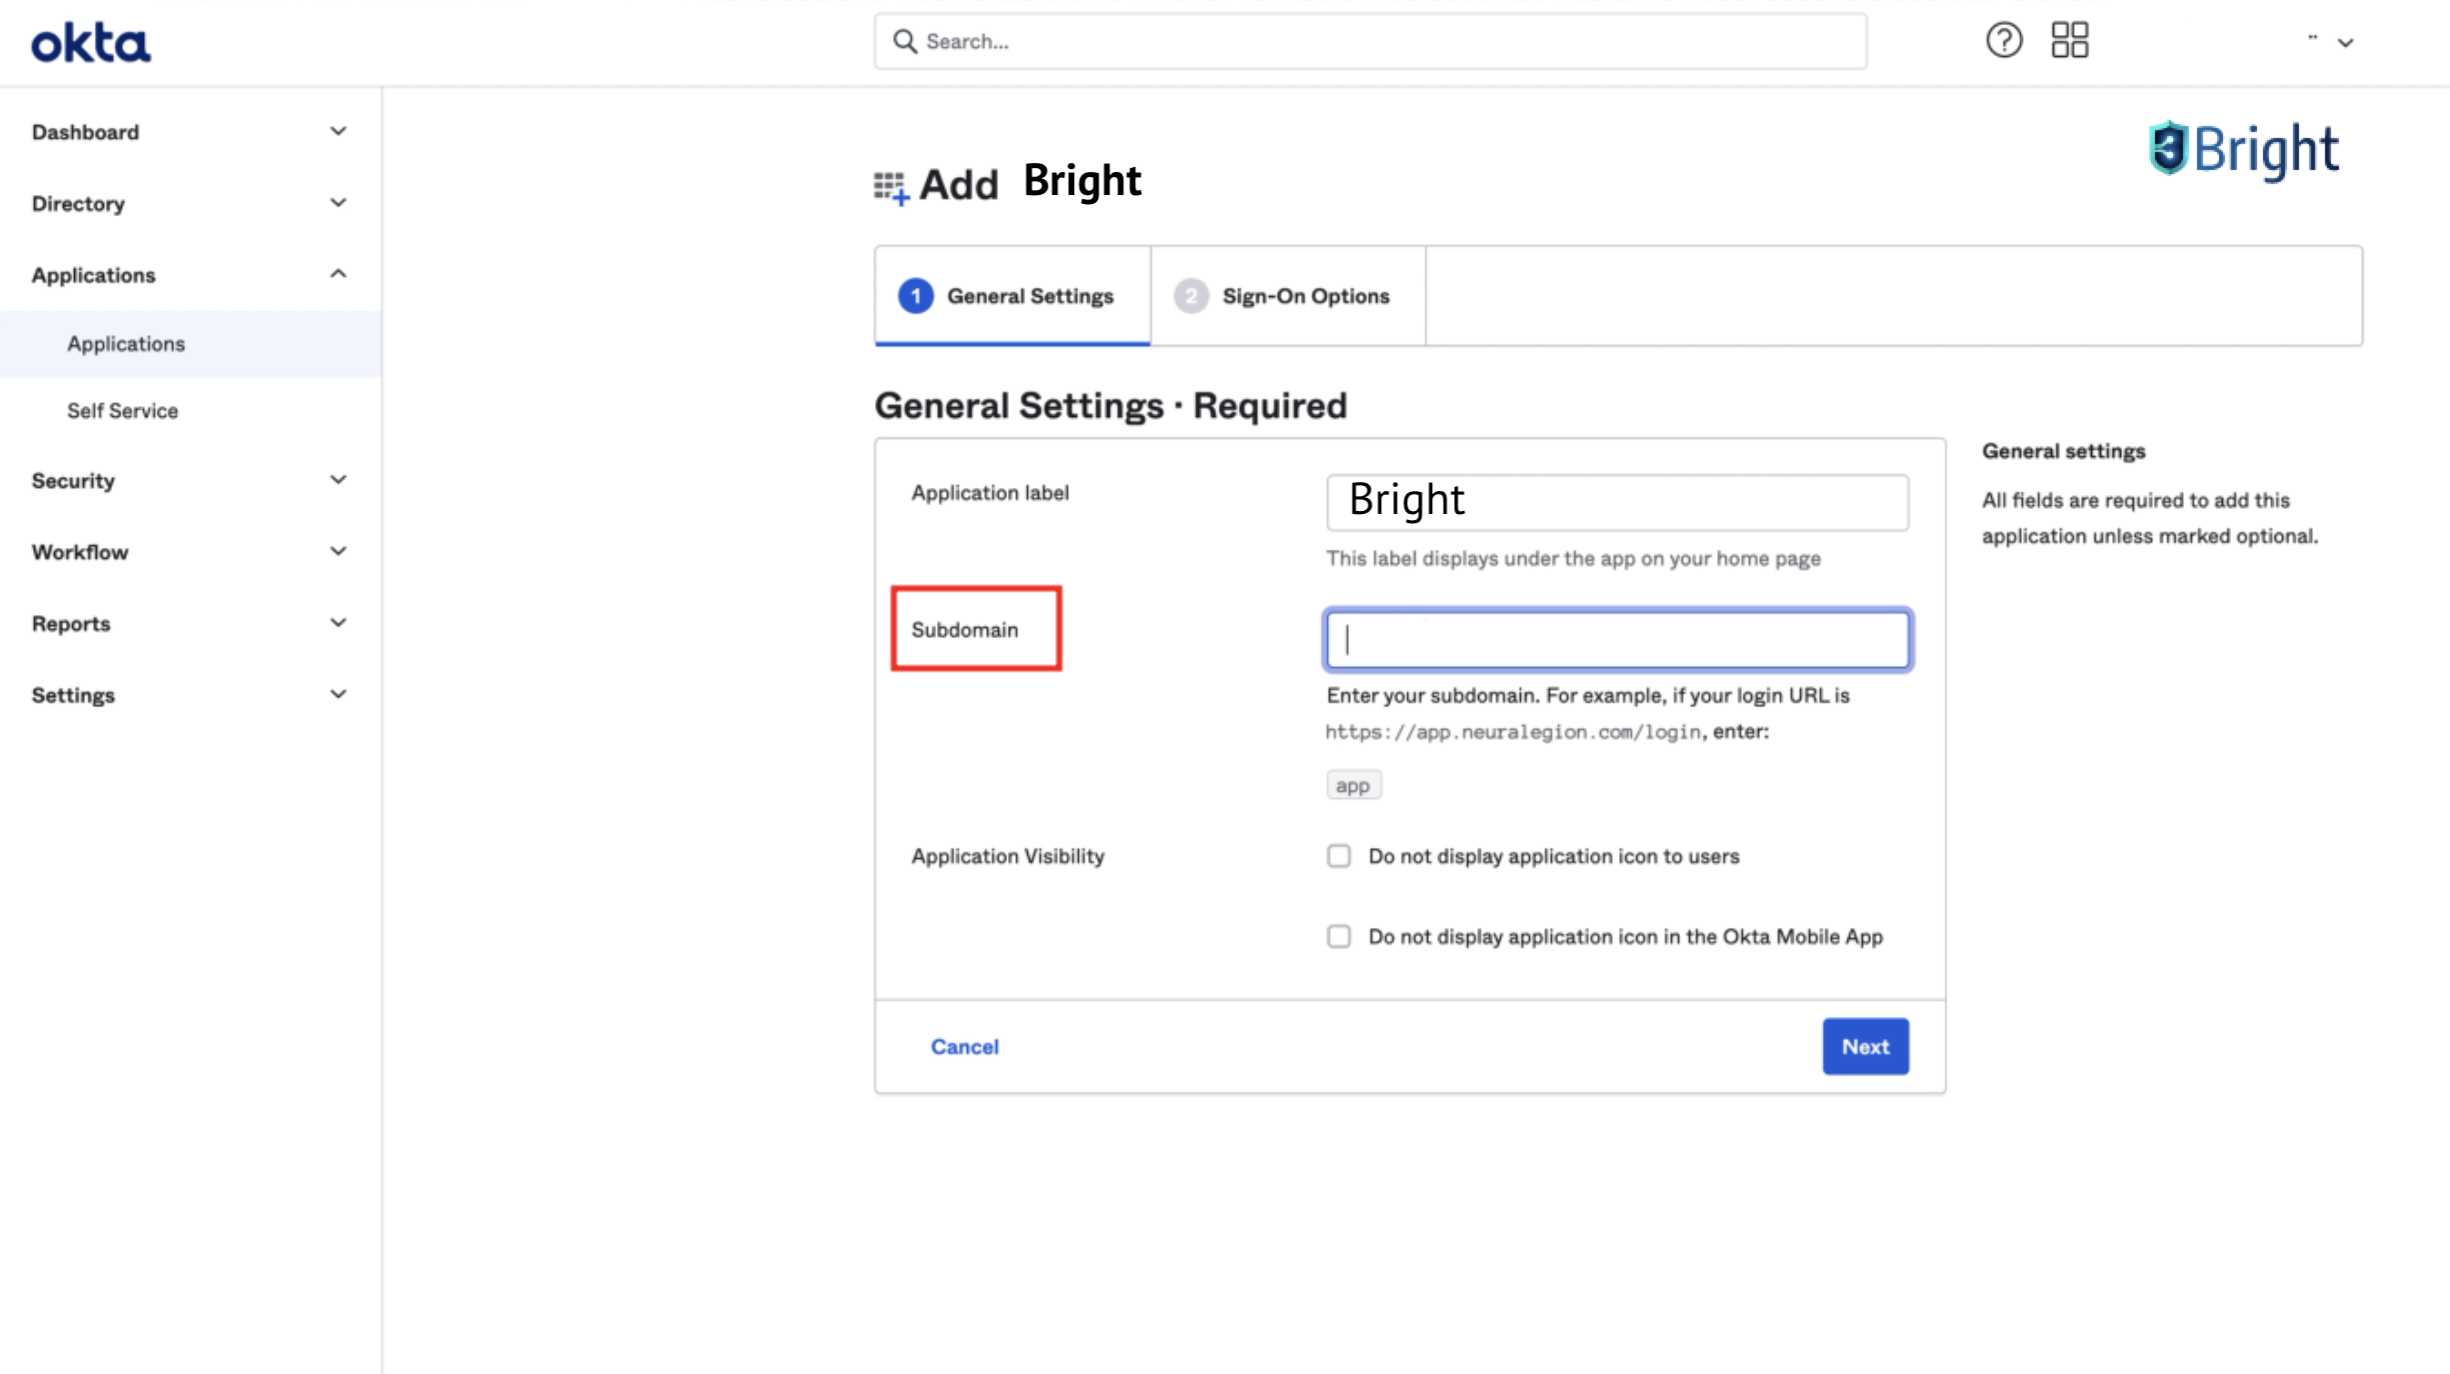
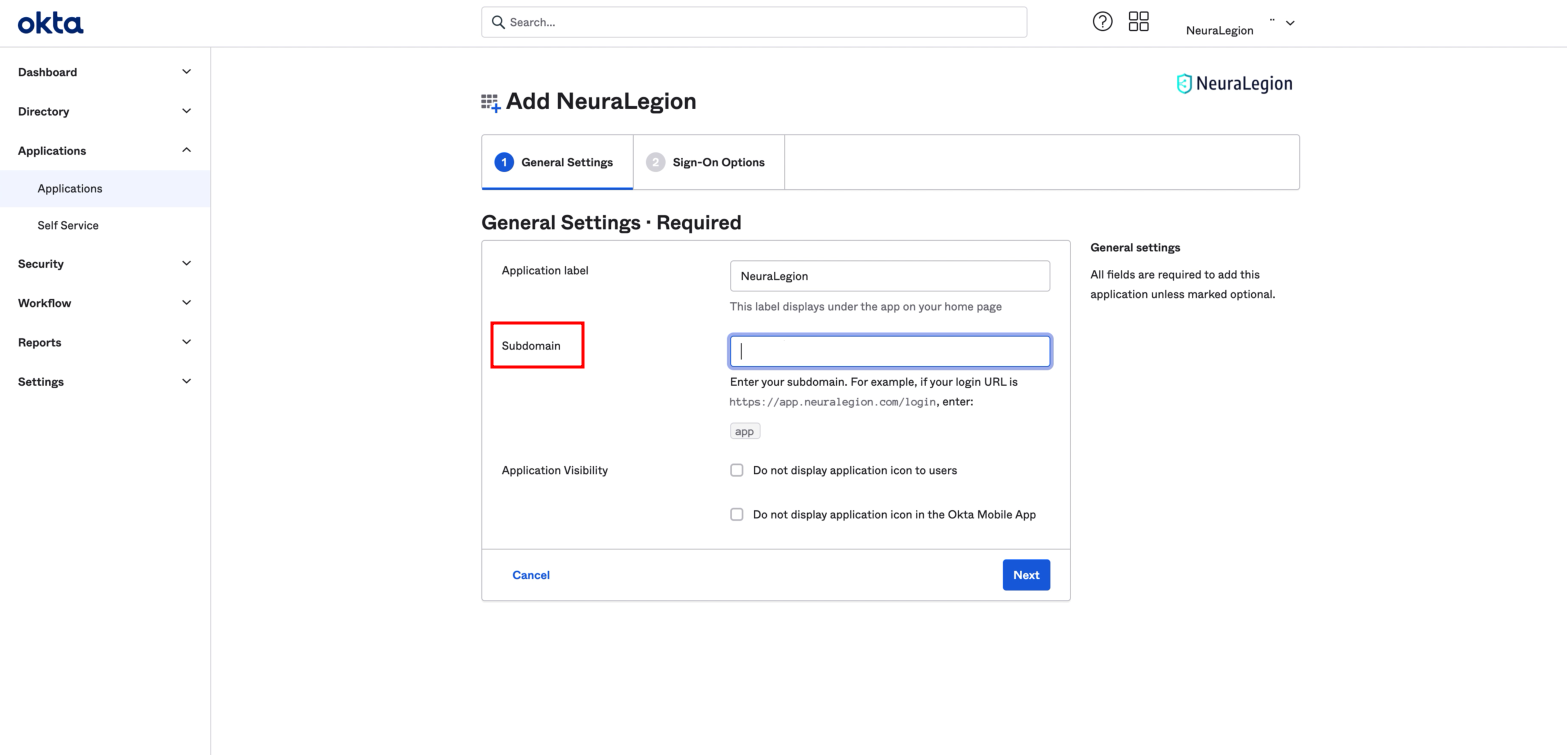
- When onboarding, in the General Settings tab, set your subdomain and click Next.
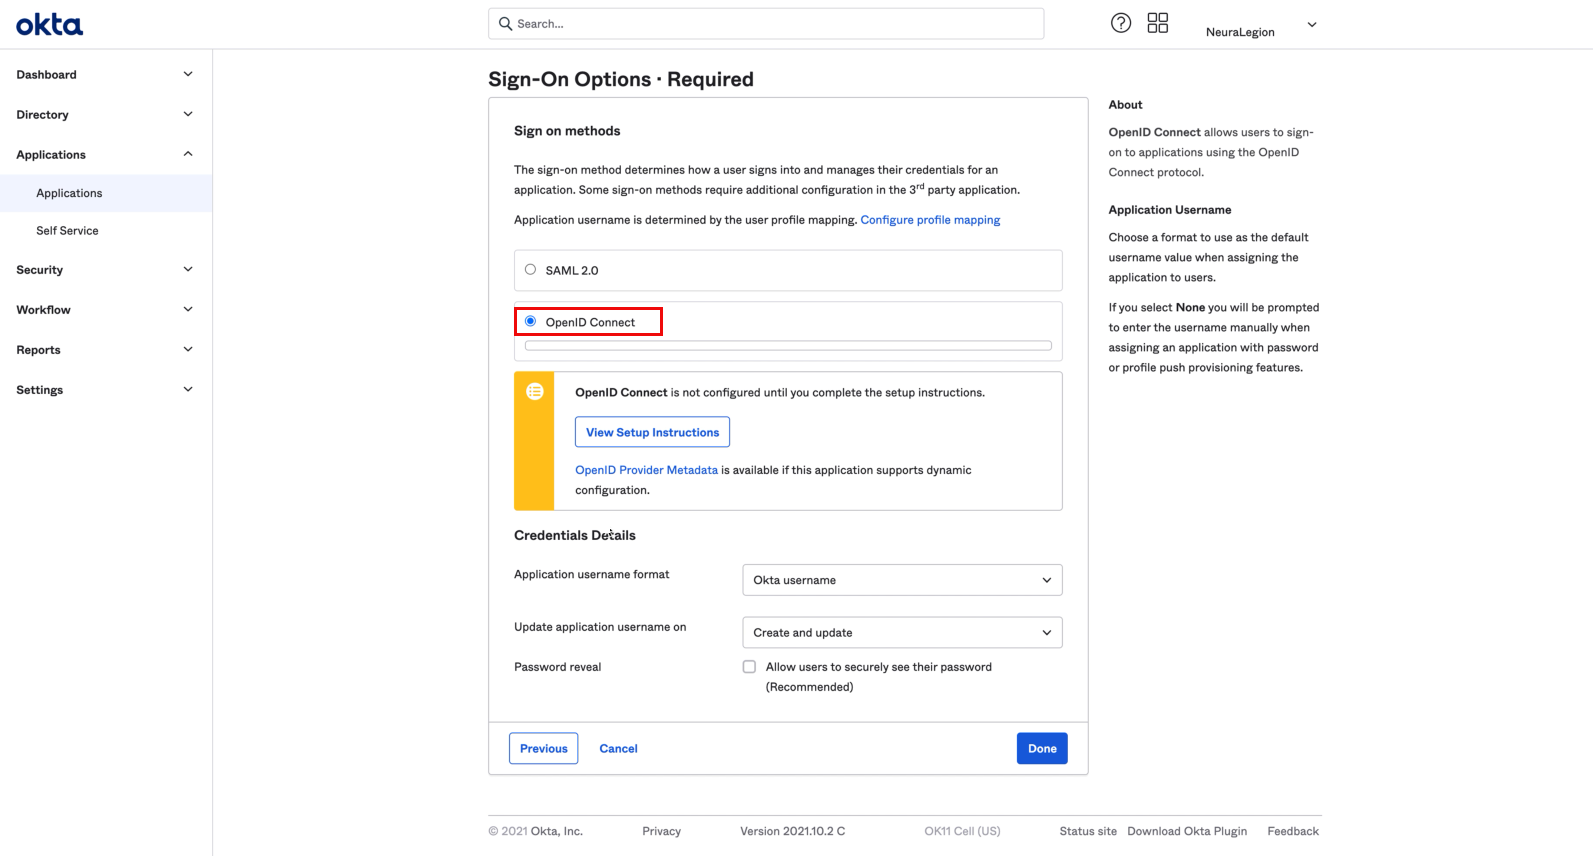
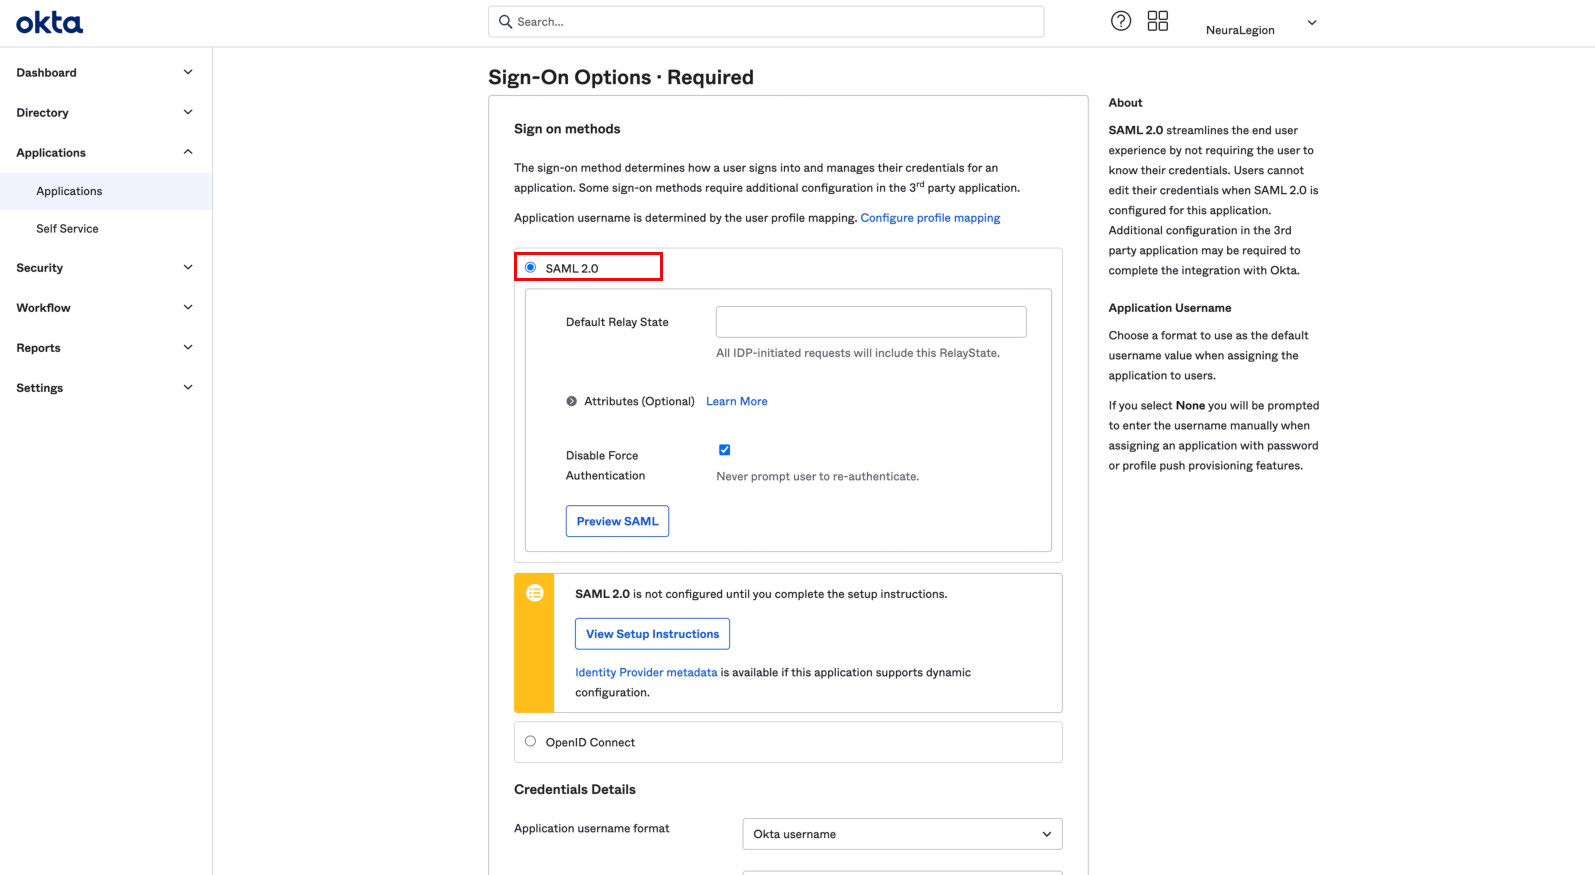
- In the Sign-On Options tab, select OpenID Connect.
-
In the Credentials Details section, set the Application username format to Email, and then click Done.
The Brightsec integration app is set up. -
In the Assignments tab, assign users to the app.
The assigned users will then get SSO access to the Bright app. -
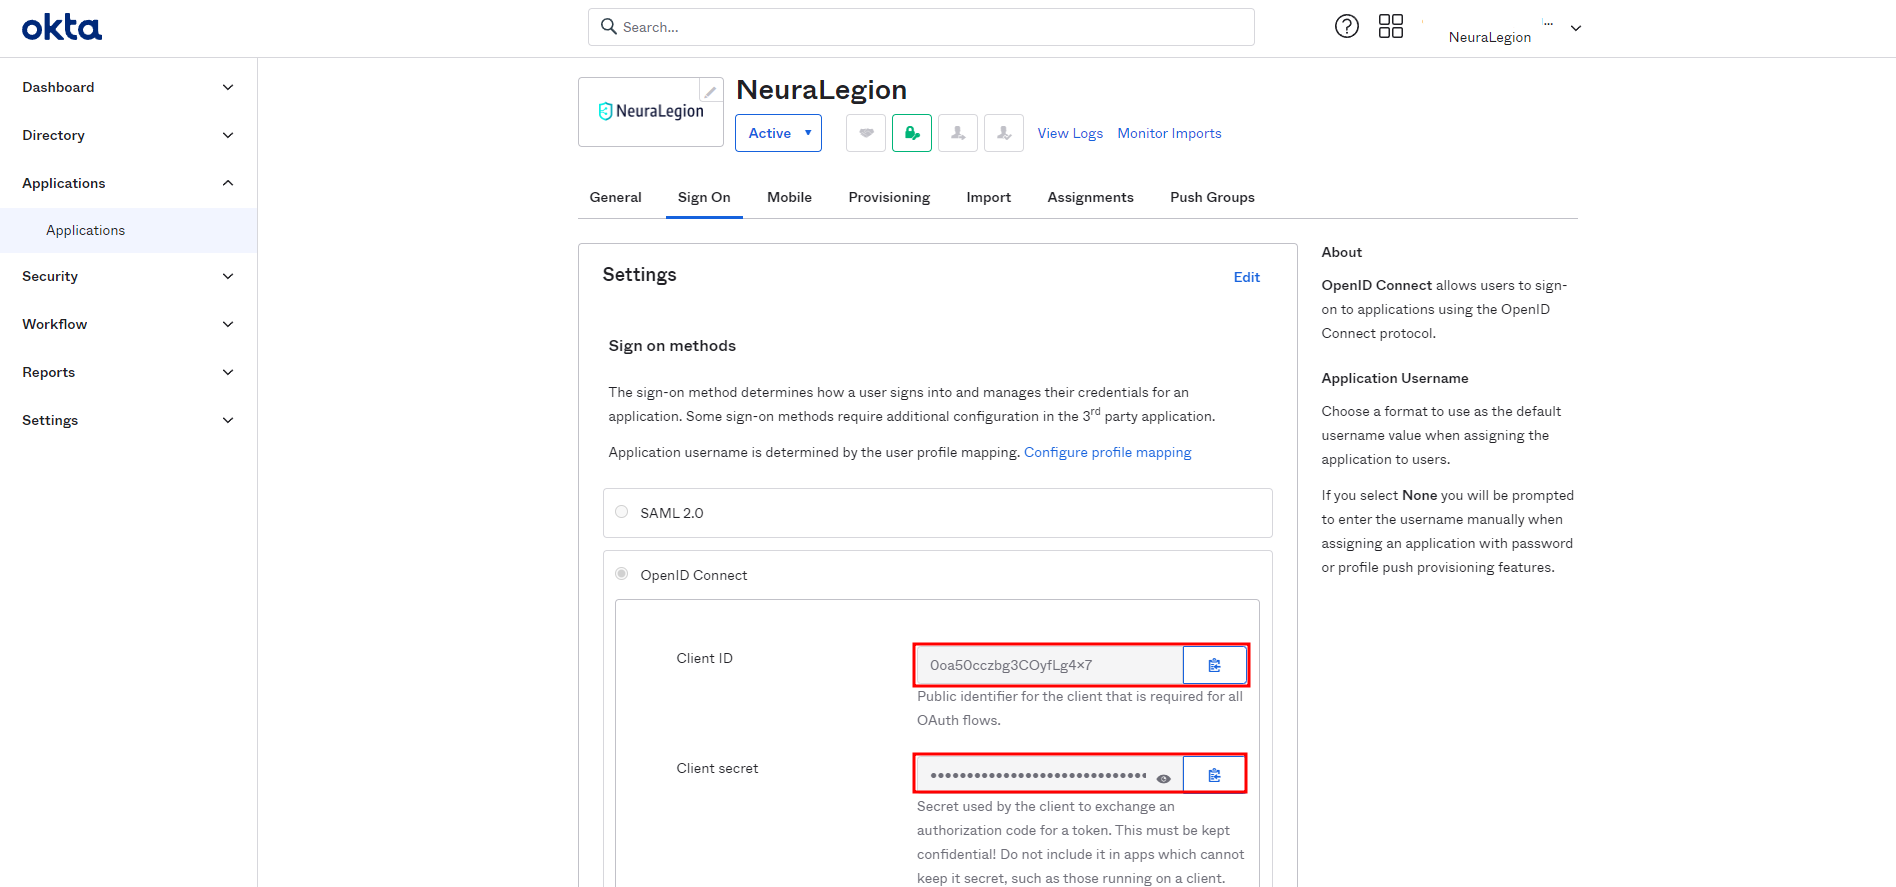
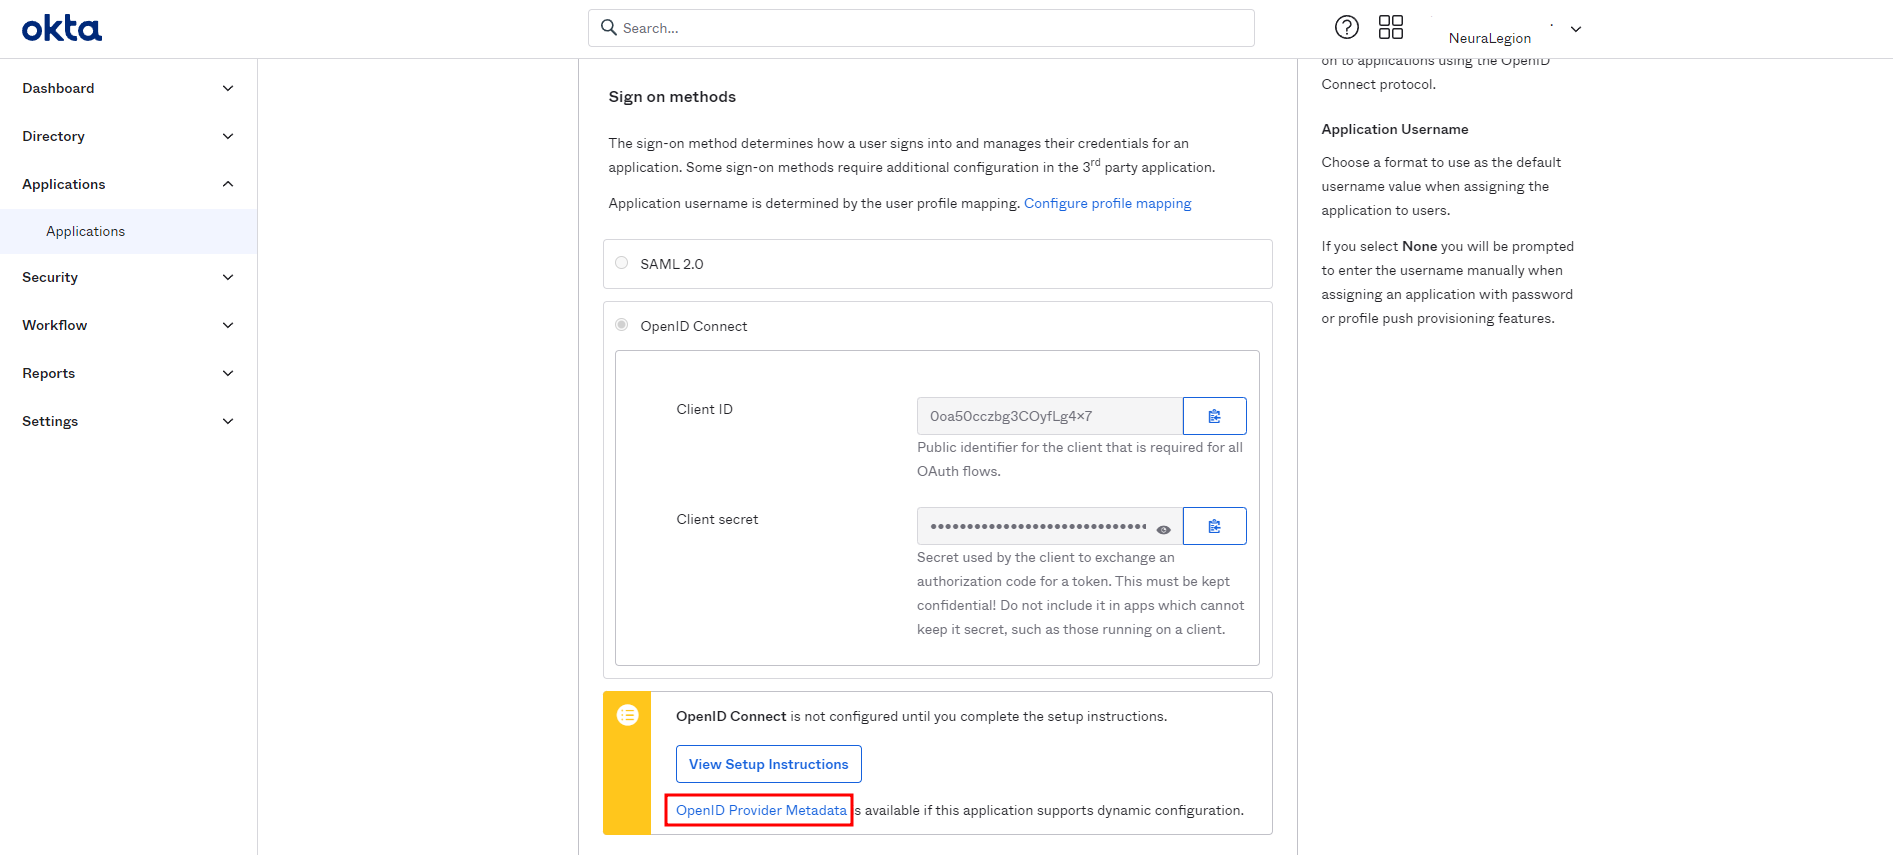
In the Sign On tab, get the credentials of the created app to authorize it in the Bright app:
-
Copy the client ID and client secret values.
-
Click OpenID Provider Metadata and copy its URL. The metadata URL format is
<https://{org_slug}.okta.com/.well-known/openid-configuration>
-
-
Log in to the Bright app.
-
In the left pane, select the Settings option.
-
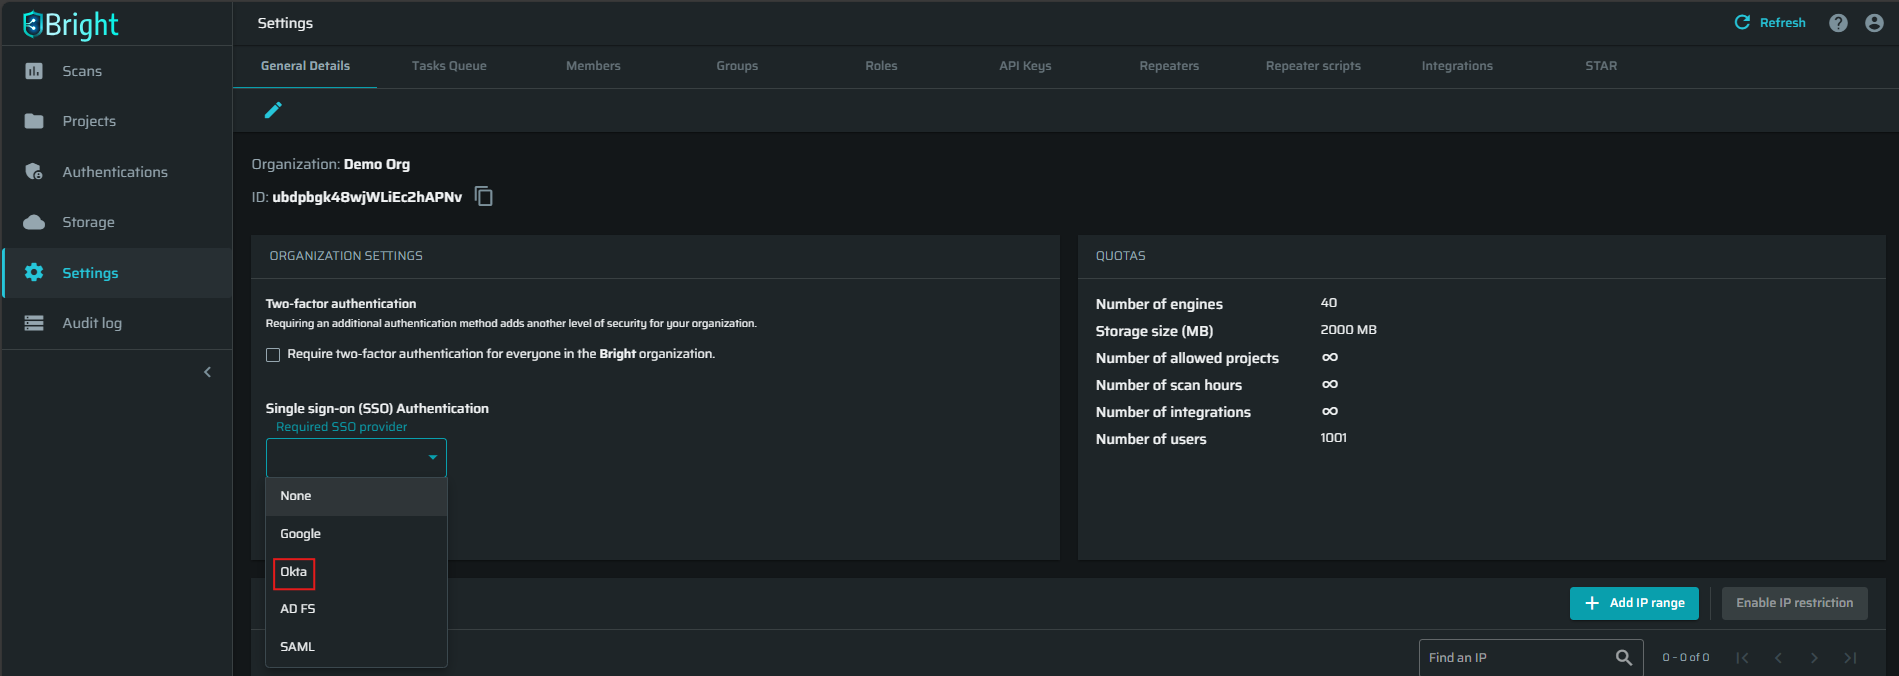
At the ORGANIZATION SETTINGS section, open the Single sign on (SSO) Authentication dropdown list, select Okta, and then click Connect.
-
On the OKTA AUTHENTICATION page, do the following:
-
Select the Default Role the new members will be assigned to.
-
Select the OIDC protocol.
-
Enter the Client ID, Client Secret and Metadata URL copied from the Brightsec integration app in Okta.

-
-
Click Save settings.
After Okta SSO is set up, an email is sent to all the users of your Bright organization suggesting confirming their accounts and link their Okta profiles to the Bright profiles. Once the accounts are linked, the users can log in to the Bright app using the Okta SSO option. -
(Optional) You can enforce SSO registration by selecting the Require your organization members to use SSO to access Bright checkbox. When this option is selected, only the registered users (current members of a Bright organization) with existing SSO accounts can access the Bright app.
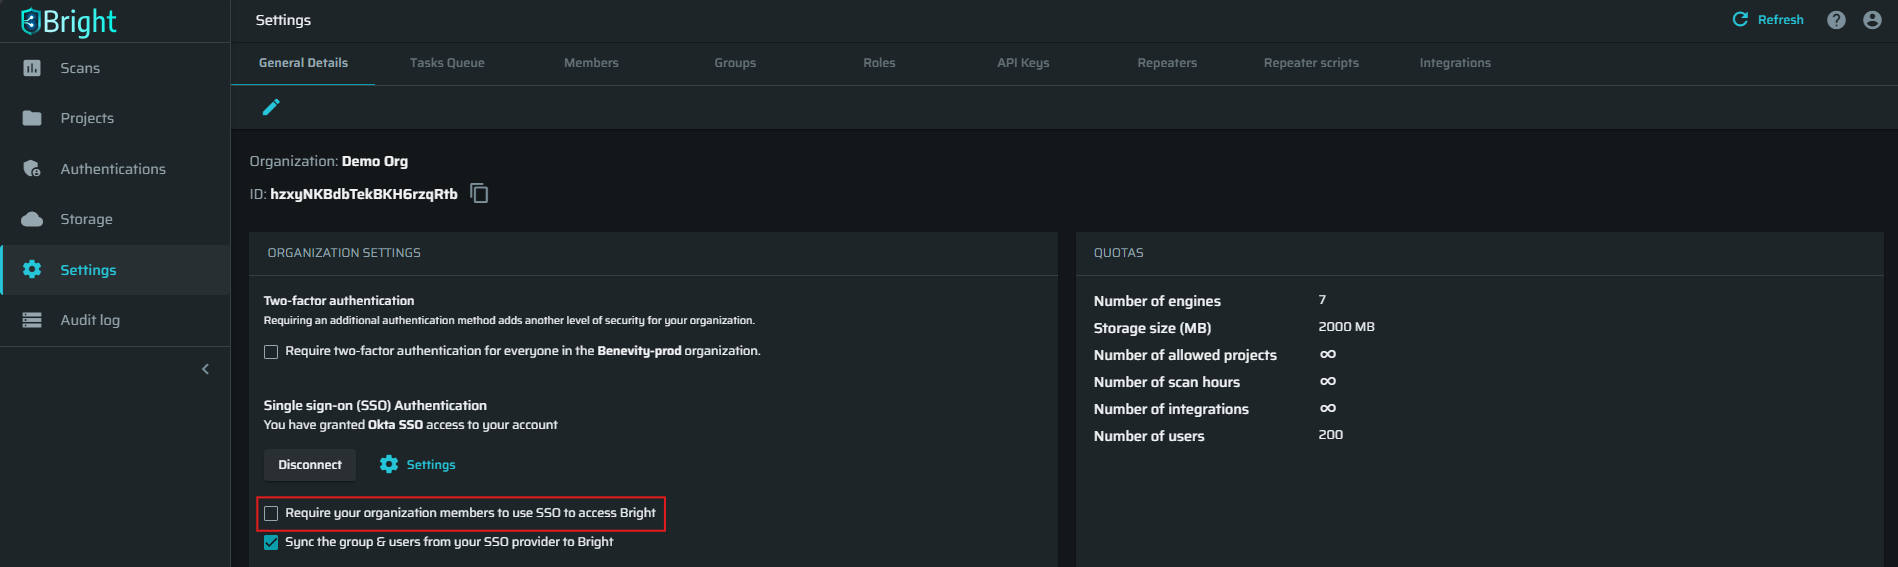
ImportantStrict enforcement of SSO for all organization members will require resetting the connection in case of an SSO break. If that happens, please contact the Bright technical support for assistance.
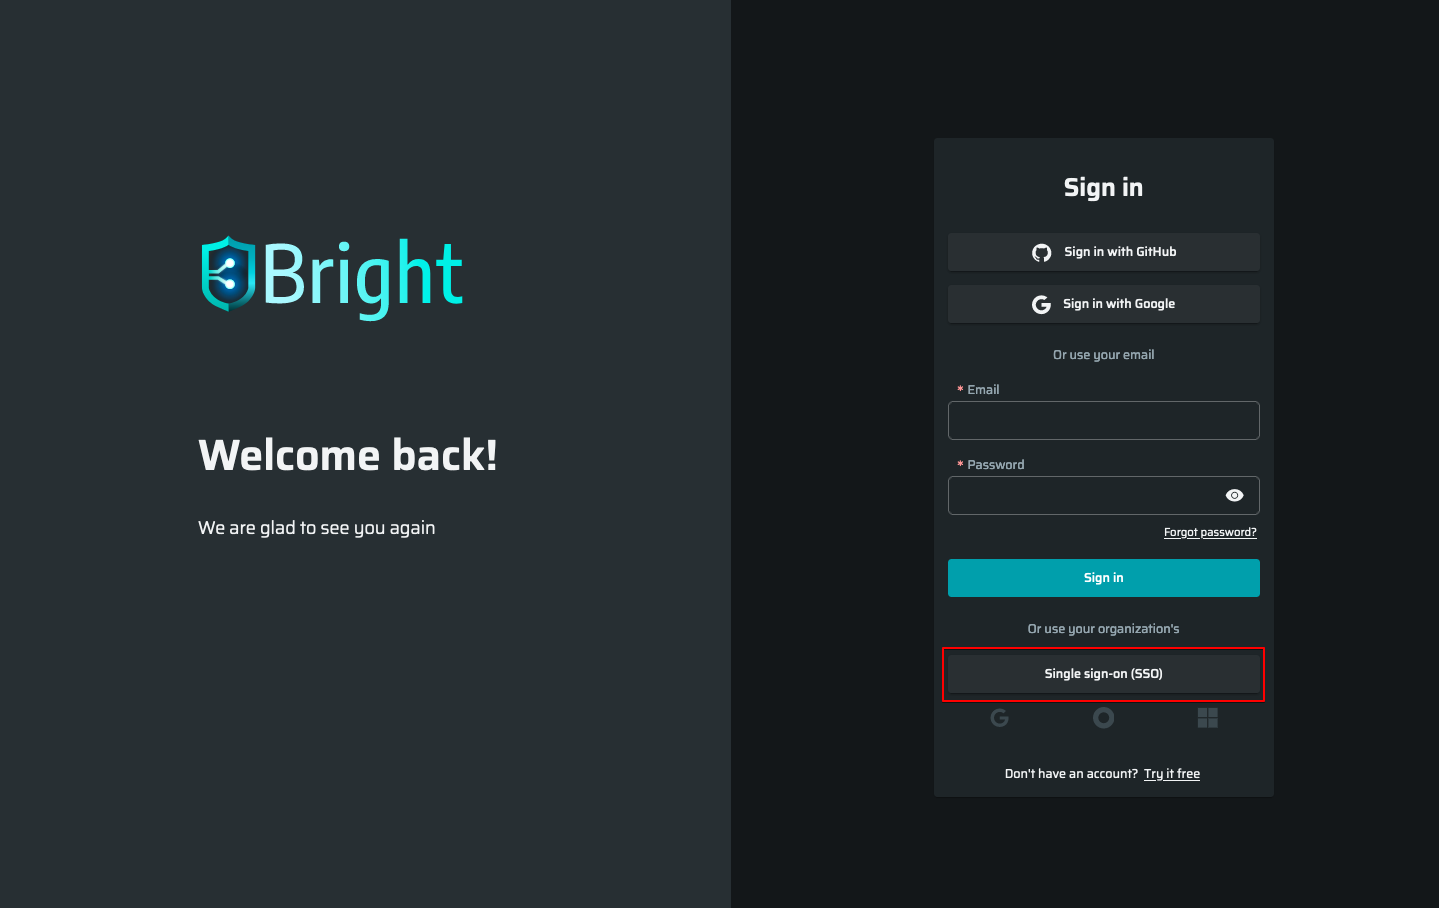
- On the login page of the Bright app, click Single Sign On (SSO).

- Enter your Bright organization name and click Continue.
- Select Sign in with Okta.
You are redirected to the Okta login page. - Enter your Okta credentials and click Sign In.
Enabling Okta SSO via SAML protocol
Features
Okta integration with Bright allows users to link their Okta accounts with their bright accounts and sign in to the Bright app via Okta SSO, using the SP-initiated flow.
Step-by-step configuration guide
To enable Okta SSO for your Bright organization, follow these steps:
-
Log in to Okta.
-
Browse for the preconfigured Bright Security integration app in the Okta catalog and add it to your applications.
-
When onboarding, in the General Settings tab, set your subdomain and click Next.
-
In the Sign-On Options tab, select SAML 2.0.
-
In the Credentials Details section, set the Application username format to Email, and then click Done.
The Brightsec integration app is set up. -
In the Assignments tab, assign users to the app.
The assigned users will then get SSO access to the Bright app. -
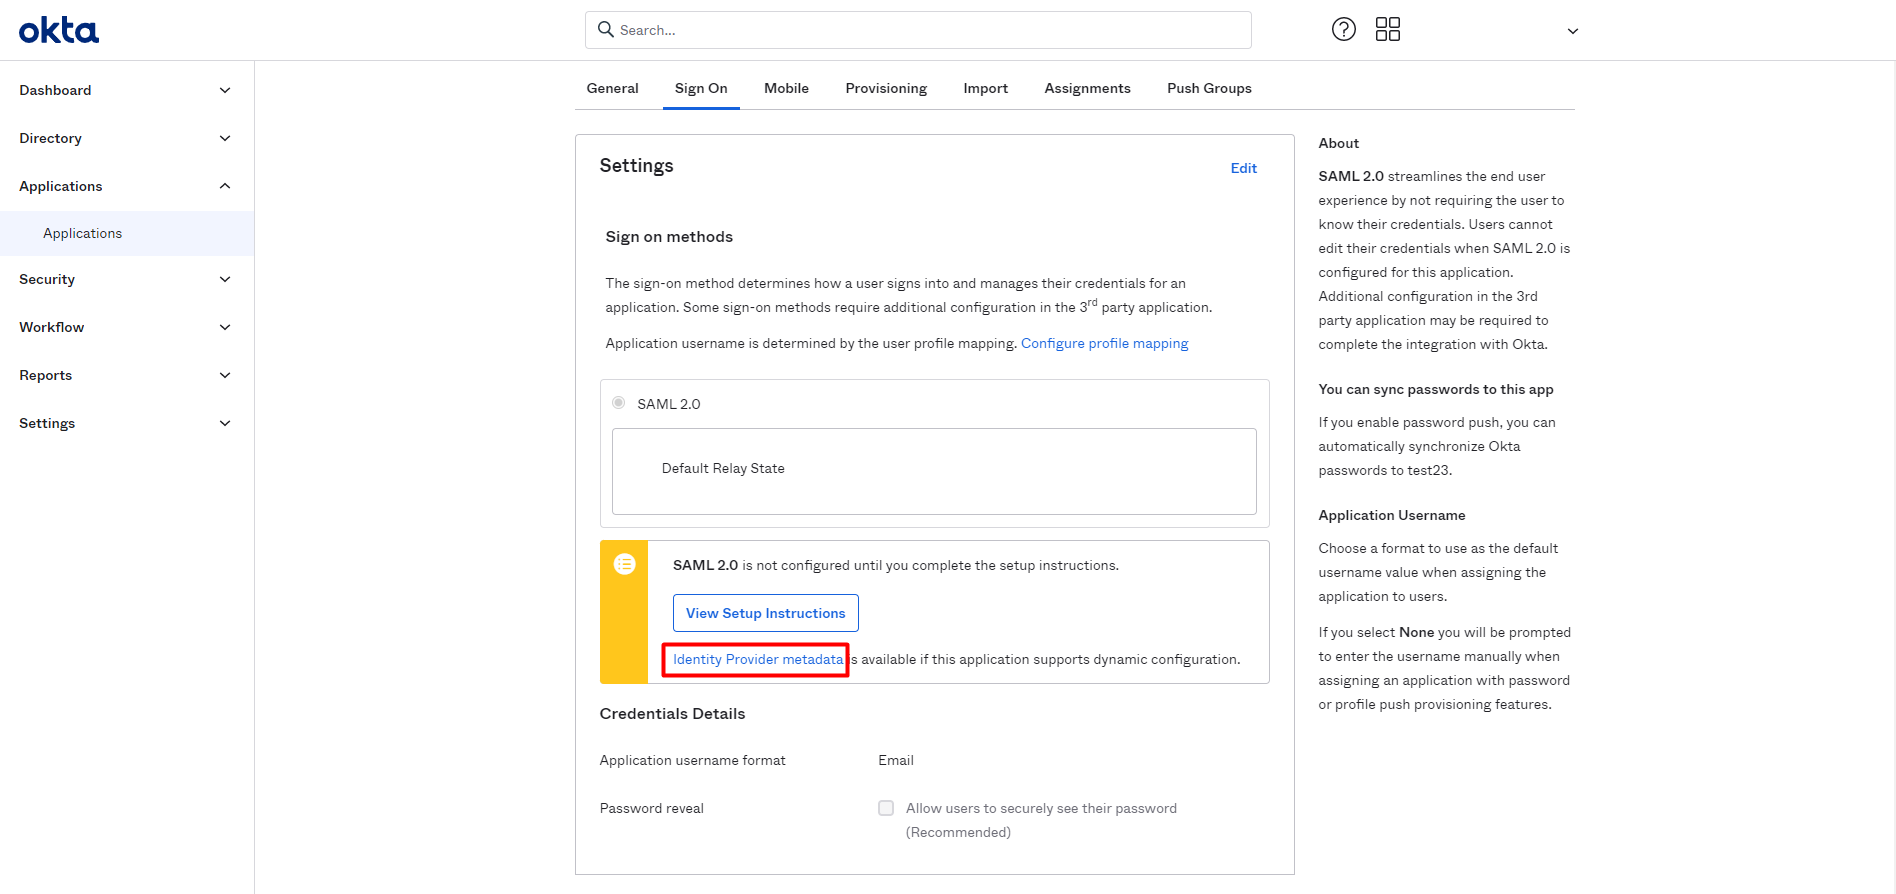
In the Sign On tab, get the metadata of the created application to authorize it in the Bright app. For that, click Identity Provider Metadata and copy its URL.
-
Log in to the Bright app.
-
At the ORGANIZATION SETTINGS section, open the Single sign on (SSO) Authentication dropdown list, select Okta, and then click Connect.
-
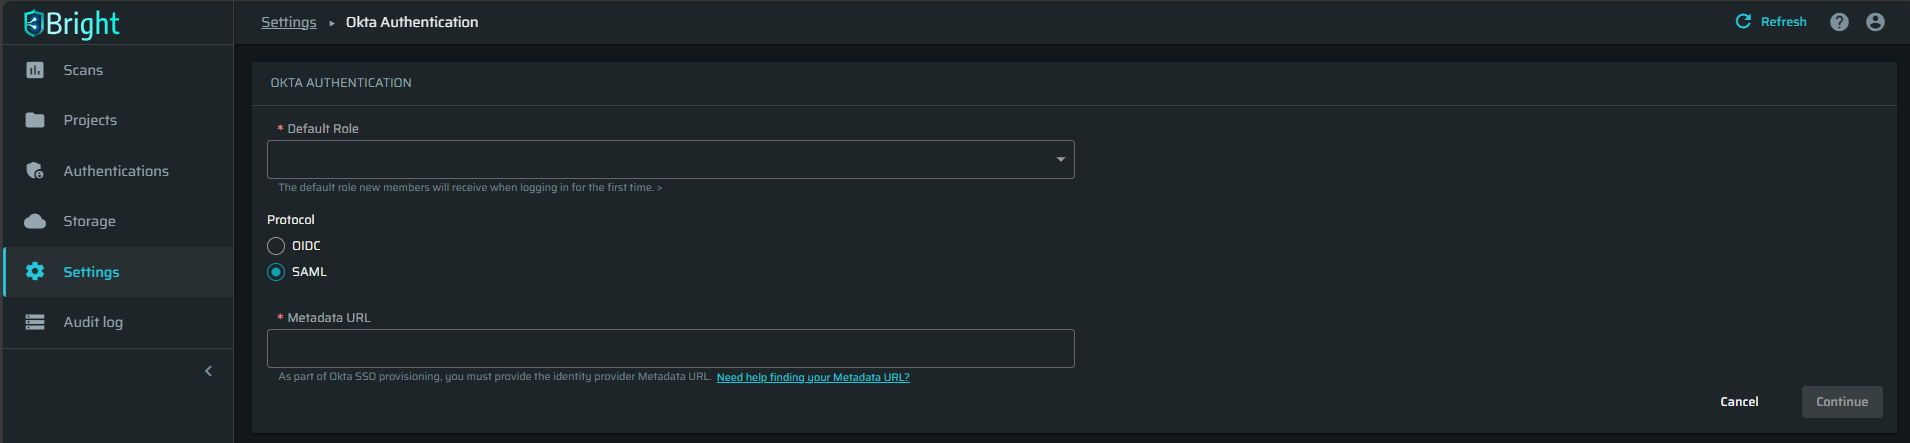
On the OKTA AUTHENTICATION page, do the following:
-
Select the Default Role the new members will be assigned to.
-
Select the SAML protocol.
-
Enter the Metadata URL copied from the Brightsec integration app in Okta.
-
-
Click Save settings.
After Okta SSO is set up, an email is sent to all the users of your Bright organization suggesting confirming their accounts and link their Okta profiles to the Bright profiles. Once the accounts are linked, the users can log in to the Bright app using the Okta SSO option. -
(Optional) You can enforce SSO registration by selecting the Require your organization members to use SSO to access Bright checkbox. When this option is selected, only the registered users (current members of a Bright organization) with existing SSO accounts can access the Bright app.

ImportantStrict enforcement of SSO for all organization members will require resetting the connection in case of an SSO break. If that happens, please contact the Bright technical support for assistance.
- On the login page of the Bright app, click Single Sign On (SSO).
- Enter your Bright organization name and click Continue.
- Select Sign in with Okta.
You are redirected to the Okta login page. - Enter your Okta credentials and click Sign In.
Enabling SCIM provisioning between Okta and Bright
Features
The following provisioning features are currently supported by Bright:
- Push New Users. Users created in Okta and assigned to the Brightsec integration application in Okta are automatically added as members to the linked organization in the Bright app.
- Push Profile Updates. Updates made to the user's profile through OKTA will be pushed to the Bright app.
- Push User Deactivation. Deactivating the user or disabling the user's access to the Brightsec integration application through OKTA will deactivate the user in the Bright app.
Note: For the Brightsec integration application in Okta, deactivating a user means removing access to login, but maintaining the user's Bright information as aninactiveuser. - Reactivate Users. User accounts can be reactivated for the Brightsec integration application in Okta.
- Push Groups. Groups and their members in Okta can be pushed to the linked Bright organization.
Requirements
- To configure the provisioning flow, first you need to enable Okta SSO for your Bright organization via the OIDC or SAML protocol. Please see the guides above for the detailed instructions.
- For the provisioning setup, you will require to create an Organization Key with the
scimscope.
Step-by-step configuration guide
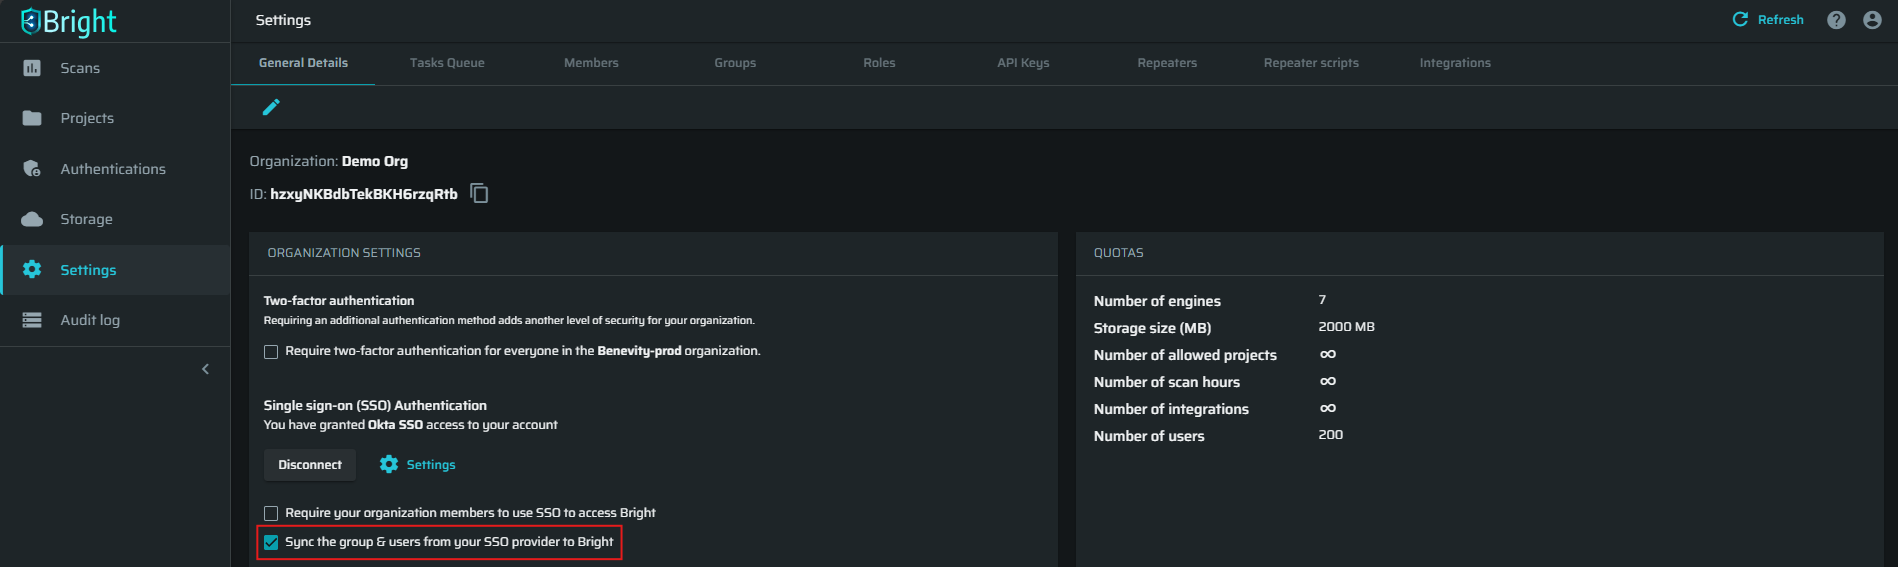
Provisioning setup in the Bright app
In the ORGANIZATION SETTINGS, select the option Sync the group & users from your SSO provider to Bright.
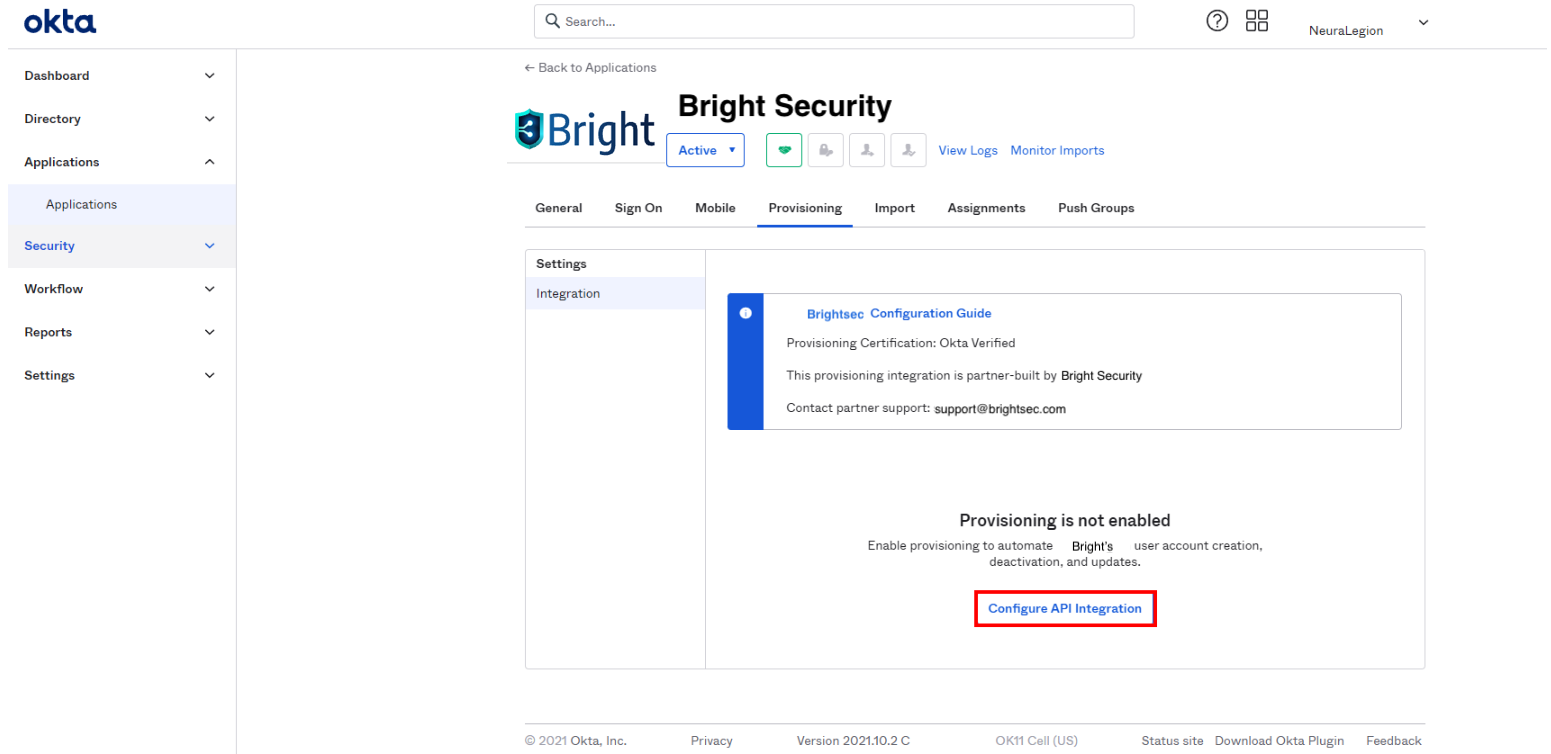
Provisioning setup in Okta
-
In your Brightsec integration app, open the Provisioning tab and click Configure API integration.
-
Select the Enable API integration checkbox, and then enter the API token copied from the Bright app.
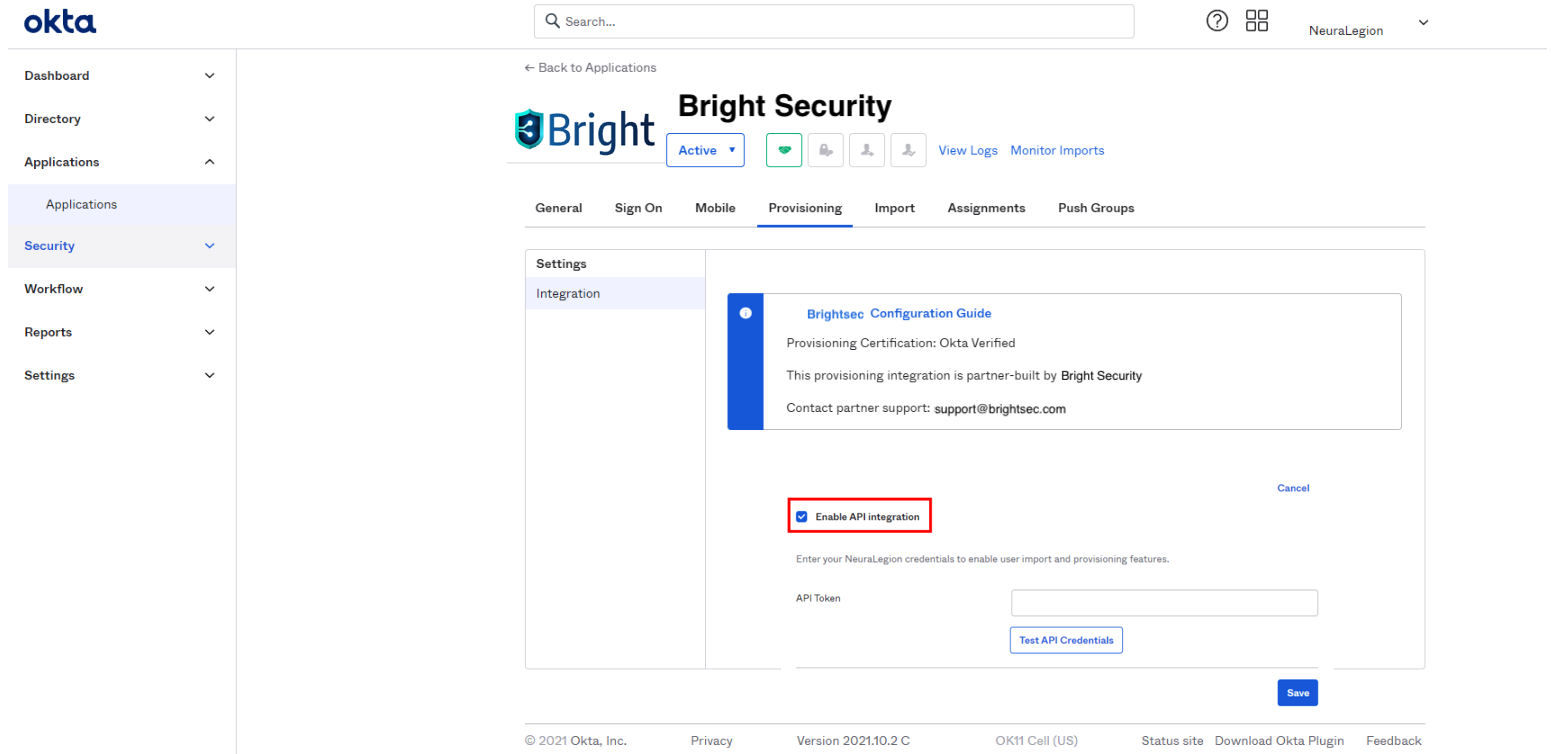
-
Click Save.
-
In the Provisioning to App section, enable the provisioning options you will need by selecting the relevant checkboxes, and then click Save.
The provisioning setup is completed.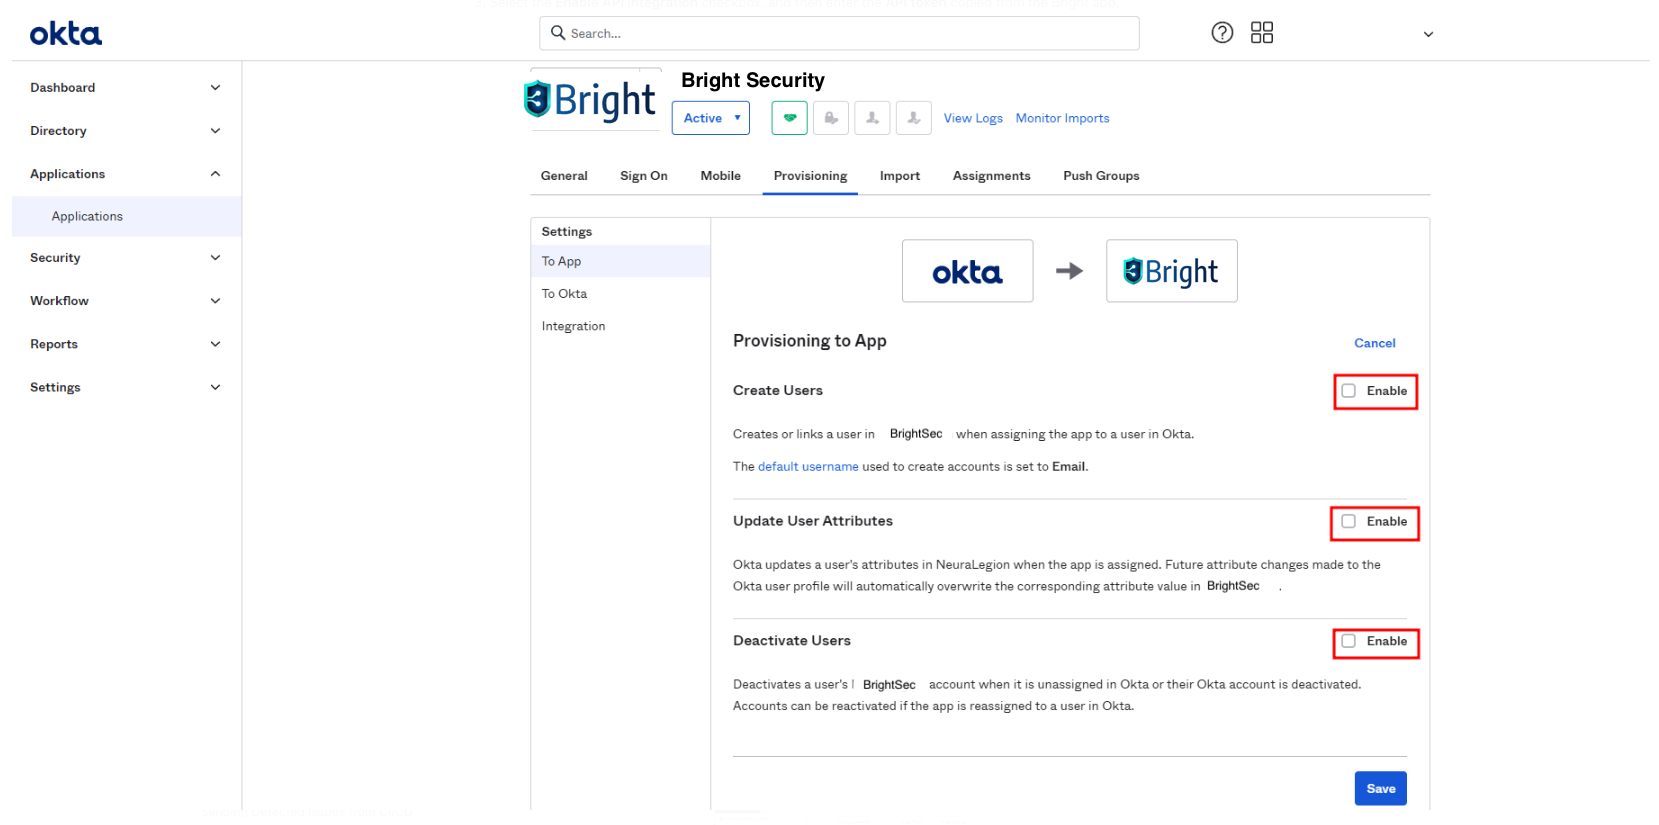
User provisioning
Once you complete the provisioning setup, every new user assigned to the Brightsec integration app will be automatically added to the relevant Bright organization.
Group provisioning
Group provisioning from Okta to the Bright app is only enabled by pushing every group manually.
To push a group to your Bright organization, follow these steps:
-
Assign the group you want to push to the Brightsec integration app.
-
In the Push Groups tab, click Push Groups.
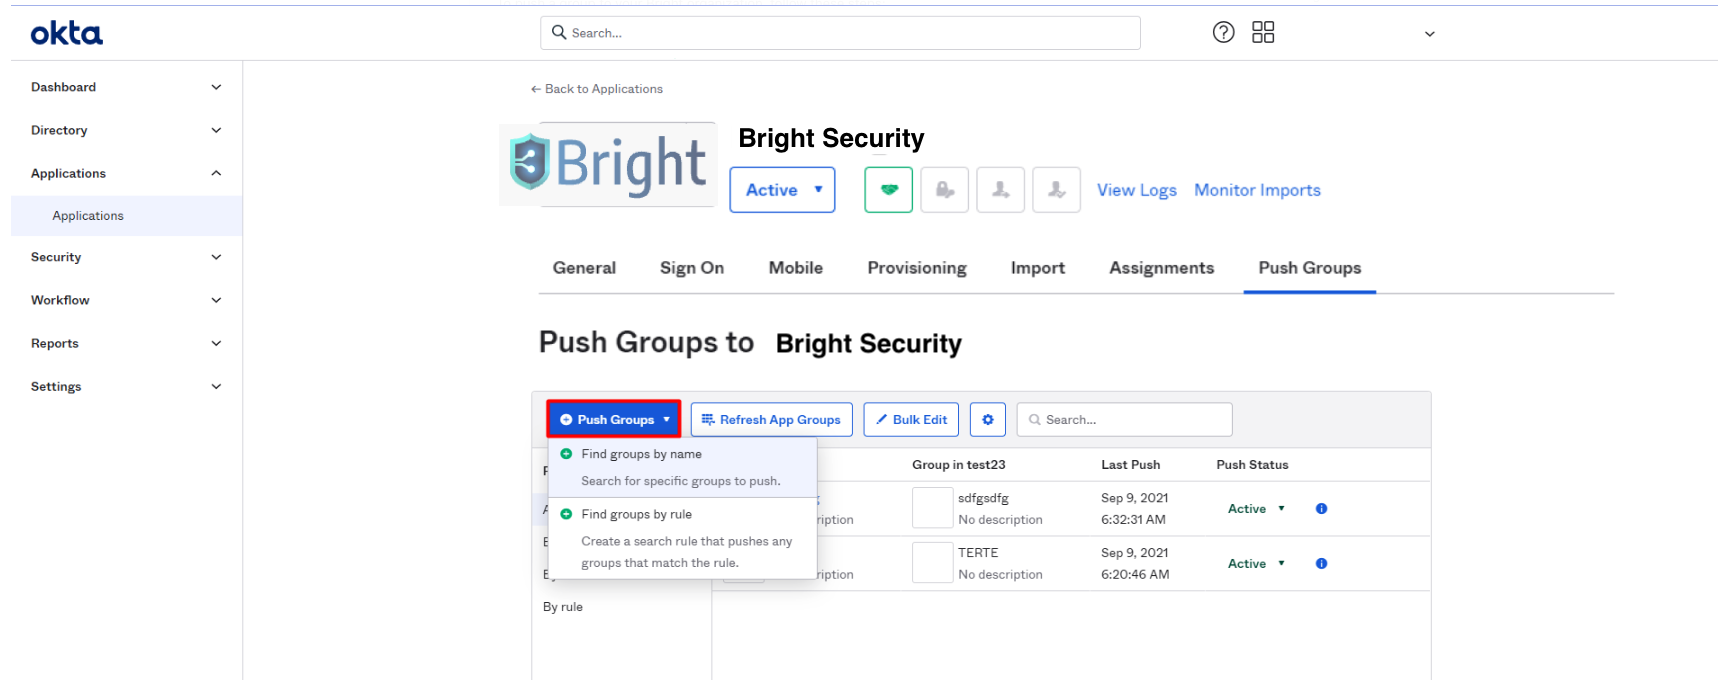
-
Select the group you want to push to your Bright organization and click Save.
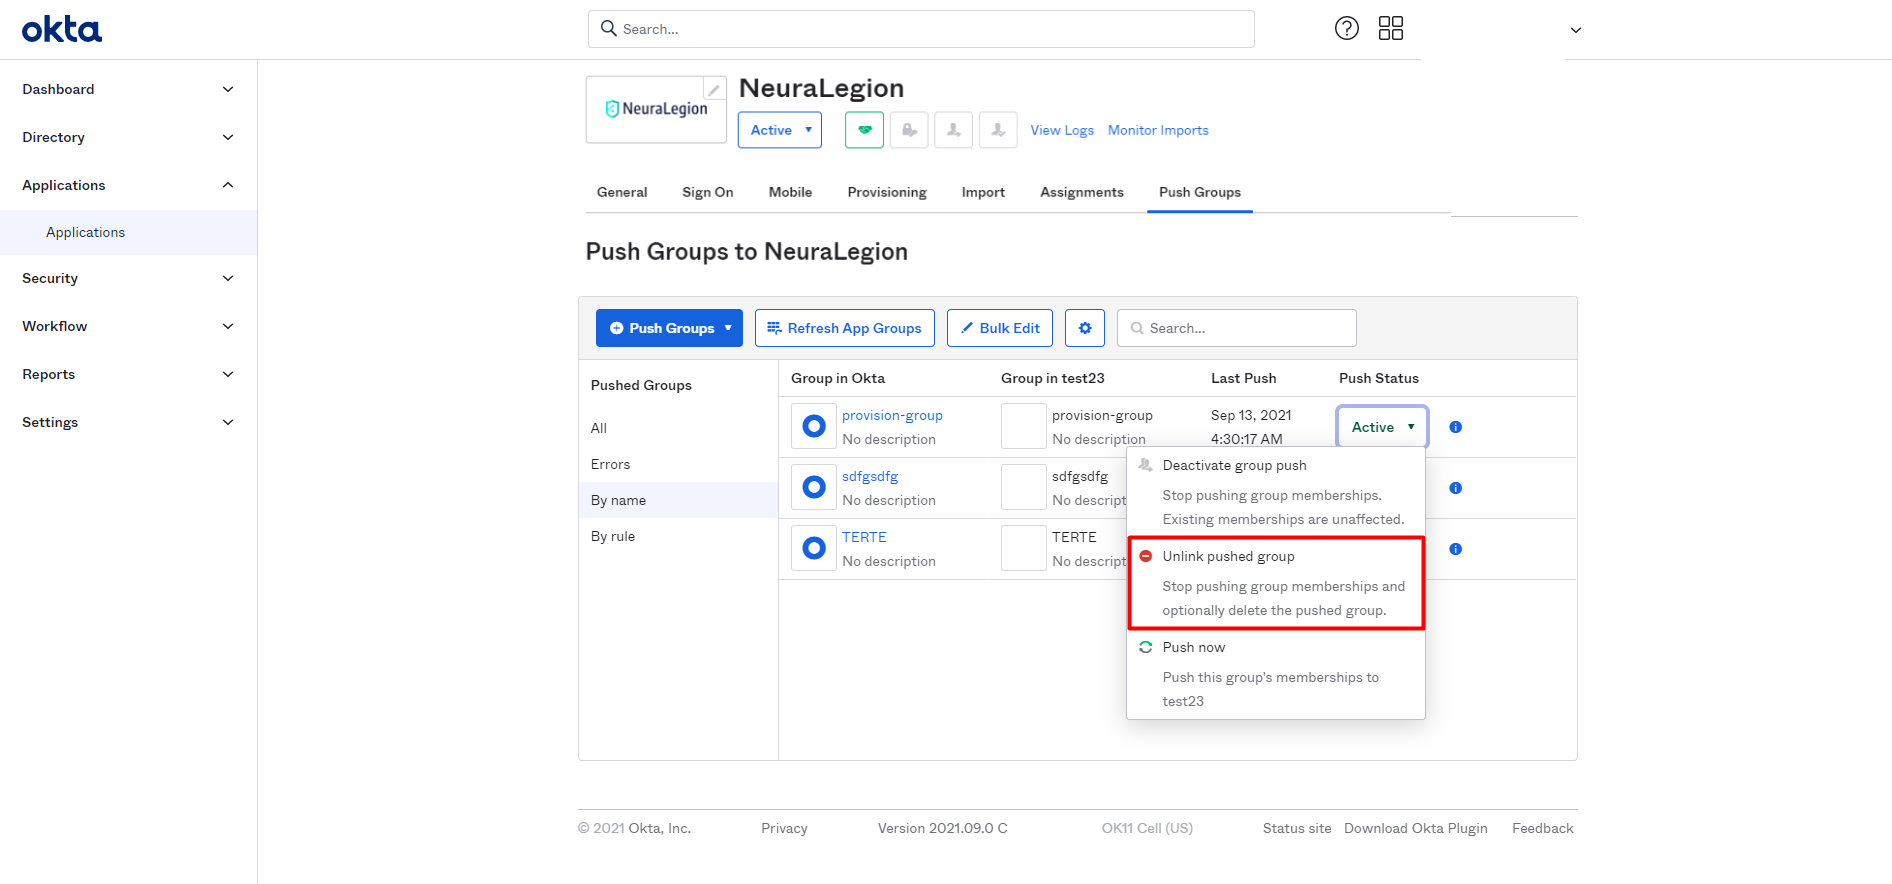
If you need to deprovision a group from your Bright organization, delete the group from the Brightsec integration application in Okta, and then unlink this group in the Push Groups tab.
Known issues/troubleshooting
Bright does not support special symbols for userName. If the userName of an Okta user contains special symbols, they will be sanitized when signing in to a Bright organization via SSO. For example, “#John Do`e¥” will be signed in to Bright as "John Doe”.
Updated 12 months ago