Managing Projects
If your organization has multiple groups that work on the development of several applications simultaneously, the best way to separate and manage the scanning flows is to create different Bright projects. You can manage which member groups get access to a project and have full control over certain permissions and associated ticketing repositories.
In addition, you can limit the number of concurrent scans for each project so that each team has equal access to the organization's resources.
If you have integrated Bright with the ticketing tool a project team uses, the relative repositories (projects, channels) can be associated with a specific project. The integration configuration allows teams of different projects to select the repository associated with their project when creating a new scan. As a result, all the discovered issues will be opened as tickets or messages automatically in the selected repository.
You can find more information about Bright integrations here.
NoteA project is required for the configuration of a new discovery or a scan, so if you do not have any custom projects, you need to select the default one.
Creating a project
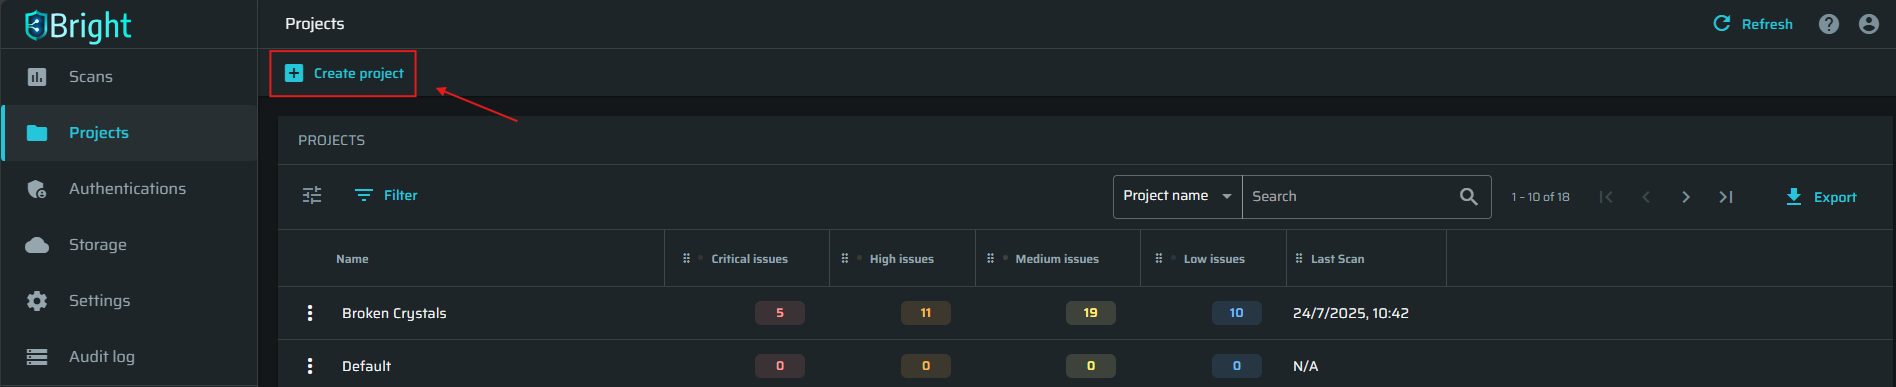
To create a project, follow these steps:
-
In the left pane, select Projects and click + Create Project.
-
In the Create project dialog box, enter a project name and select the groups that can access the project.
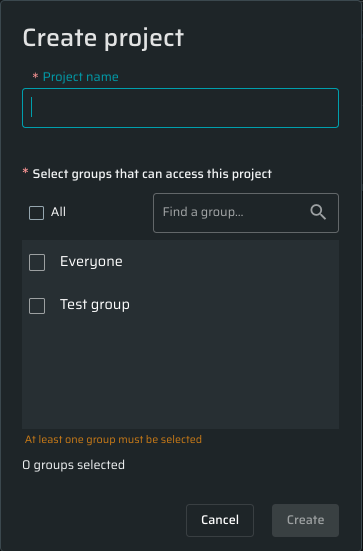
- Click Save.
The project will appear in the PROJECTS table.
Setting a maximum number of concurrent scans for a project
To set a limit for scans that can be run simultaneously by one project team, do the following:
-
In the PROJECTS table, click
 next to the project where you want to set a limit to concurrent scans, and then click on Settings.
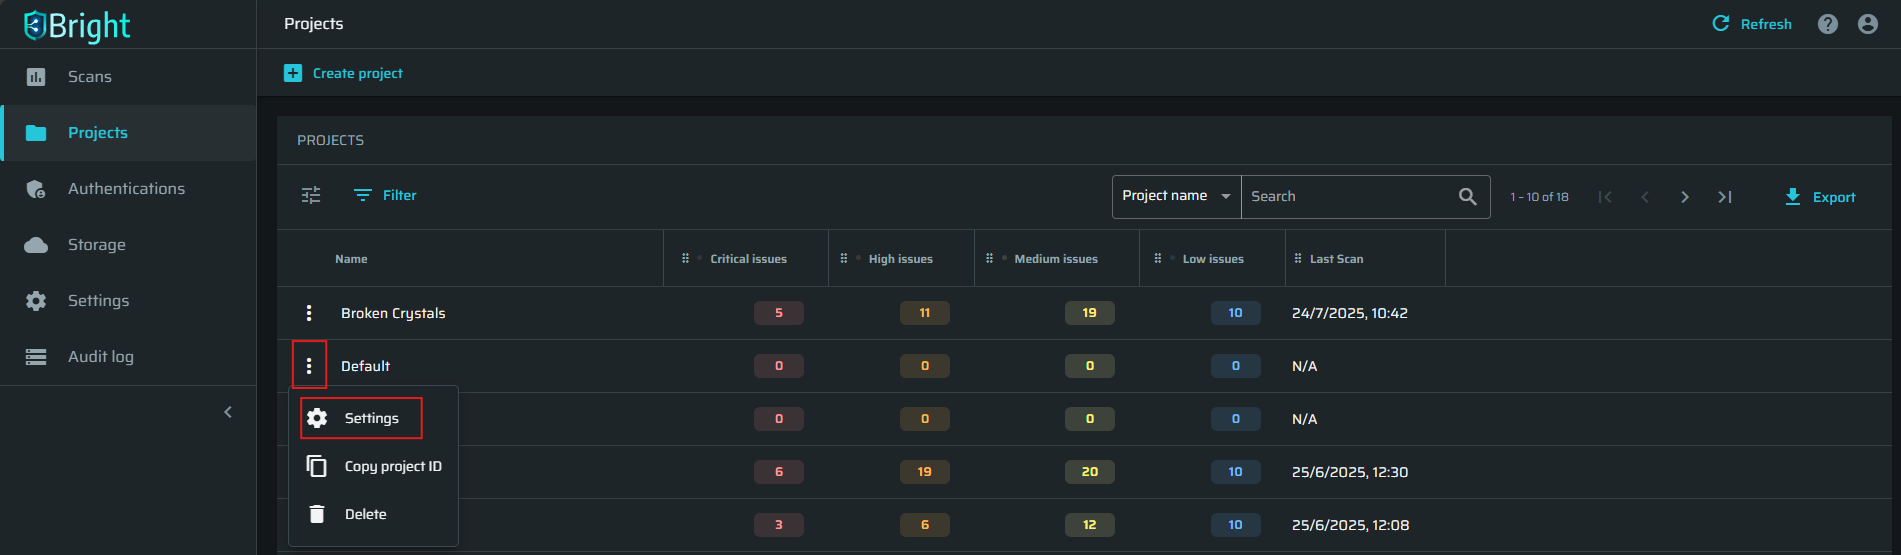
-
In the PROJECT SETTINGS section, select the check box next to Limit number of concurrent scans.
-
Enter the number of engines that can be run concurrently for this project.
Please make sure that the number you set does not exceed the total number of engines available for the entire organization.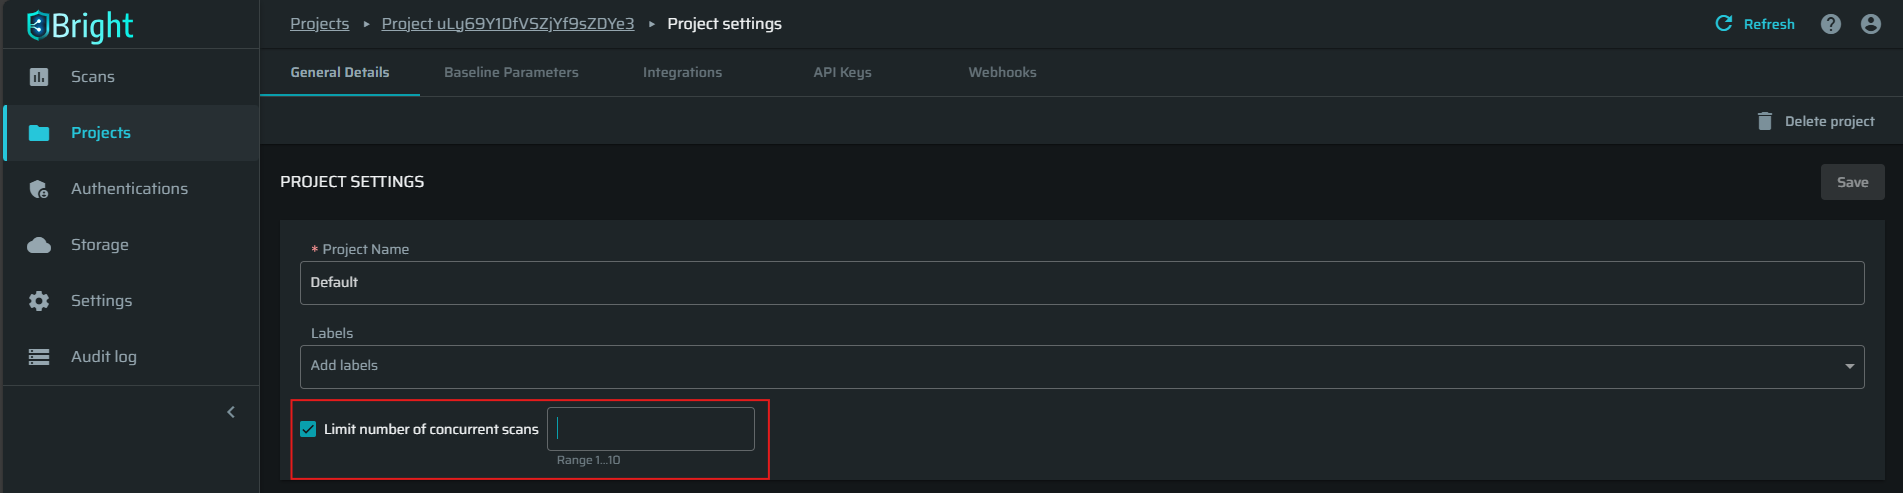
-
At the top right of the Project Settings page, click Save.
View all project scans
To open a table with all scans, related to this particular project, click the ![]() View all scans button. This will open a new tab with a preconfigured filter.
View all scans button. This will open a new tab with a preconfigured filter.
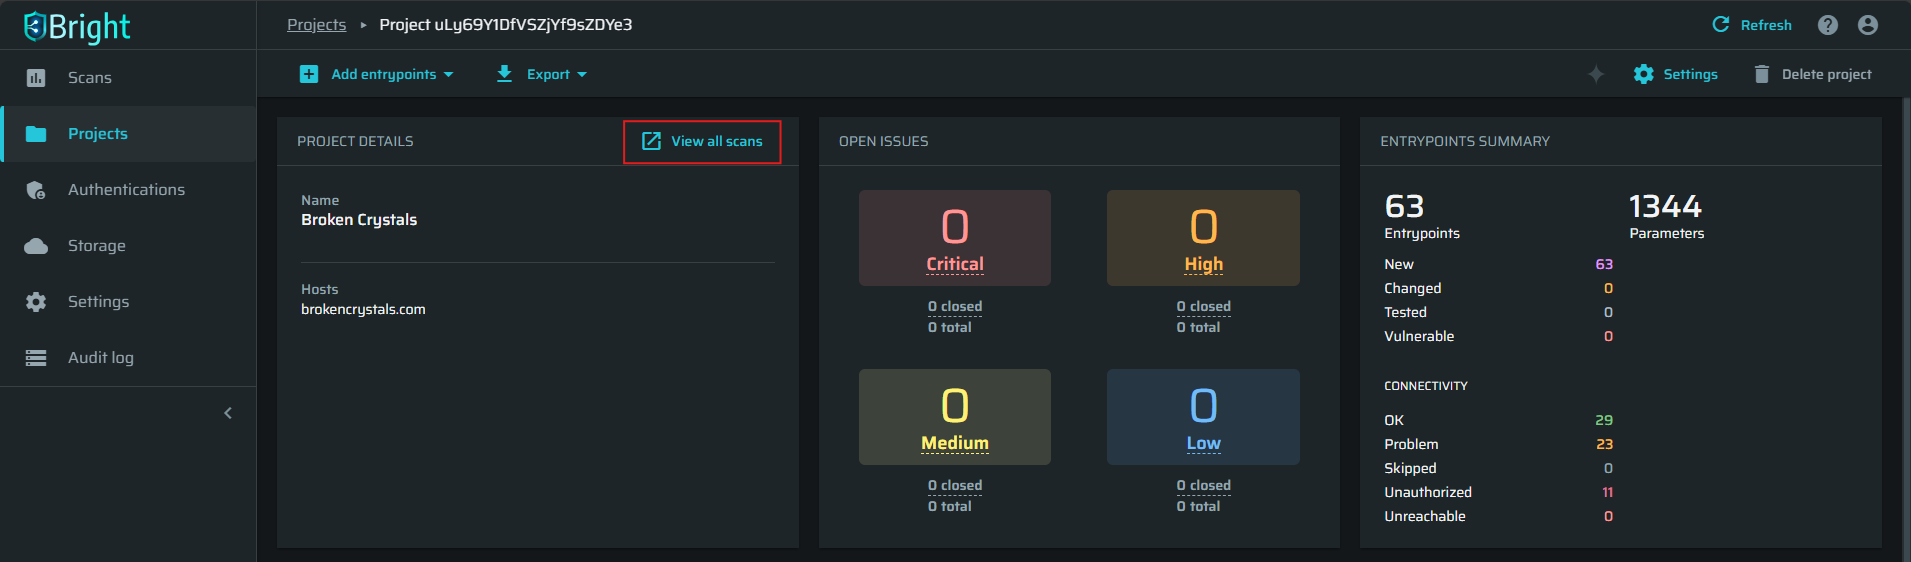
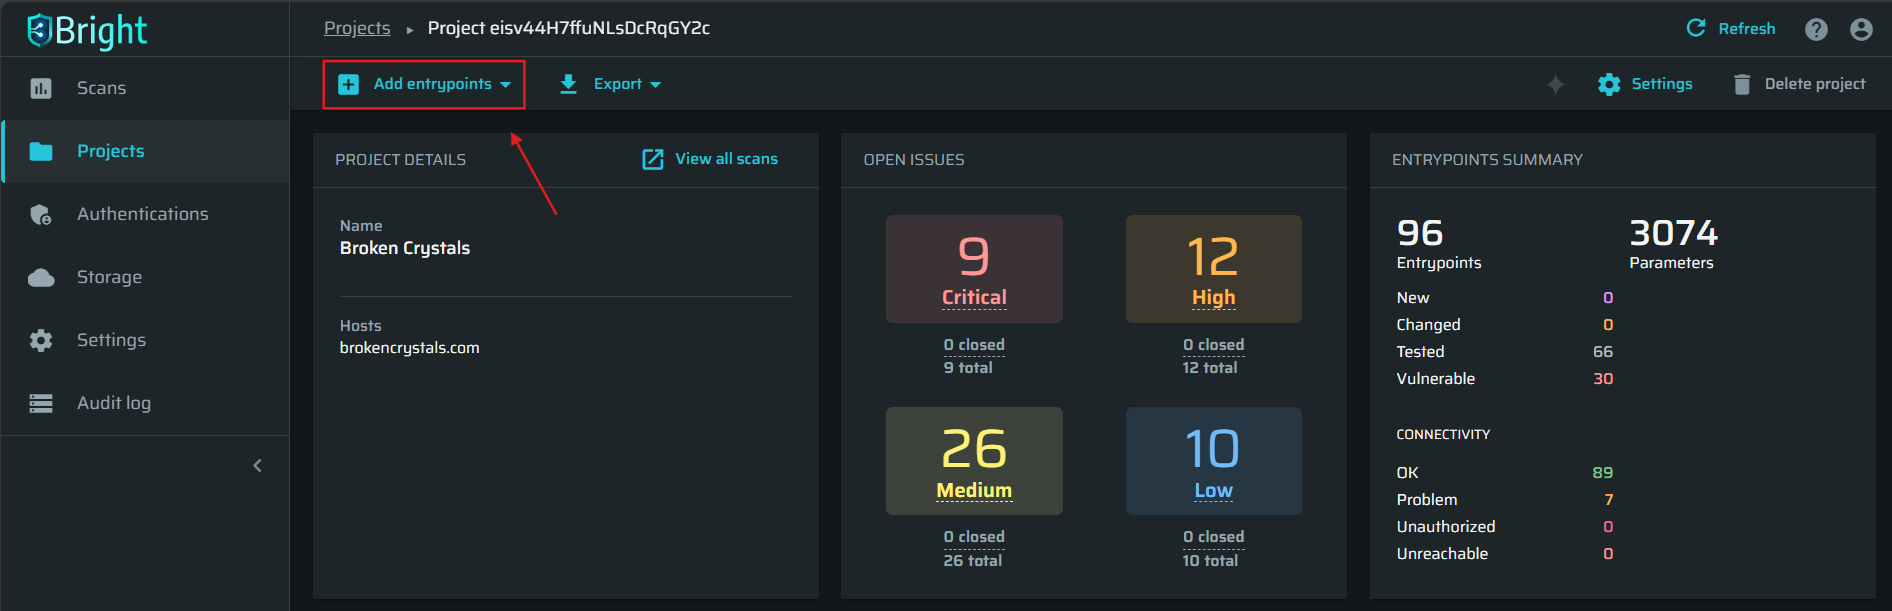
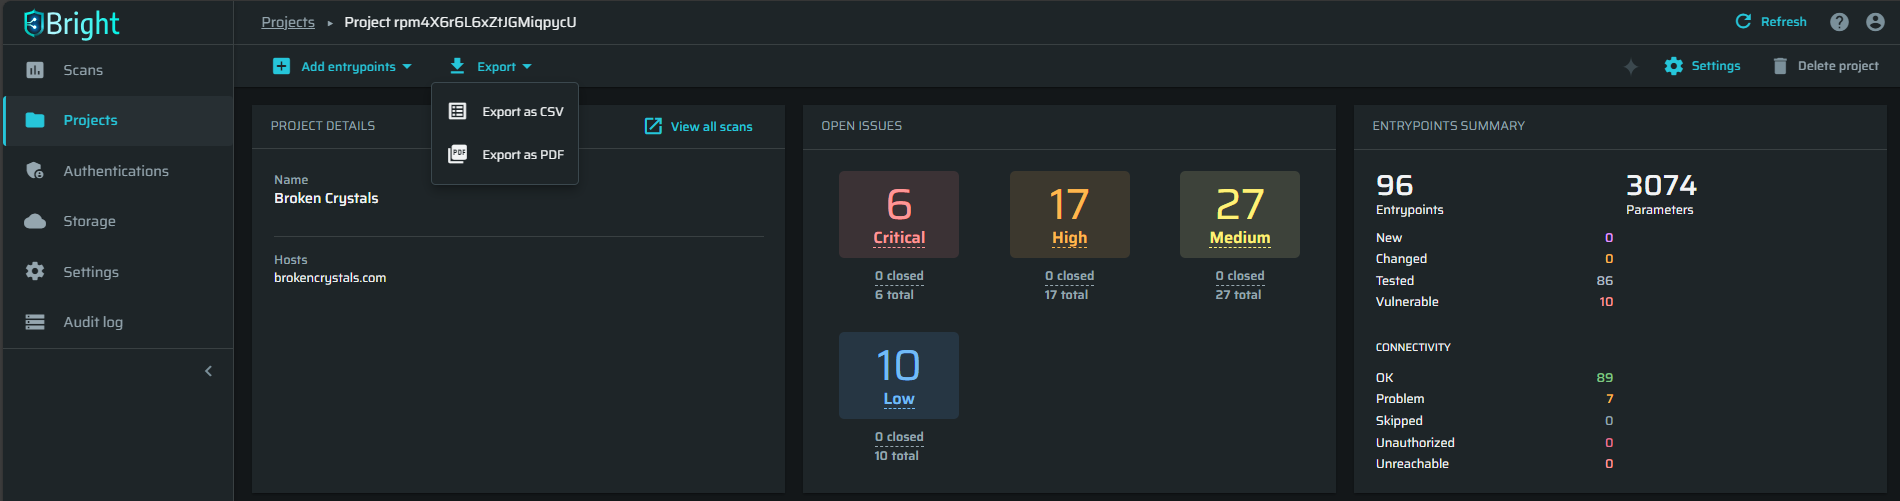
Reviewing the project issue details
The page consists of several blocks:
- Project Details - General information about the project, including project name and used hosts.
- Open Issues - Statuses of all scans in the project for better visibility. Includes Critical, High, Medium and Low severity. You can click on any of the tiles to filter the issues table below to the severity of choice.
- Entrypoints Summary - information about Entrypoints' statuses, including connectivity: OK, Problem, Skipped, Unauthorized, Unreachable.

- Project Overview - The section contains several tabs with detailed information about the project. The section is divided into the following parts: Issues, Entrypoints, Files, and Discovery history.
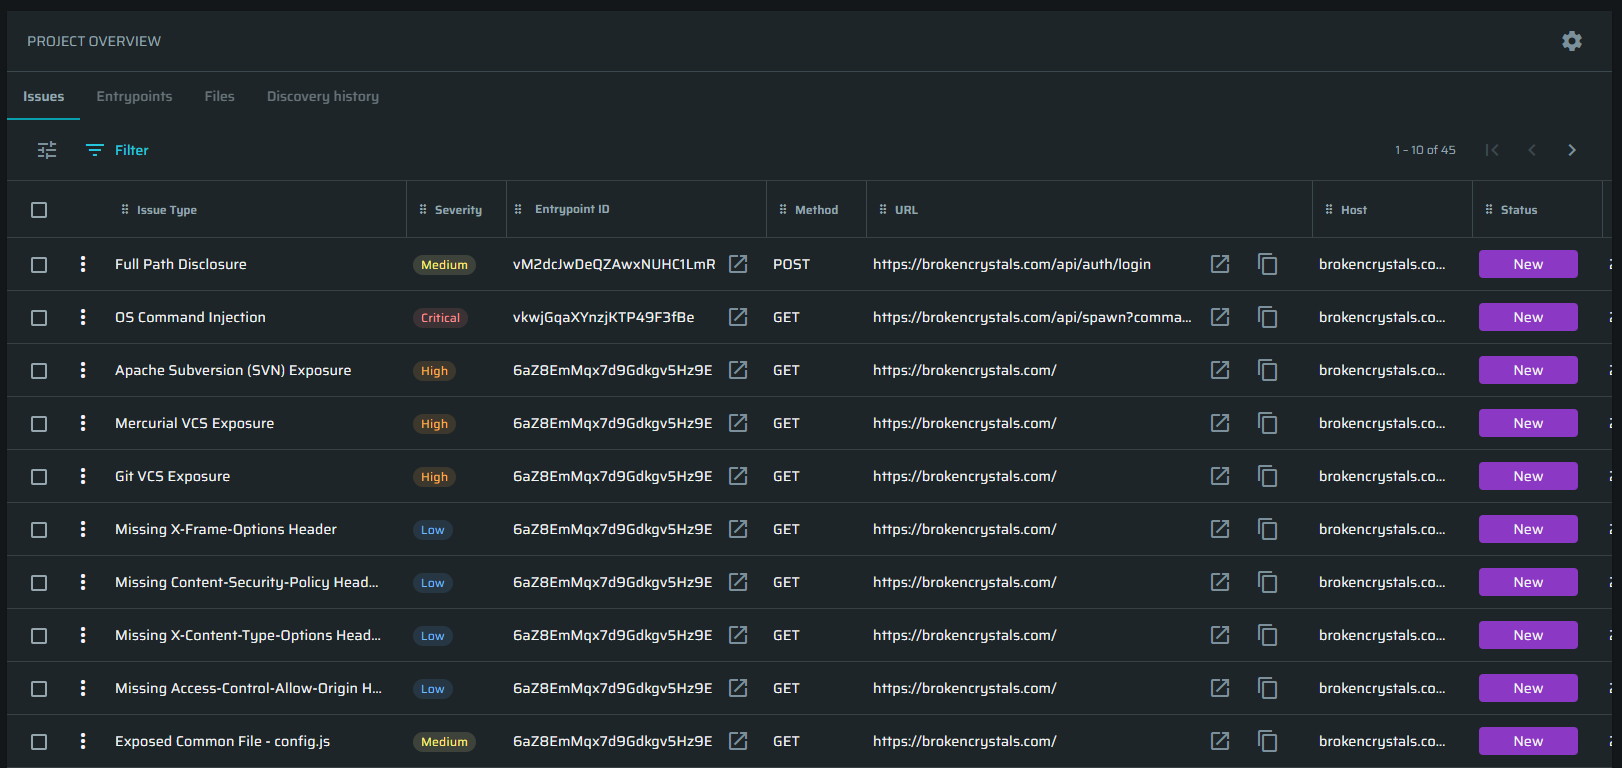
Issues tab
This table shows you the list of issues detected across all of the scans of this project. You can manage the statuses of issues using a bulk selection or change it one by one.
The issues table includes the following columns:
- Issue Type
- Severity
- Entrypoint ID
- Method
- URL
- Host
- Status
- Last Reported
- Times Reported
- Labels
Click on the issue to open detailed information about it. To learn more about the issue summary page, follow the link. Click ![]() to open the issue in a new tab or click
to open the issue in a new tab or click ![]() to copy the issue URL.
to copy the issue URL.
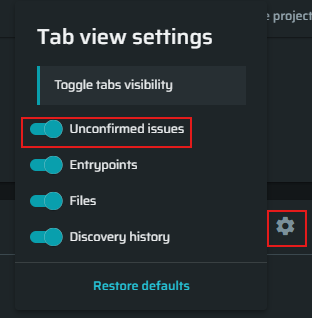
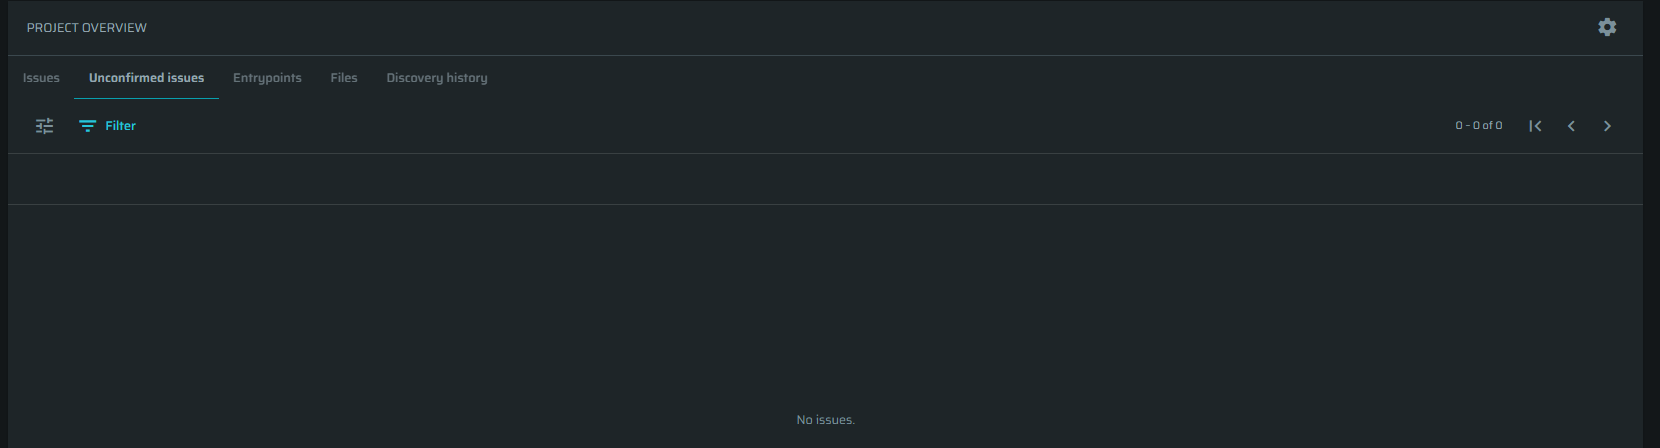
Using the gear settings, you can enable Unconfirmed issues as an additional tab. It will show issues which we are potentially a false positive.
Export Project Issues as SARIF (STAR Projects)
This section describes how to export a comprehensive SARIF file containing all confirmed security issues for a STAR project. This export is performed at the project level, aggregating findings across all associated scans and code repositories.
Procedure for Exporting SARIF
To create a SARIF report for a STAR project:
- Go to the project page for the relevant STAR project.
- Select the Issues tab.
- In the upper right corner, select the Export menu.
- Choose the option: Export as SARIF for STAR.
The system downloads the SARIF file. This file aggregates all issues confirmed within the project scope.
SARIF File Structure Details
The file uses the standard SARIF format but includes an essential property to identify the source code repositories associated with the findings.
The report's properties section contains the star_sources property, which lists all unique repository:branch combinations contributing issues to the project.
Example of the properties section:
"properties": {
  "star_sources": [
    "owner/repo-name:main",
    "owner/repo-name-two:development-branch"
  ]
}
Entrypoints tab
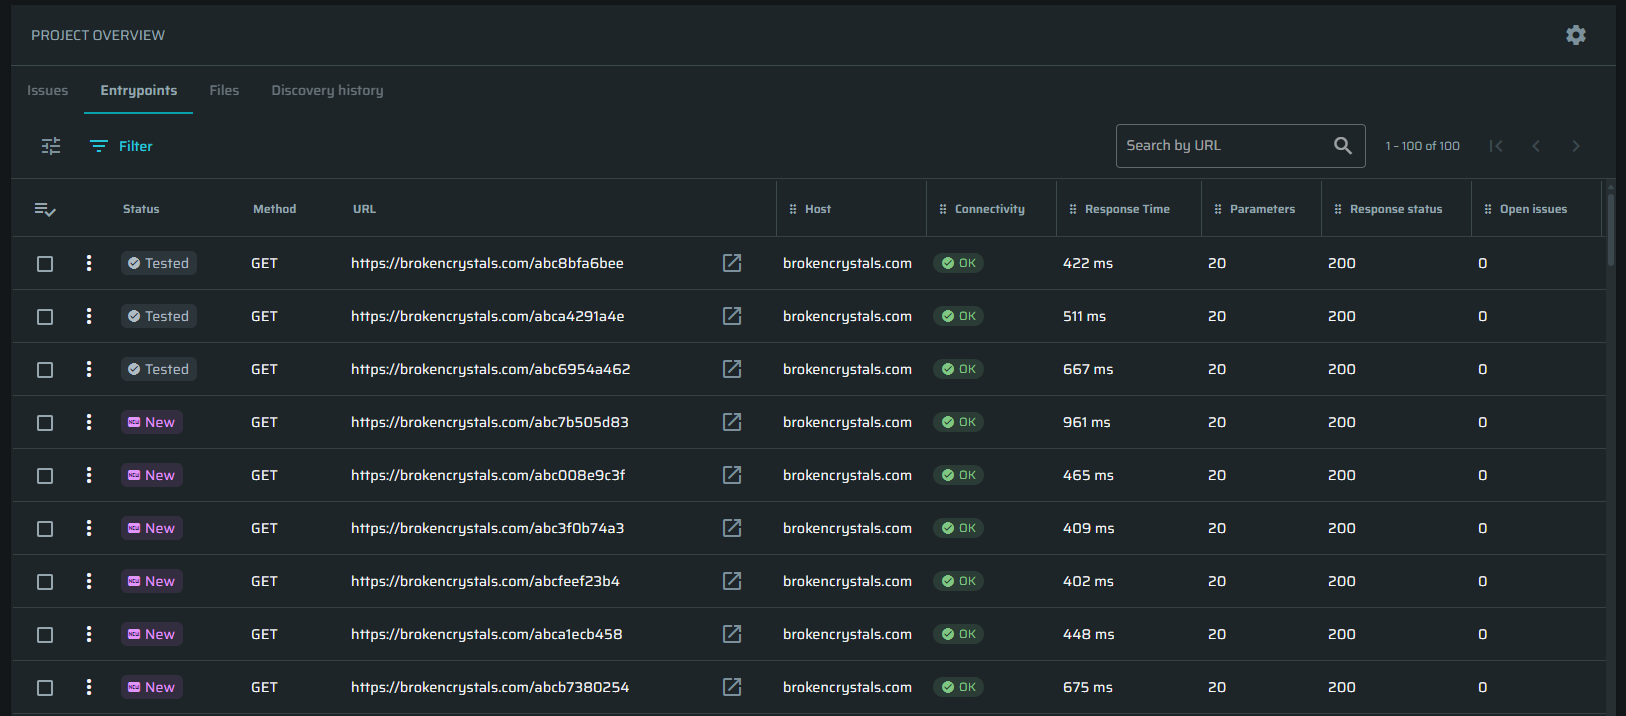
In the Entrypoints table, you can view manage all Entrypoints of the project. From this table you can select entrypoints for scanning.
To do this, click ![]() to open the selection menu, where you can select all items or undo the previous action. Once Entrypoints are selected, the new Create new scan button will appear above the table.
to open the selection menu, where you can select all items or undo the previous action. Once Entrypoints are selected, the new Create new scan button will appear above the table.
This tab contains all the information about the Entrypoints in this project. Click on the Entrypoint to open detailed information about it. To learn more about Entrypoint summary page, follow this link.
The Entrypoints table includes the following columns:
- Status - Security status of the Entrypoint: New, Changed, Tested, Vulnerable.
- Method - The method of the Entrypoint.
- URL - The URL of the Entrypoint.
- Host - The host of the Entrypoint.
- Connectivity - An indicator of whether the request was sent and the response's status was received. Connectivity will have one of the following values: OK, Problem, Unauthorized, Unreachable.
- OK - The Entrypoint reached successfully and returned a valid response.
- Problem - The Entrypoint is reachable but returned with problematic response status.
- Unauthorized - The attempt to use an authentication with the Entrypoint has failed. Check if you have used a correct and valid authentication object.
- Unreachable - The Entrypoint could not be reached.
- Response Time - The Entrypoint response time in ms.
- Parameters - Discovered parameters available for testing.
- Response status - The Entrypoint response status.
- Open issues - The number of open issues assigned to this Entrypoint.
Files tab
The Files table shows you all the files that are associated with this project. It's a subset view of the large Files view which you can learn more about in here.
You can take the following actions:
- Upload file - To upload new files to the project. You can upload .har, .json, .yaml, .yml or .zip files.
- Download - Download a copy of the file.
- Delete - Delete the file. Bulk delete is also supported by selecting the checkboxes of multiple files.

Discovery history tab
In the Discovery history table, you can see all previous discoveries in this particular project. You can perform the following actions over Discoveries by clicking the ![]() button:
button:
- Edit
- Stop
- Rerun
- Run immediately
- Delete

Adding new Entrypoints to the project
There are two ways of adding new Entrypoints to the project:
- Create a new discovery - This will begin a process of searching for all the Entrypoints in the target. To learn how to create a new discovery, see this article.
- Create a single entrypoint - This option is for adding a single Entrypoint manually, using a built-in Entrypoint editor. To learn more about creating a single Entrypoint, see this article.
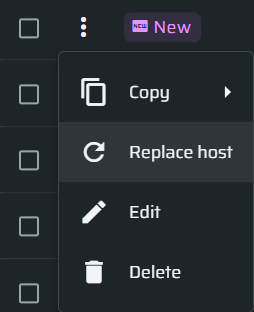
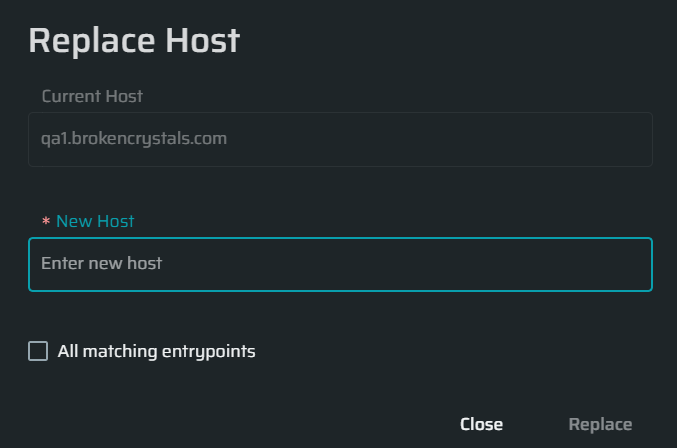
Replace the entrypoints' host
You can replace the host of a single entrypoint or multiple ones in bulk by clicking the ![]() button to the left of an entrypoint and click on Replace host.
button to the left of an entrypoint and click on Replace host.
In the popup dialog, type the new host and select if you want to apply the change to all the Entrypoints which have the same host. You will be notified via email once the operation completes.
Downloading all the issues
Bright allows users to download all the found issues from the scan in CSV table. To download the issues list, click on Export, select the desired format and downloading will start immediately.
Adding a group to project
To add a group to the project, follow these steps:
-
In the PROJECTS table, click
next to the project where you want to add a group, and then select Settings.
-
In the upper-right corner of the GROUP MANAGEMENT section, select the group to be added to the project from the Add group dropdown list.
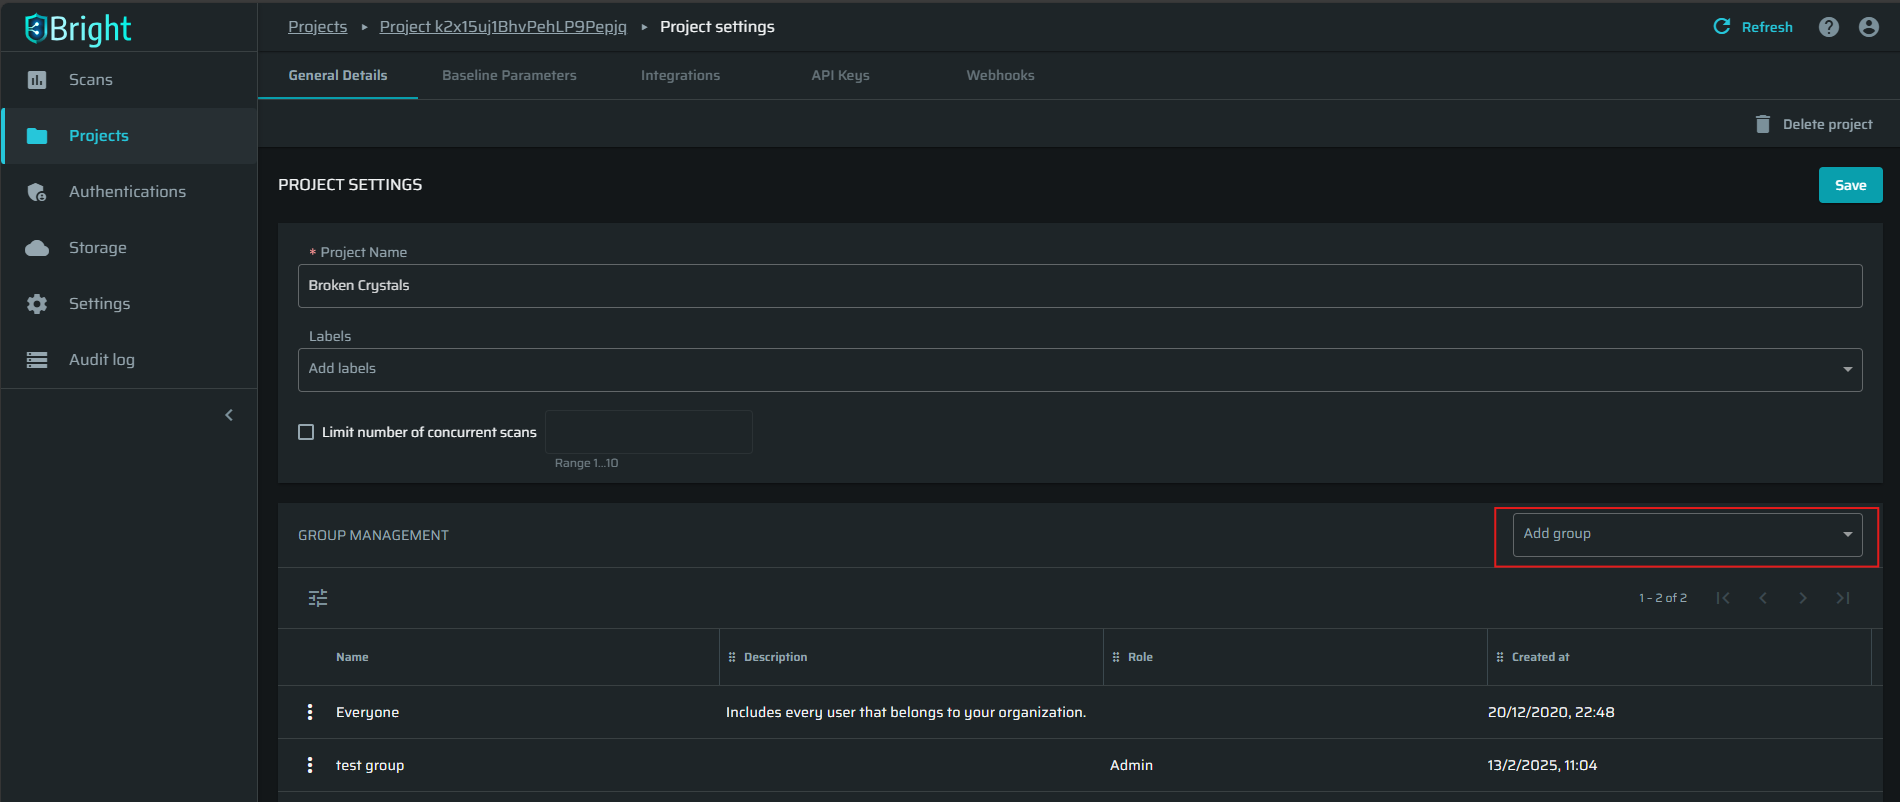
Deleting a group from project
To delete a group from a project, follow these steps:
-
In the PROJECTS table, click
next to the project where you want to delete a group, and then select Settings. -
In the GROUP MANAGEMENT table, click
next to the group you want to delete, and then select Delete.
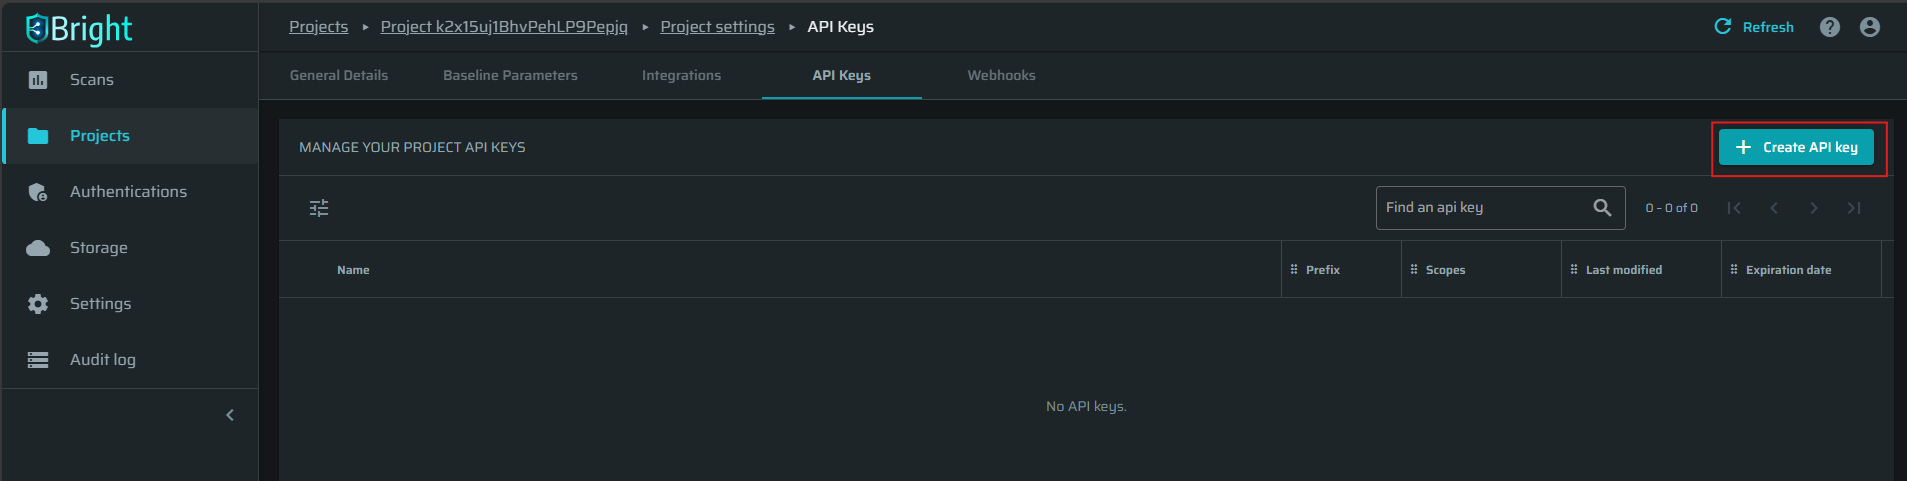
Managing your project API keys (authentication tokens)
To enable some Bright operations and integrations, you will need an authentication token (API key).
To create a project API key, follow these steps:
-
In the PROJECTS table, click
next to the project where you want to manage API keys for, and then select Settings. -
Navigate to the API Keys tab.
-
In the MANAGE YOUR PROJECT API KEYS section, click + Create API key.
-
Fill in the form.
-
Assign the API key a name.
-
(Optional) Select an expiration date.
-
Select access scopes and which type of actions (such as read or write) it is permitted to perform. Read more about the access scopes here.
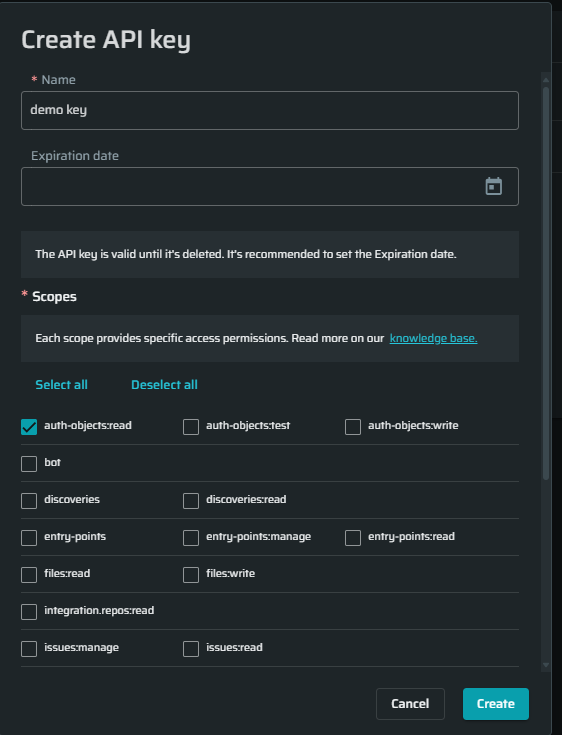
-
-
Click Create.
-
Copy the generated key and save it to a safe place since as soon as you navigate away from this popup, you will not be able to restore this key.
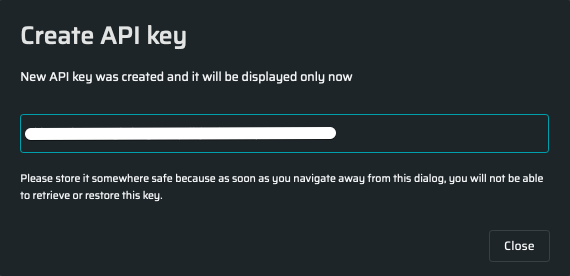
-
The created keys without the entire values are listed in the MANAGE YOUR PROJECT API KEYS section.
Downloading all Projects data
You can export all the Projects data. To do that, click on Export in the upper-right corner of the table, and downloading will start immediately.

Deleting a project
To delete a project, do the following:
-
In the PROJECTS table, click
next to the project you want to delete, and then select Delete.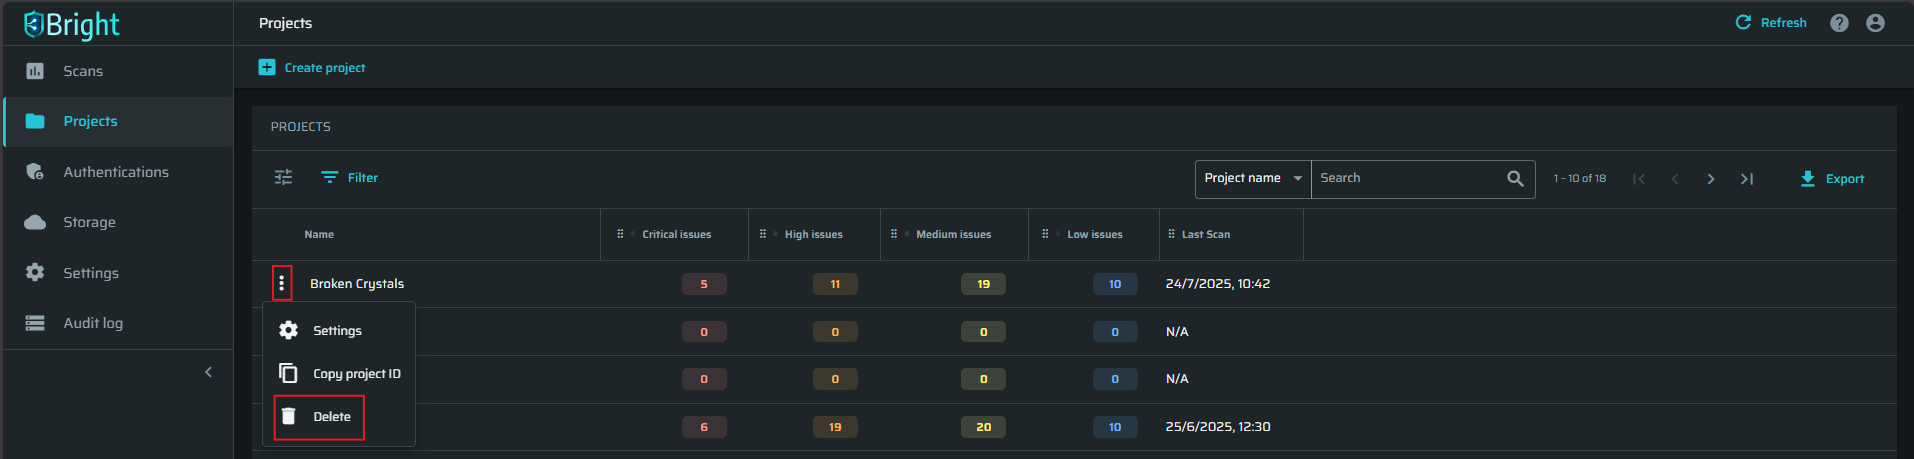
-
On the popup, click Yes, delete.
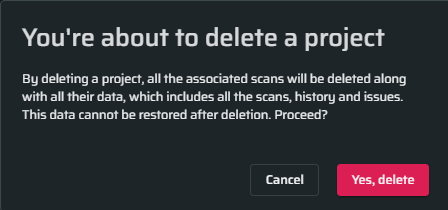
WarningBy deleting a project, all the associated data (discoveries, scans, authentication objects, history, issues etc.) will be deleted. This data cannot be restored after deletion.
Updated 8 months ago