Discovery
Discovery is a process of finding Entrypoints. This can be done once and reused going forward, assuming the target does not change.
Creating a Discovery
To run a Discovery in an existing project, follow these steps:
-
In the left pane, select the Projects option to see the list of available projects.
-
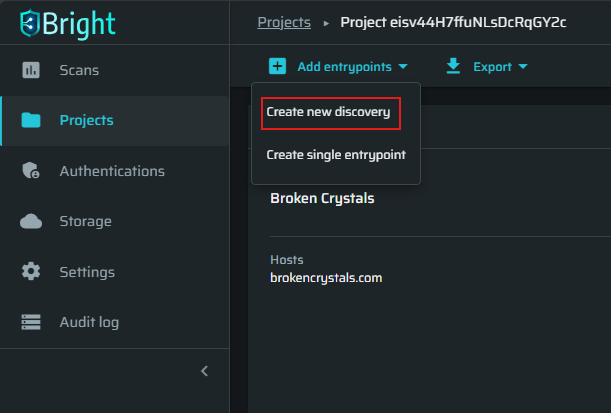
Select the project, then click the Add entrypoints → Create new discovery.
Specifying discovery details
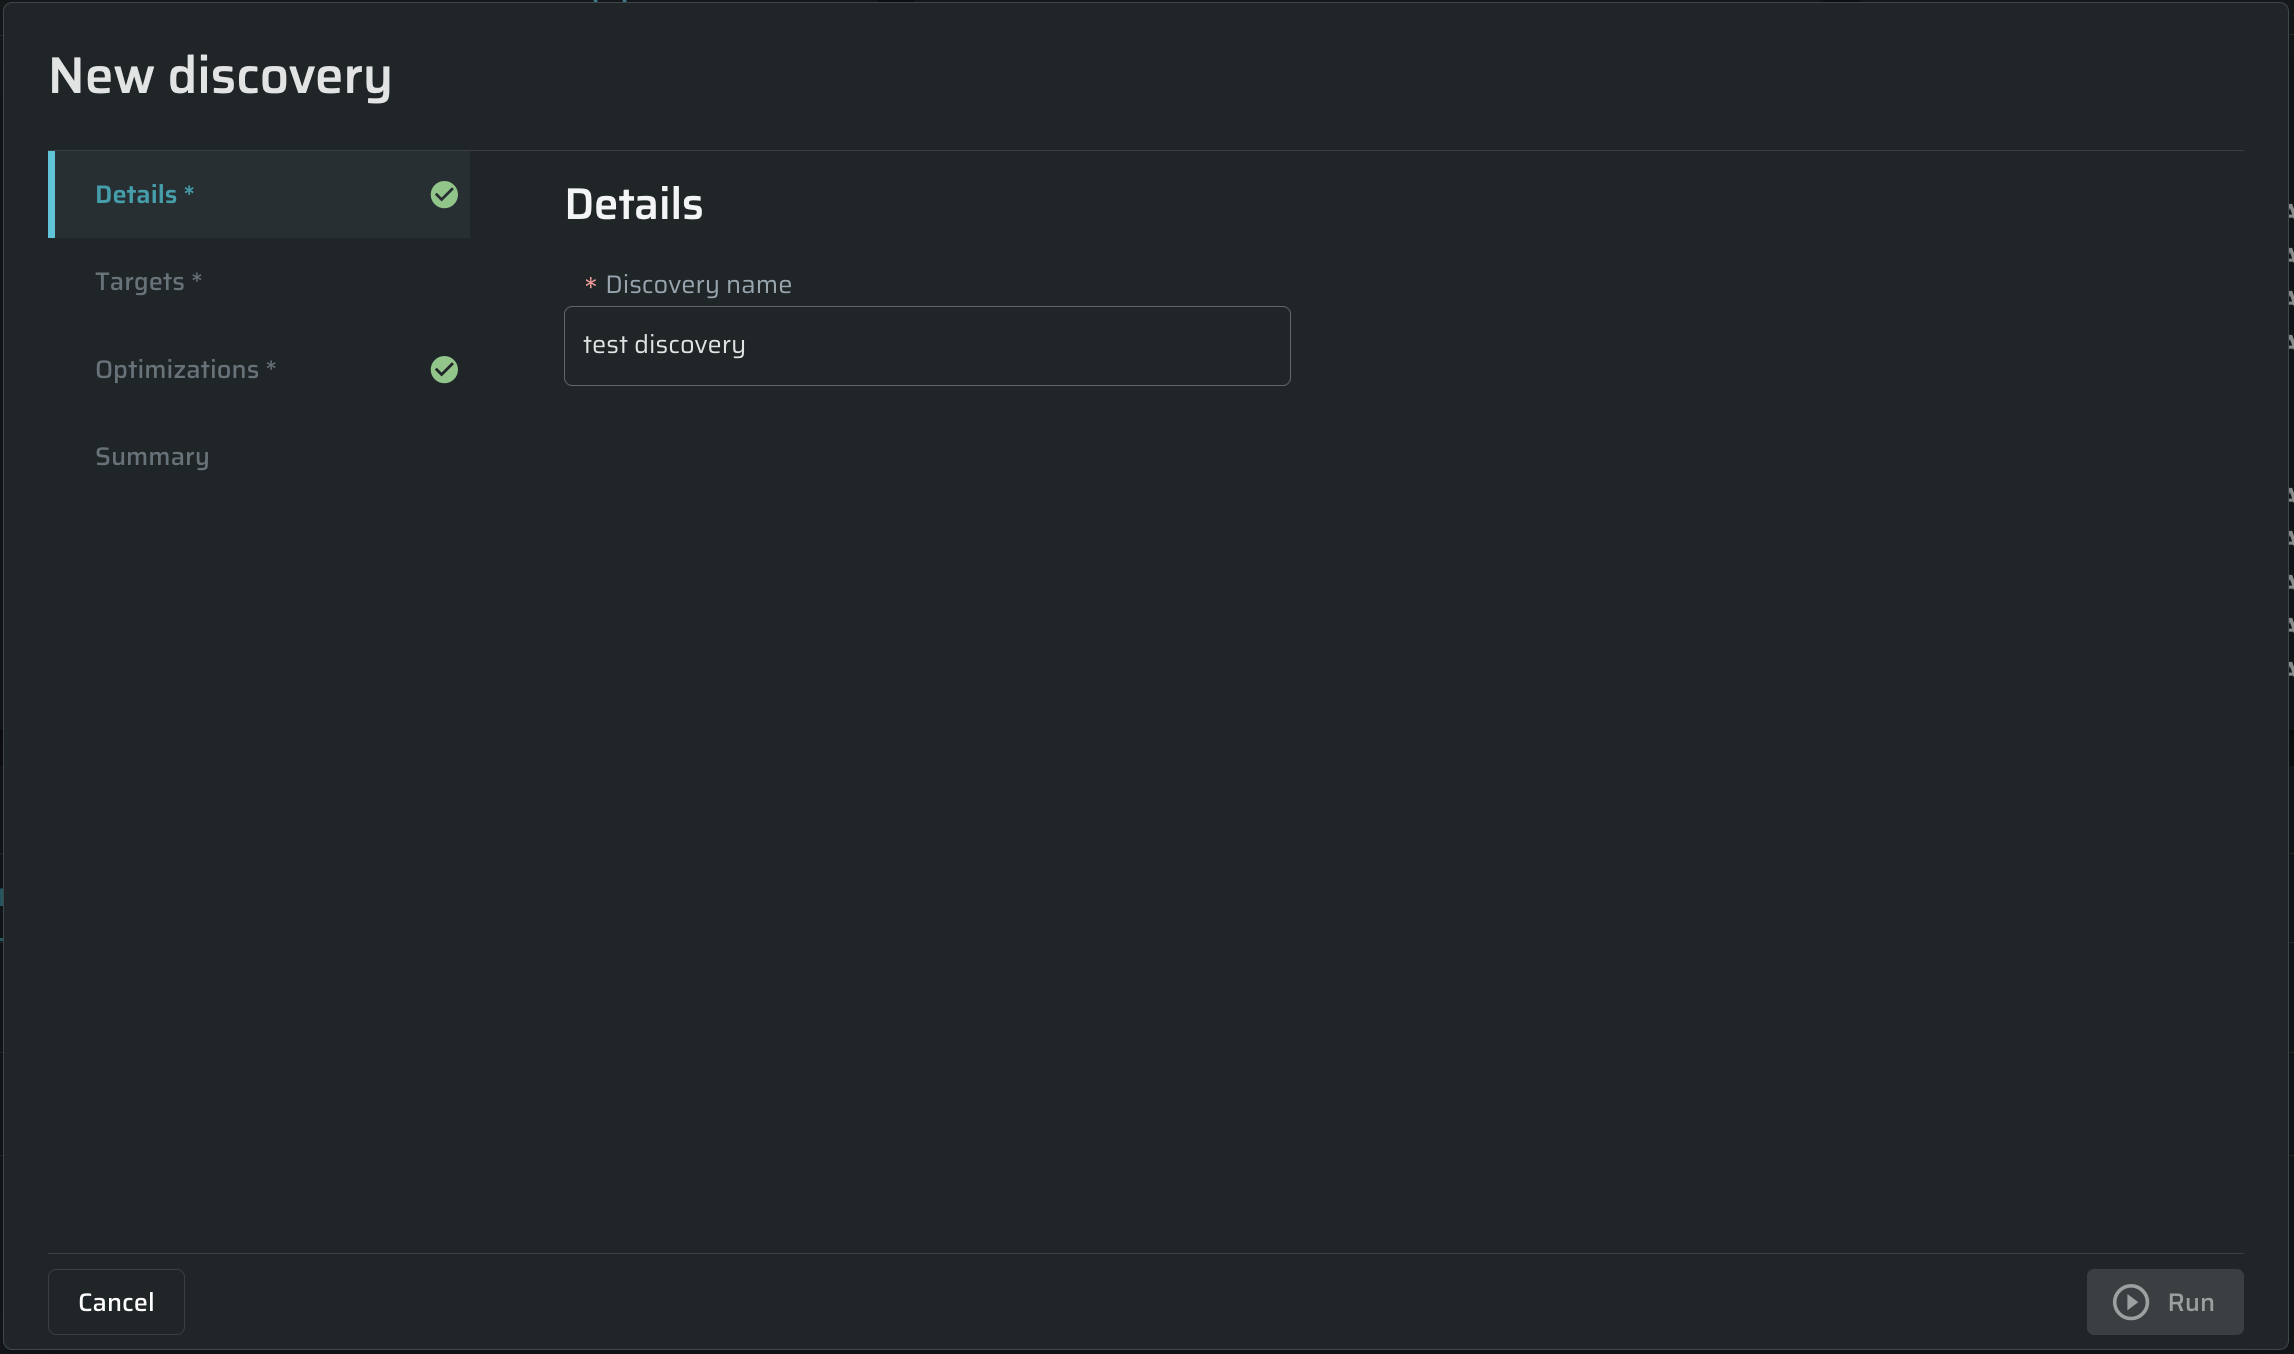
In the Details tab, enter any free-text name for the scan In the Discovery name field.
Defining targets
In the Targets tab, do the following:
Choose a discovery targets type. Discovery targets may be the following types:
- Publicly accessible from Bright's cloud - Scanning directly from the cloud is allowed for authorized targets only. Learn more about Target Authorization.
- On a private network or not authorized - Scanning via CLI in Repeater Mode, provides secure access to local networks or unauthorized targets. Learn more about Repeater Mode
Target credentials
(Optional) Authentication - Select an authentication type, or Without authentication, if it's not needed. Learn more about Creating an authentication object
Discover Entrypoints
Select a method to discover entrypoints. Learn more about Entrypoints.
For websites and web apps
Via crawling - Bright can crawl your web application to define the attack surface. This option does not require any details that might get you tangled. To run a discovery using a crawler, you simply need to specify the target URL in the URL field. Learn more about Crawling.
URL - Enter a URL (target host) to scan the whole or a part of the specified application. The crawler will map the entire application attack surface automatically.
To discover only specific parts of your application, use a relative path like https://foo.bar/example. Entrypoints located under a different domain/path will be skipped.
You can also add multiple URLs by clicking on Add target.
Note:Some hosts may be unreachable or unauthorized for a direct scan from the cloud:
- If a host cannot be reached by the engine, select a running Repeater for the discovery.
- If a host is unauthorized for a direct scan from the cloud, either select a running Repeater for the discovery or add a
.nexfile to the host root directory. (Learn more about using .nex files)

Crawl parent path folders and subdomains
This allows the crawler to explore more than just the direct links from the target URLs. It can also check out the higher-level folders and subdomains related to those URLs. However, it will not crawl other authorized domains that were not part of the discovery’s scope.
For instance, a Discovery started against test.com/bar. Here's how the crawler will behave with the checkbox selected:
- Allowed:
test.com/groups
shop.test.com - Not allowed:
example.com/login
Use smart crawling for speed optimization
Smart Crawling can skip URLs or forms with duplicate parameter names but different values to reduce crawling time.
Please keep in mind that it is possible that not all Entrypoints will be found if Smart Crawling is turned on.
Smart Crawling can be turned off to ensure that all Entrypoints will be found during a discovery. When turned off, crawler time might be significantly longer, which increases the coverage at the expense of crawler time.
NoteDisabling the Optimized crawler setting increases the coverage at the expense of the crawling time.
- With the Optimized crawler setting enabled, Bright may find not all entry points for the specified site.
- With the Optimized crawler setting disabled, the crawling time may be significantly longer.
Skip entrypoints with similar content
Skip entrypoints which have a similar content (like retail catalog items). This will result in less entrypoints being added to the project, leading to a faster scan time.
You can customize the content overlap percentage allowed between pages for them to be considered as the same. A higher value means small similarities will cause pages to be grouped and skipped. A lower value requires pages to be almost identical to be skipped, so more entrypoints will be added.
Depth of client-side chained interactions
Define how deep the crawler should try to use chained options such as multi-level nested drop-down menus.
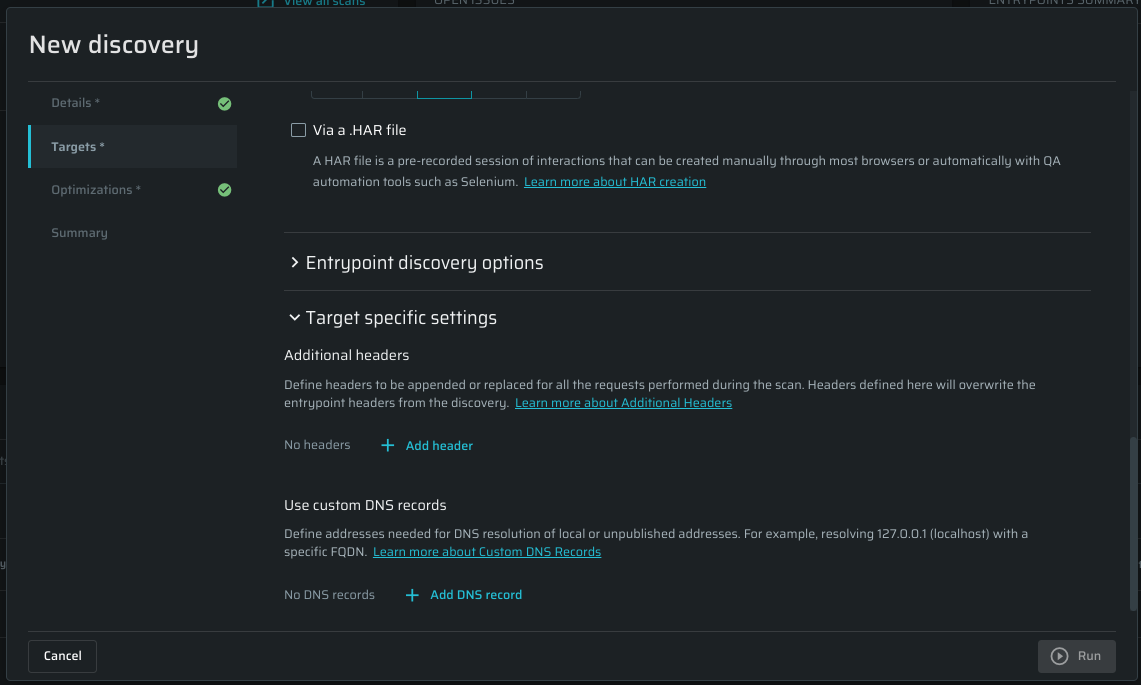
Via a .HAR file - Use a pre-recorded session of your interaction with the application (HAR file), which has been created either manually or automatically (using QA tools, such as Selenium to scan your application). This discovery type enables you to define the scope of a discovery and ensures complete coverage of the attack surface.
See Creating a HAR File to learn how to create a HAR file.
See Discovering a website with a HAR file for detailed information.
Delete the file after it has been sent to the engine for a scan - Mark this checkbox if you don't want the file to be saved.
To enjoy both full automation and deeper attack surface analysis, you can combine Crawling and Recording (HAR) in a single discovery.
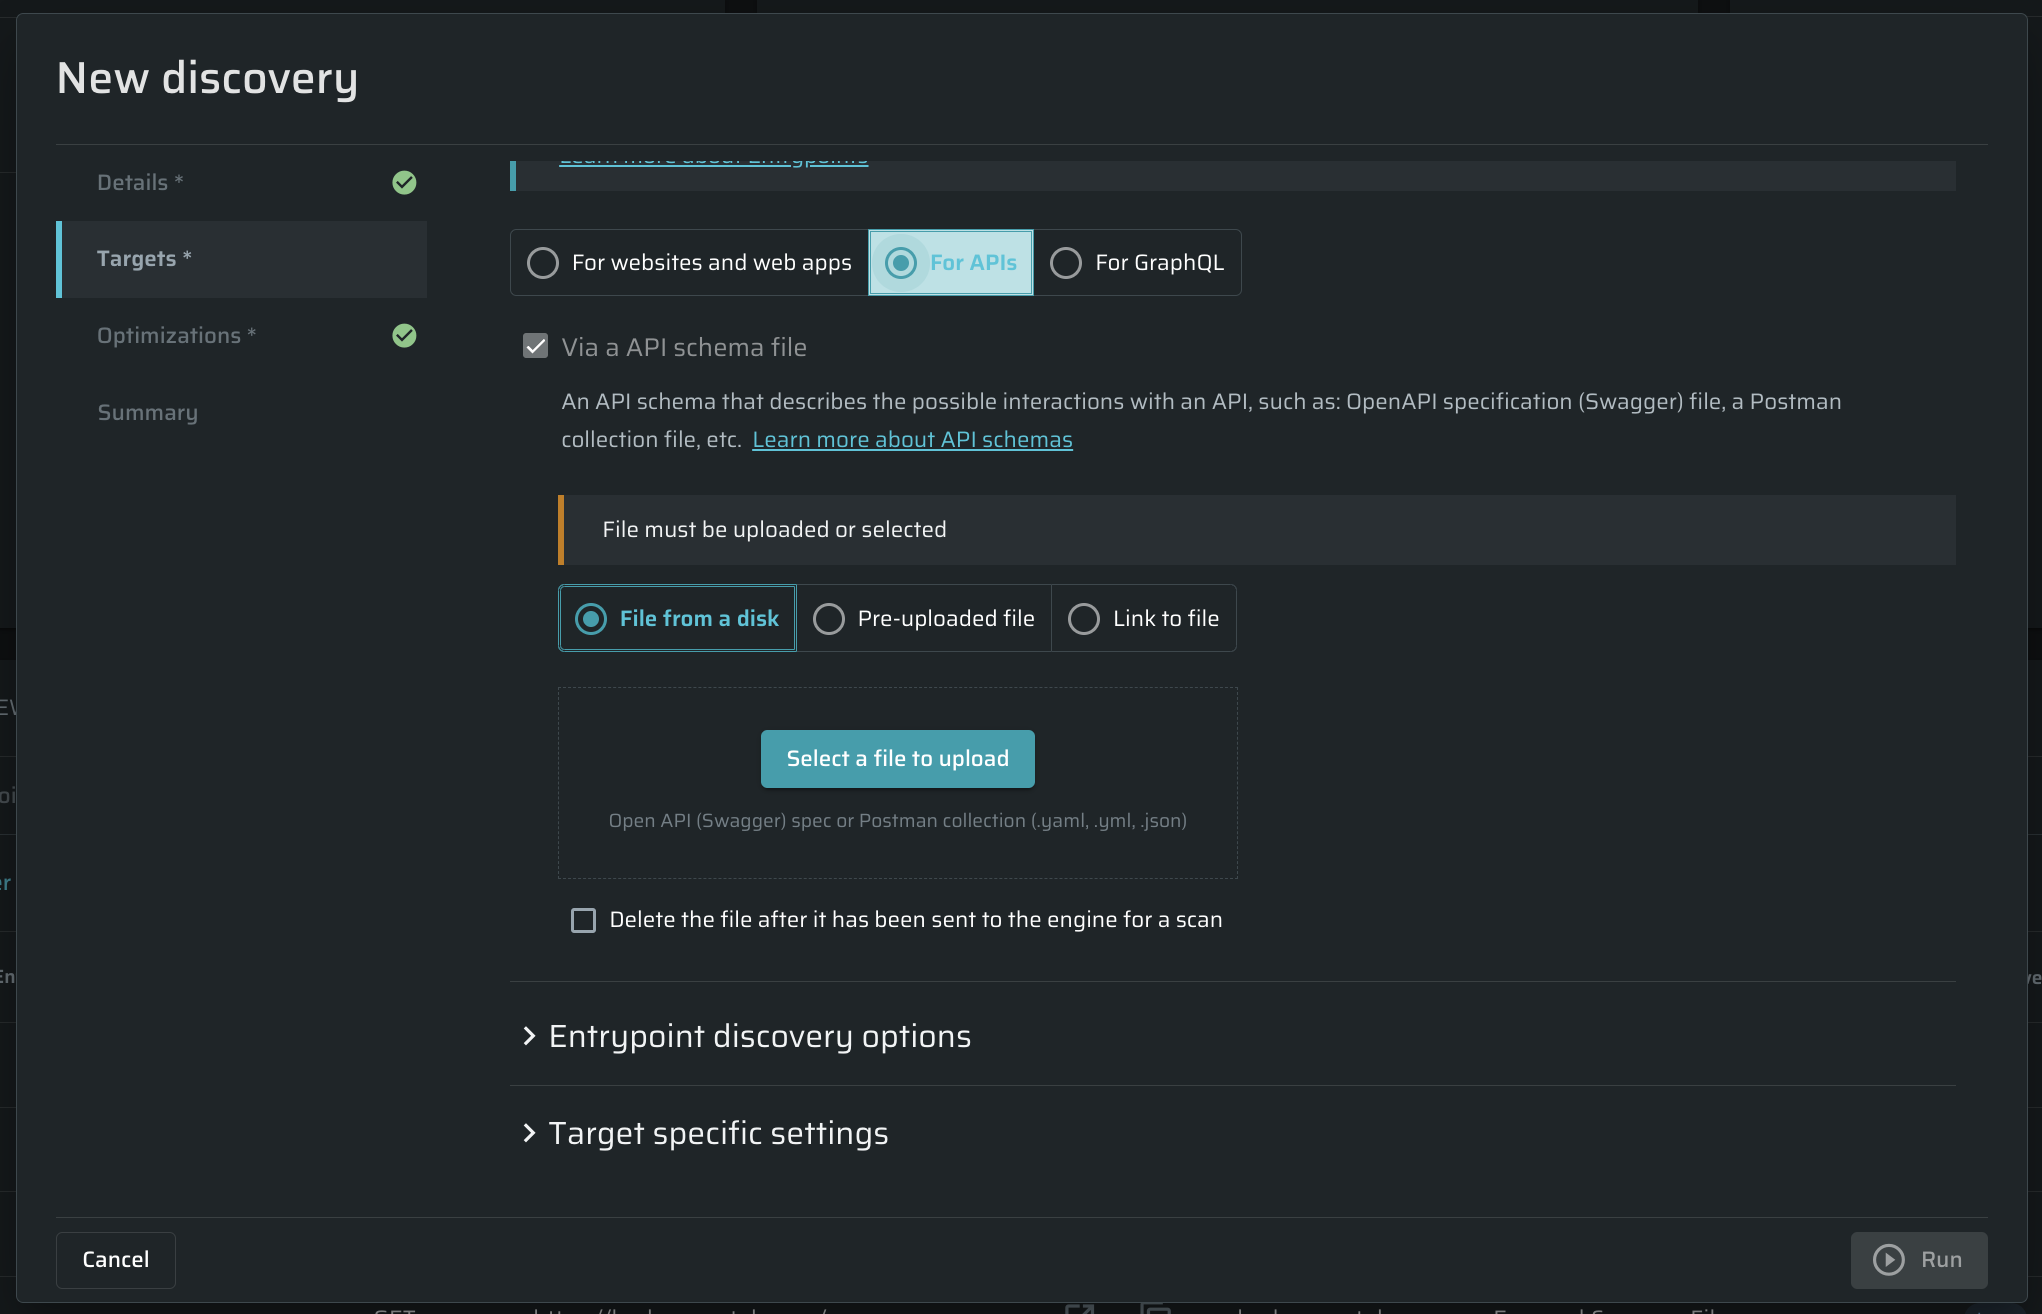
For APIs
Via API schema file (for API endpoints)- Use an .yml or a .json file to discover APIs. See Discovering API endpoints for detailed information. The file can be chosen from a disk or pre-uploaded to the Bright app. Also, you can simply add a link to the file.
For GraphQL
This tab allows you to specify a GraphQL endpoint link for introspection, similar to configuring API schemas above. Introspection is a GraphQL schema feature that enables users to inquire about the supported queries within a GraphQL schema.
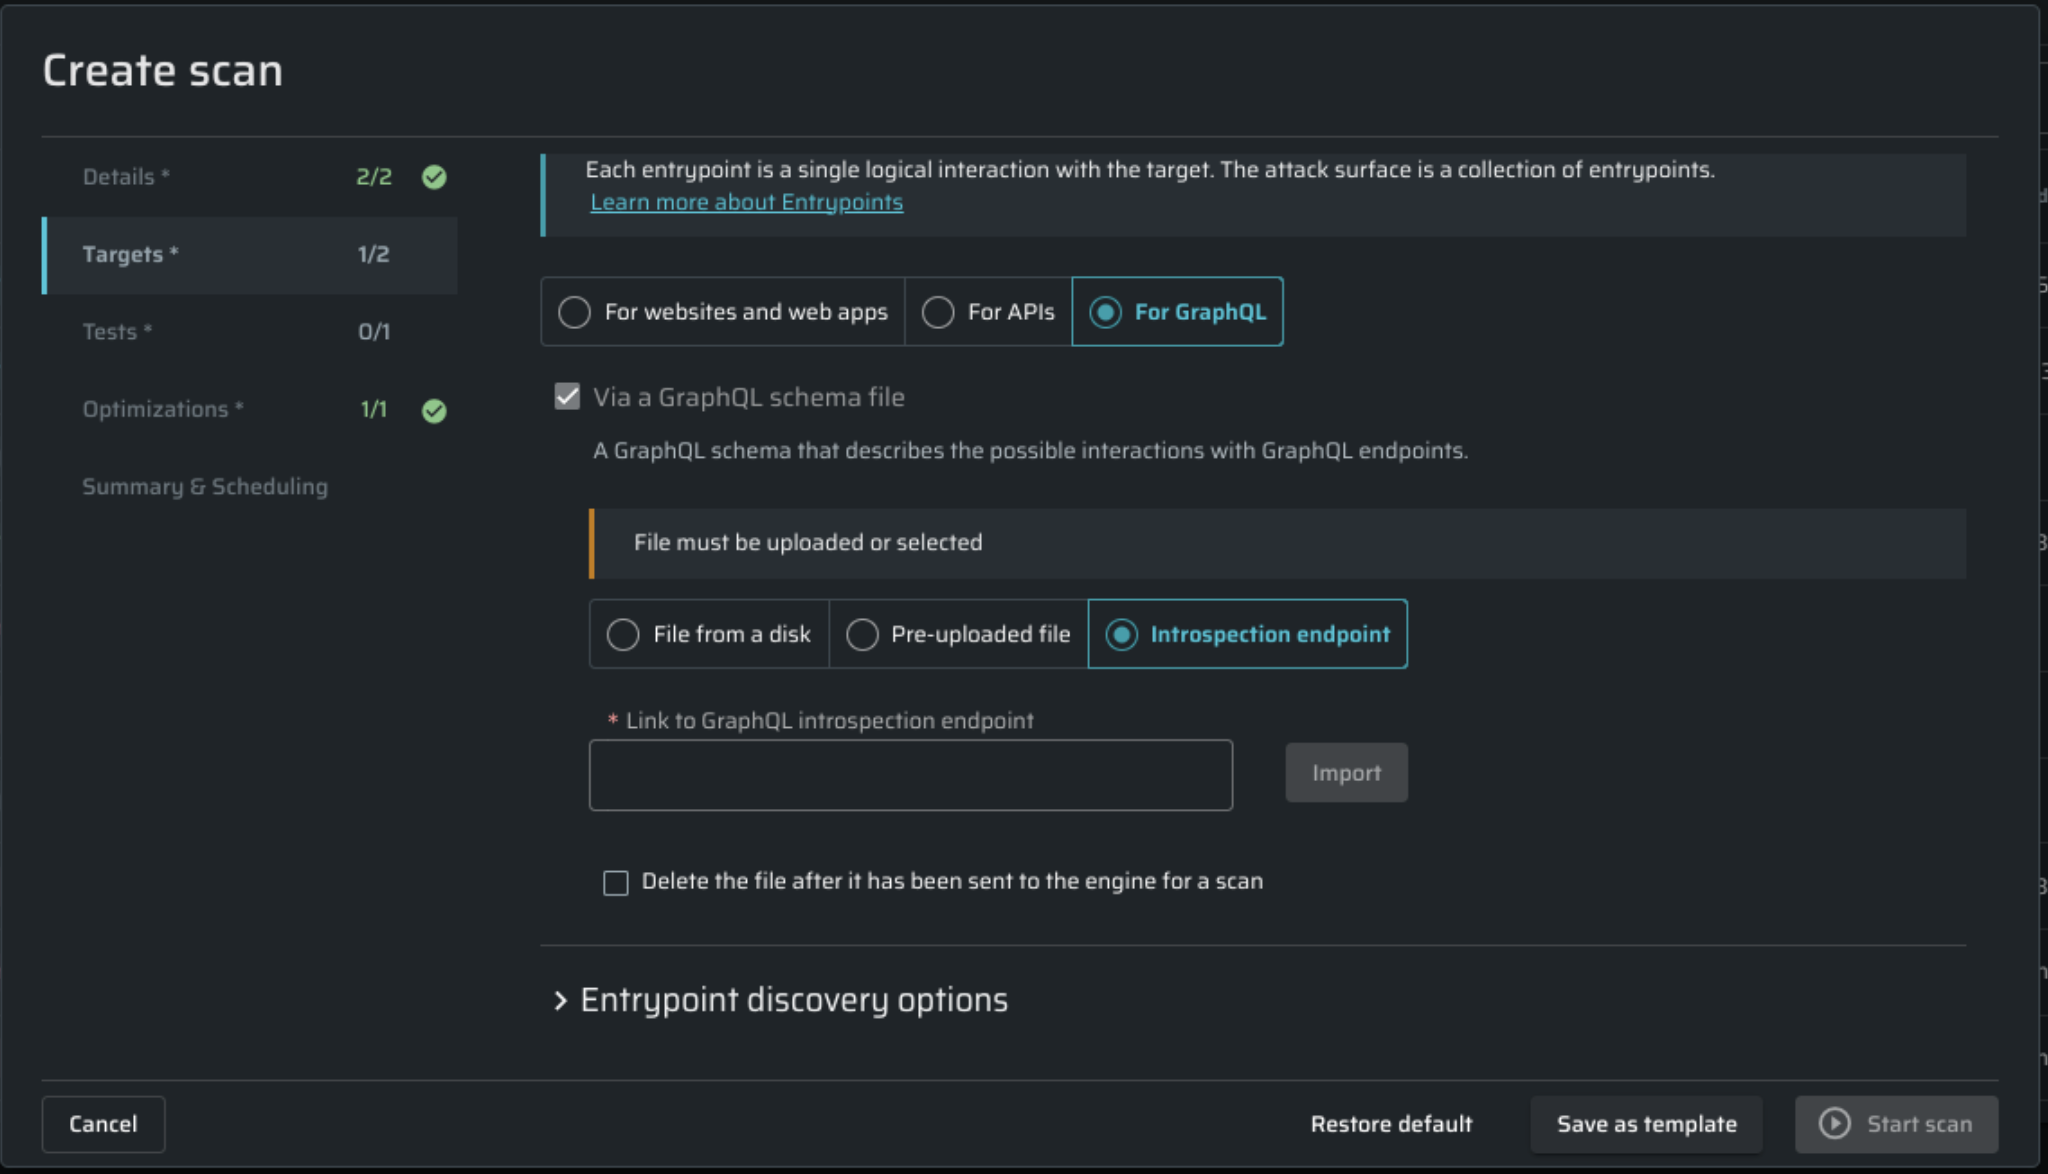
To proceed, provide a GraphQL schema file by one of these options:
- File from a disk - to upload a file from your computer. Required file formats: .gql, .graphql, .json.
- Link to GraphQL introspection endpoint - add a link to the target GraphQL endpoint.
- Pre-uploaded file - to select a pre-uploaded file from Bright cloud storage.
- Introspection endpoint - use this field to target a publicly accessible introspection endpoint.
If you want uploaded files to be deleted after sending them to the engine, mark the corresponding checkbox.
Entrypoints discovery options
(Optional). The Skip Entrypoints by patterns section contains an expression that excludes the most common static files like images, audio, video, and other files that don't contain any vulnerabilities (including fonts). If you don't want these files to be excluded, you can clear the URL regex pattern field.
In this pane, you may set additional parameters to be ignored during scanning.
- Below the Method field, click + Add exclusion . Empty fields will appear.
- From the Method dropdown menu, select the method you want to be excluded from scanning.
- In the URL regex pattern field, enter the parameters for the selected method.
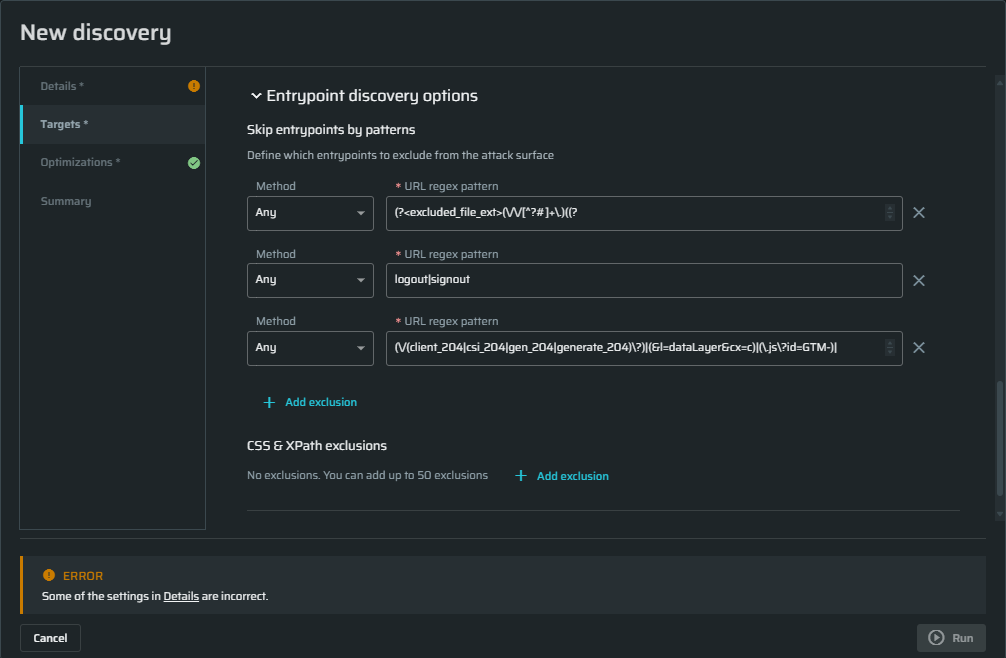
For example, if you don't want the POST method to go over entry points that contain vendor in the URL, from the Method dropdown menu, select POST and then in the URL regex pattern field, enter vendor. Any URL that contains vendor will be excluded from scanning.
CSS & XPath exclusions - CSS selectors & XPath for links to exclude.
Target specific settings
Additional Headers
In the Additional Headers section, define any custom headers to be appended to or replaced in each request. If you need to add authentication headers, consider using Header Authentication.
Tips:
- If you need to add several Additional headers, you can copy-paste them in a single Name field. The headers will be distributed among the fields automatically.
- Users can configure (add/change) headers during a Discovery scan. These headers are then associated with each discovered Entrypoint in that scan.
- The same headers are used in subsequent scans performed against the previously discovered Entrypoints.
- Users can manually modify (add/change) headers for each individual Entrypoint after the discovery scan. There is no way to change a header that would affect multiple or all of the Entrypoint simultaneously.
- To apply header changes to all entrypoints, users must run a new Discovery with the updated Headers.
Custom DNS records
Custom DNS Records are used to access local, non-public targets. Use it when you want to replace localhost with a specific IP address.
Also, it can be helpful to bypass CDN and proxy layers when requesting content from the site by sending those web requests directly to a specific IP address without using the site's public DNS records.
Click Add DNS record button to add a Host/IP pair. You can add multiple records if needed.
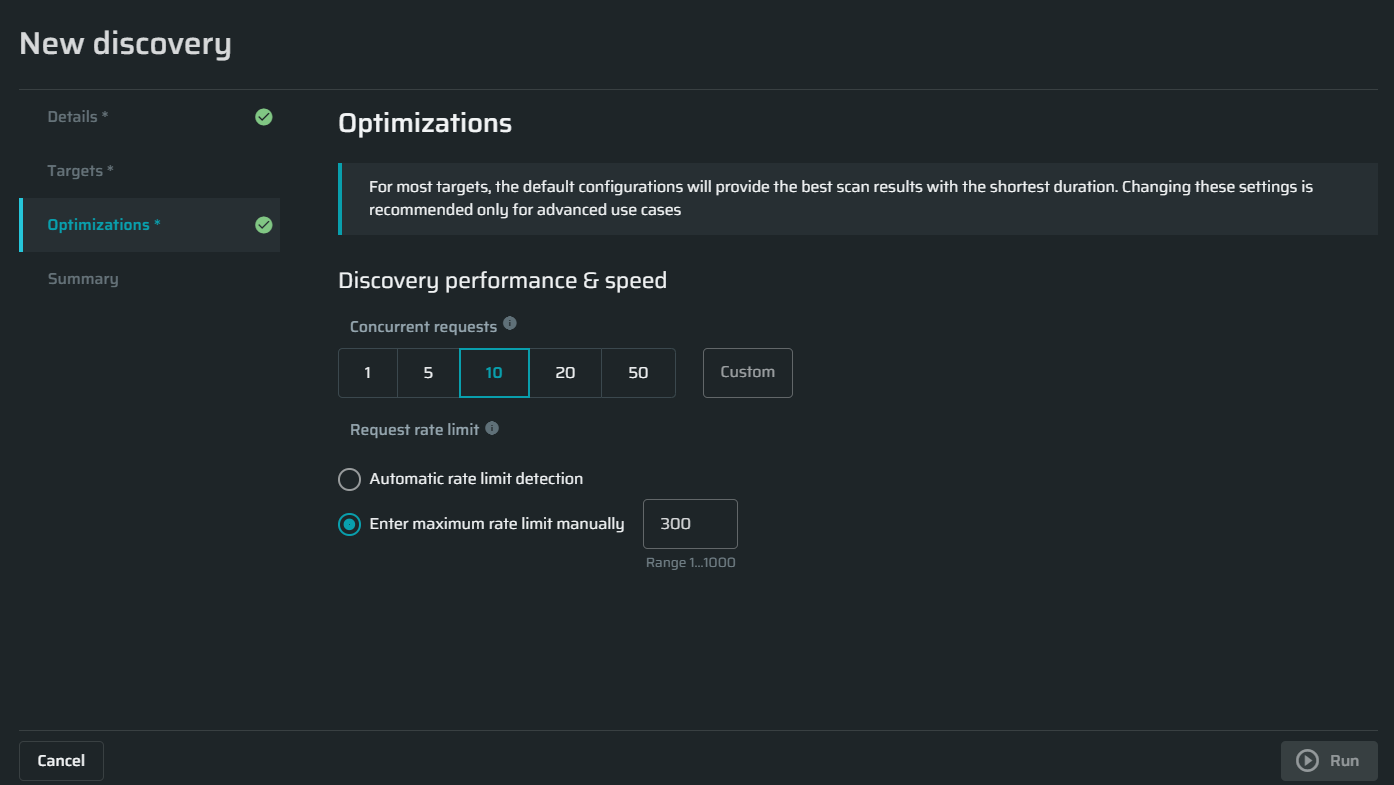
Configuring optimizations settings
Discovery performance and speed
Concurrent requests - Specify the maximum concurrent requests allowed to be sent by the scan in order to control the load on your server. The default value is 10 requests.
Request rate limit - Specify how many requests per seconds will be sent or let us automatically calculate it based on the target's responses.
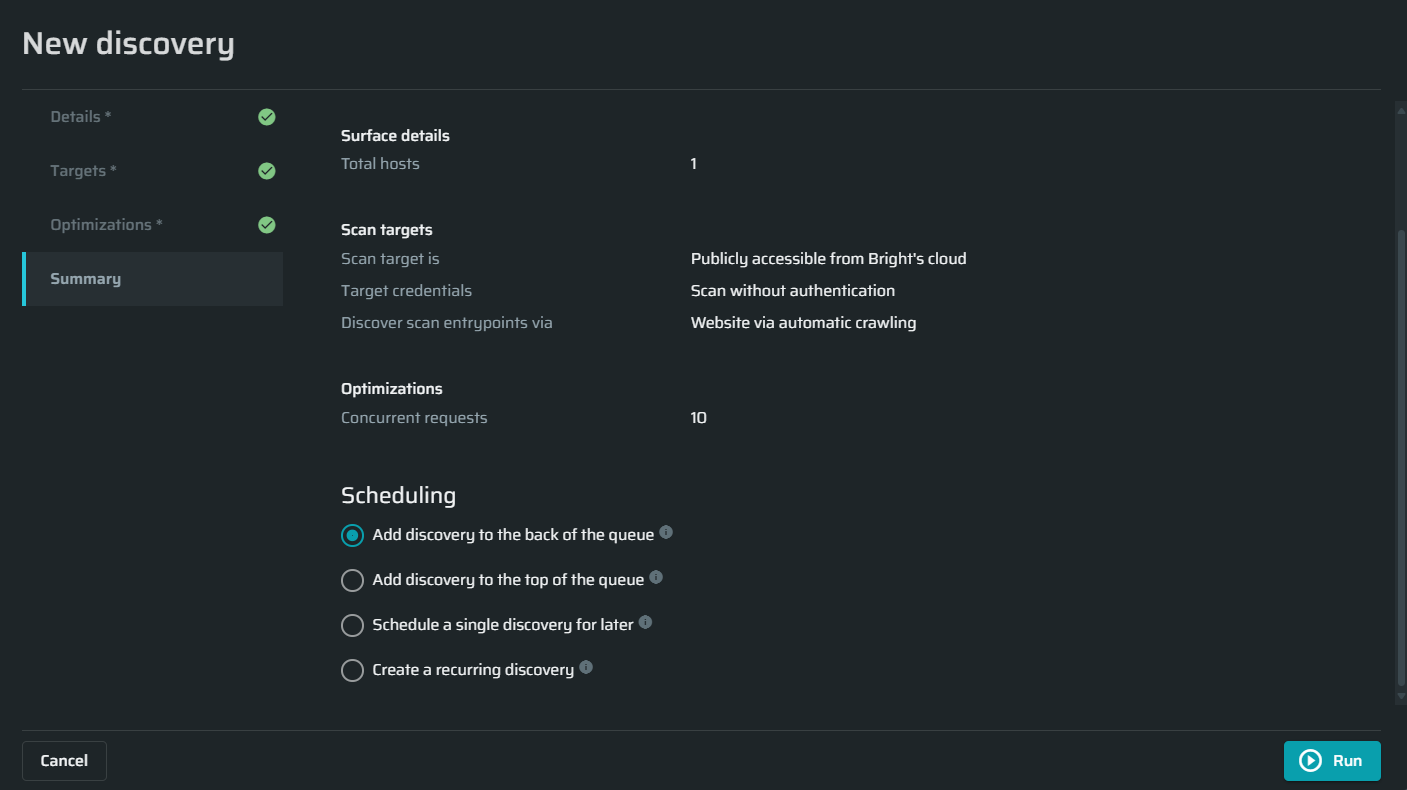
Summary
There are three available options on how and when to run a discovery:
-
Add discovery to the back of the queue - Choose this option to add the discovery to the back of the queue.
-
Add discovery to the top of the queue - Choose this option to add the discovery to the top of the queue.
-
Schedule a single discovery for later - adjust the start time and date for this discovery
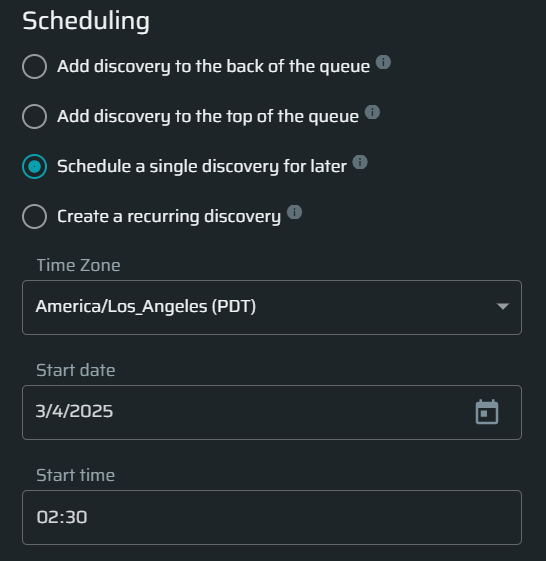
-
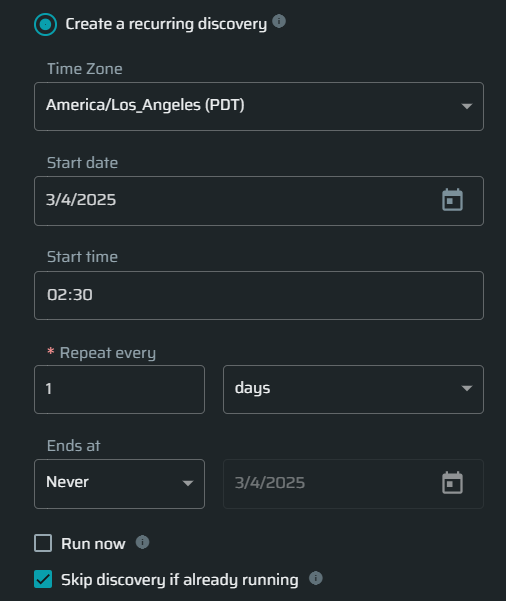
Create a recurring discovery - Define the frequency and schedule of the discovery to run repeatedly and automatically.
To start the scan immediately, click the Run.
Tracking a Discovery History
To open a table which contains detailed information about all performed Discoveries, do the following:
- Projects tab → Click on a particular Project → switch to the Discovery History tab.
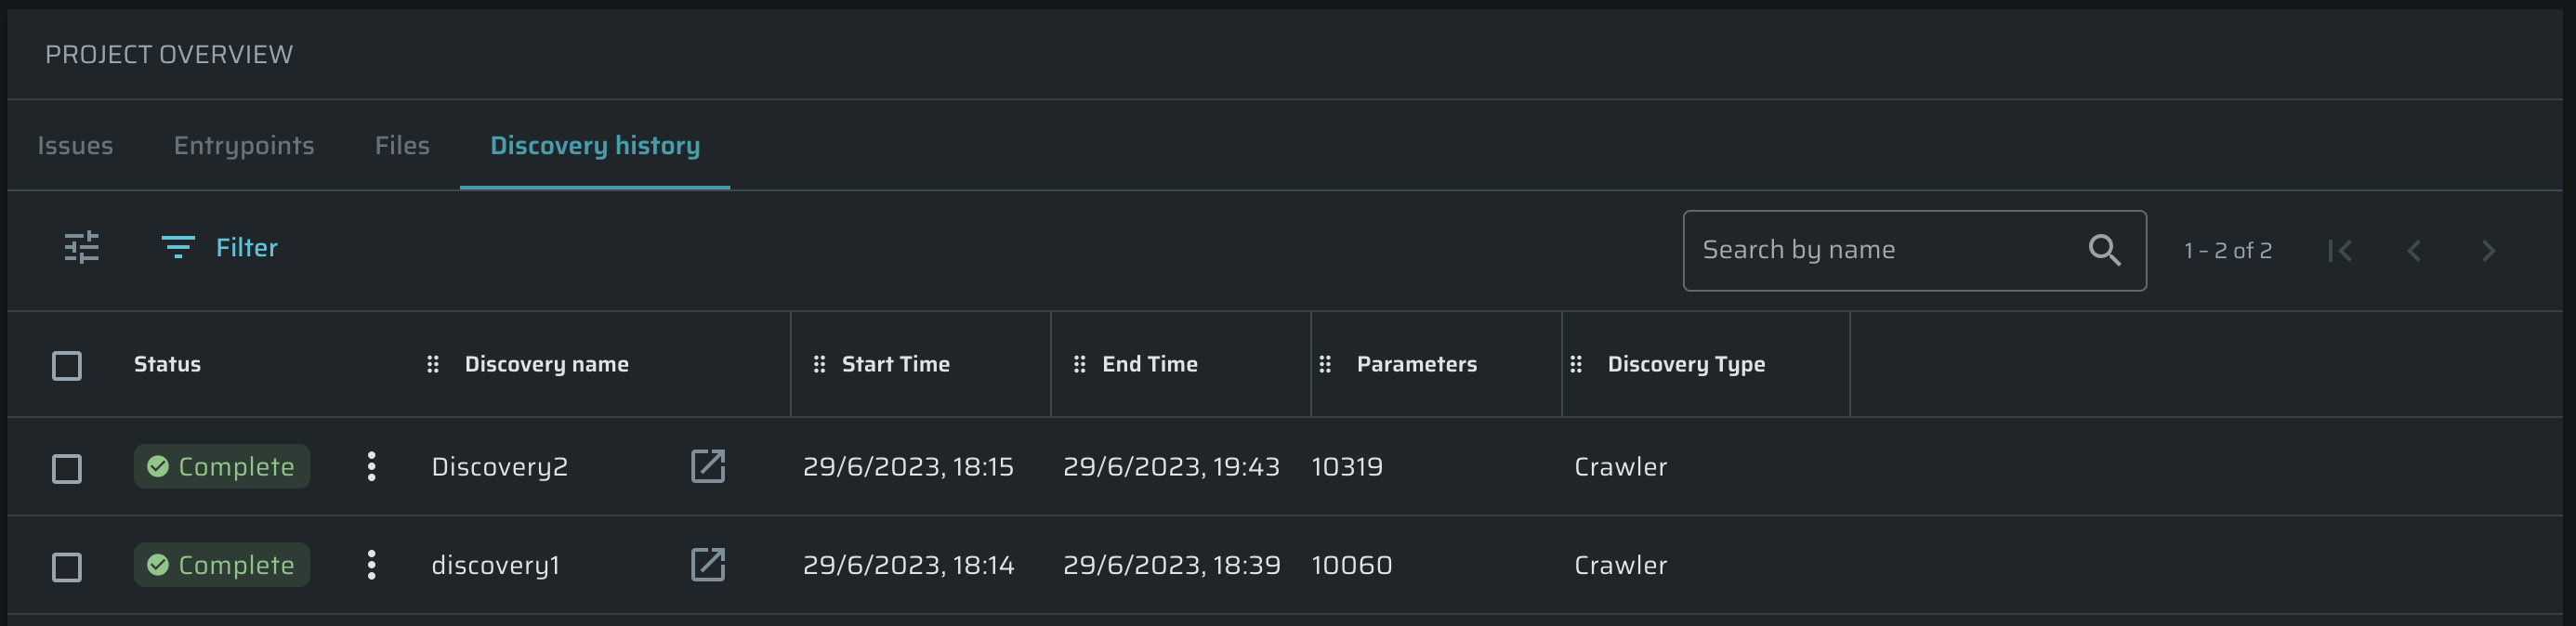
The table is fully adjustable using ![]() icon. Also, you can perform the following actions over Discoveries using
icon. Also, you can perform the following actions over Discoveries using ![]() button:
button:
- Edit
- Stop
- Rerun
- Run immediately
- Delete
To open a Discovery in a separate page, click ![]() button.
button.
Updated 11 months ago