Troubleshooting Scans
Introduction to scan optimization
If your scan is completed with the Done status, it means there were no critical problems during the scan that would cause it to fail or stop. Wonderful! However, the Done status does not necessarily indicate that the entire attack surface was covered, which is an essential component of a good scan. By validating that the attack surface was completely covered by the scan, you can be confident that your target was tested thoroughly and the real vulnerabilities were detected.
The scan attack surface is defined by entrypoints that were identified and included in the scan. Each entrypoint represents a single interaction of Bright with the target application. So the first thing you should do is to review the number of found entrypoints in the scan results. Generally, if no entrypoints or only a few of them are found during a scan, this should be a red flag. In other words, the Bright engine faced some blockers during the scan.
Secondly, take a look at the scan response statuses and engine notifications. These will tell you if there were blockers or connectivity issues during scanning. Such blockers critically affect the results and duration of a scan. They are typically associated with either network or configuration issues. Read on to learn more about network and configuration issues.
In most cases, network issues originate from improper approval of the Bright IP in the target's firewall. For example, if during a scan, Bright receives mostly 403 or 405 statuses, it may indicate that Bright is blocked by a WAF, but response statuses like 401 could also indicate that there is a problem with authentication. You may also get distorted scan results if your network connection is unstable or there are limitations on the number of concurrent requests (API throttling).
Configuration issues typically refer to misconfigured authentication objects, API schemas, or incorrect crawler parameters. For example, you may mistakenly select the wrong authentication object for a scan. In this case, the protected parts of your target won't be included in to the attack surface and will be skipped during scanning.
We have only mentioned some of the potential scan blockers. See below for a complete list of network and scan configuration issues with the remediation suggestions.
Scan optimization scenarios
Network Issues
WAF / Firewall block
| Indicators of this issue |
|---|
- Response statuses include
403and sometimes404, with the percentage of total responses >40%
For more information, read our documentation - SaaS Deployment.
Repeater connectivity issues
| Indicators of this issue |
|---|
- Response statuses include:
- Repeater::ESOCKETTIMEDOUT
- NexPloit::Session::Client::Agent::RepeaterTimeout
- Repeater::ECONNREFUSED - You are trying to connect to your server but are unable to connect to the port
- Repeater::ECONNRESET - Your request to the server is not fulfilled
- Repeater::ETIMEDOUT - Your request response is not received in the given time
- Repeater::HPE_LF_EXPECTED
- Repeater::ENOTFOUND - You were not able to connect to the given address
- Repeater:: EAI_AGAIN - DNS lookup timed out error, meaning there is a network connectivity error or proxy related error
- Repeater:: EHOST_UNREACH - No route to host.
Disruptedscan status, with the following errors:- Log - Repeater has been disconnected
| Configuration problems |
|---|
- Improper Repeater configuration
- Improper connection stability
- Improper WAF approval or implementation of Repeater
| Remediation suggestions |
|---|
Make sure of the following:
- The Repeater should be diagnosed. It is a good practice to use our intentionally vulnerable application as a testing host.
To diagnose a Repeater from the Bright app:
- select the Repeaters option from the left menu
- select the necessary Repeater
- select the Diagnose option from the dropdown menu
- enter the host you want to reach and check if it is reached successfully.
For the detailed instructions, see our documentation - Diagnose Network Connection.
To diagnose a Repeater using the Bright CLI:
- run the command
bright-cli configurein your console - enter your User API Token and Repeater ID in the corresponding fields
- follow the wizard instructions.
For the detailed instructions, see our documentation - Repeater Troubleshooting.
Once the diagnostics is completed, you can see how many targets cannot be reached by the Repeater.
Unstable network/target
| Indicators of this issues |
|---|
- Response statuses include
500, with the percentage of total responses <60% - WebDriver::DriverStore::Timeout
- WebDriver::Error
- WebDriver::Timeout
Disruptedscan status, with the following errors:- Repeater has been disconnected
- Target unreachable for X minutes (or similar message),
- No entry points to scan
- The scan engine did not respond for 2 hours or more, and thus the scan was aborted automatically
- Scan was disrupted
| Configuration problems |
|---|
- Disabled ‘skip static params’ or ‘smart scan’ in the scan settings
- Concurrent requests is high: more than 10
- Attack surface includes path or headers that may cause the server to not respond (timeout) on requests that attack paths or headers
| Remediation suggestions |
|---|
Make sure of the following:
- Check the stability of your network connection, Repeater connection, and any possible defects in network connectivity. The connection should be good and stable. For the detailed instructions on how to diagnose a Repeater from the Bright app, see our documentation - Diagnose Network Connection.
- Check the stability of your web application. If stability of the web application is poor, the Bright security scanning process will be disrupted.
One of the best practices is to check the current concurrent requests and set them to a lower number if the target cannot handle too many concurrent requests. To change concurrent requests for a scan, go to Create scan > select the Advanced mode > open the Targets tab > open the Network section > select a lower number of the Concurrent requests.
API throttling
| Indicators of this issue |
|---|
- Response statuses include
429
| Configuration problems |
|---|
- Concurrent requests is too high: more than 10
- Improper configuration of your web server
| Remediation suggestions |
|---|
To resolve this issue:
- Check the current concurrent requests and set them to a lower number. To change concurrent requests for a scan, go to Create scan > select the Advanced mode > open the Targets tab > open the Network section > select a lower number of the Concurrent requests.
- Select a lower number of concurrent requests in the web app server.
Target not authorized for direct scanning
| Indicators of this issue |
|---|
Disruptedscan status, with the following errors:- The target is not authorized to be scanned, please authorize the host first.
| Configuration problems |
|---|
- Target is not authorized for scanning.
| Remediation suggestions |
|---|
Do the following to fix this issue:
- Connect a Repeater for the scan. For the instructions, see our documentation - Manage Repeaters.
- Add a .nex file to the application root directory. For the details, see our documentation - Define the Hosts Authorized for Scanning.
Surface discovery issues
Authentication issues
See Troubleshoot Authentication Issues.
Crawler configuration issues
| Indicators of this issue |
|---|
- Selected discovery method includes crawler
- Total number of discovered Entrypoints is 0
- (Optional). Only 404 responses
OR - Total number of Entrypoints is <10
- Only 404/500 response statuses
| Configuration problems |
|---|
- The authentication object is configured incorrectly
- Wrong crawler configurations:
- Wrong path
- Wrong host
- Missing special headers
| Remediation suggestions |
|---|
Make sure of the following:
- Check if web application is single-page. If it is single-page, transfer from the Crawler discovery type to a .HAR file. For more information, see our documentation - Scan with a Crawler.
- Check if the target is authorized for scanning. For more information, see our documentation - Define the Hosts Authorized for Scanning.
API schema configuration issues
| Indicators of this issues |
|---|
- Selected discovery method is oas
- Total number of discovered Entrypoints is 0
- Only 404/405 response statuses
| Configuration problems |
|---|
- Misconfigured API schema with valid syntax
- Improper description of parameters or missing necessary default values in the API schema
- Improper definition of the endpoint details
| Remediation suggestions |
|---|
Make sure of the following:
- Check the API scheme configuration. You can fine the configuration requirements in our documentation - Configuring an API Schema, Edit an Uploaded API Schema.
- Select an authentication object or properly configure authorization for the scan
Problematic scan results
Failed scan
| Indicators of this issue |
|---|
- Scan status is Failed
| Remediation suggestions |
|---|
Make sure the following:
- Check the general scan health. Monitor the number of requests, progress, and network responses. Scan with a lot of 401/403/5XX response statuses is considered problematic.
- Check the WAF/Firewall accessibility.
- Check potential problems with your network connectivity.
Disrupted scans
The cases appeared, then a scan using the Repeater is disrupted. The scan will be disrupted only in case when the Repeater is timed out (if there is no response for more than 10 min). If the Repeater is stopped or deactivated clearly and intentionally by a user, a scan will be ended with the stopped status.
Scan too long
| Indicators of this issue |
|---|
- Total scan duration is > 180 min
- Scan has too many parameters because the selected surface includes path or headers
- Scan has too many discovered Entrypoints (> 300), mostly affecting crawling time
- Scan has too many parameters ( > 500)
- Low concurrent request number (< 5)
- (Optional). Scan has exclusions configured
| Configuration problems |
|---|
- Disabled Skip static parameters or Smart scan in the Attack Surface Optimization settings of the scan
- Attack surface includes path or headers
- Low concurrent requests number (< 10)
- Your target applies rate limiting to the scan
- The scan Coverage exclusions are misconfigured
| Remediation suggestions |
|---|
Make sure the following:
- Increase the concurrent requests from <5 to >5
- Enable beneficiary parameters in the scan configuration
- Exclude non-vital web application site assets from crawling
- Exclude the Target Parameter Locations like Headers and Path in the Attack Surface Optimization settings of the scan
- Enable the Smart scan option in the Attack Surface Optimization settings of the scan
Adding Bright DAST to the allowlist on Cloudflare
Cloudflare is a content delivery network and DDoS mitigation platform. It primarily acts as a reverse proxy between a website's visitor and the Cloudflare customer's hosting provider. Cloudflare secures and ensures the reliability of your external-facing resources such as websites, APIs, and applications. It protects your internal resources such as behind-the-firewall applications, teams, and devices. Also, it is your platform for developing globally scalable applications.
If the targets scanned by the Bright platform are protected by the Cloudflare platform or other WAF or application protection devices, the protection devices must be configured to allow the Bright platform to perform the scans, otherwise, Bright DAST scan will be interrupted and marked as Disrupted.

To troubleshoot this issue, start with the most common WAF rules enabled in Cloudflare.
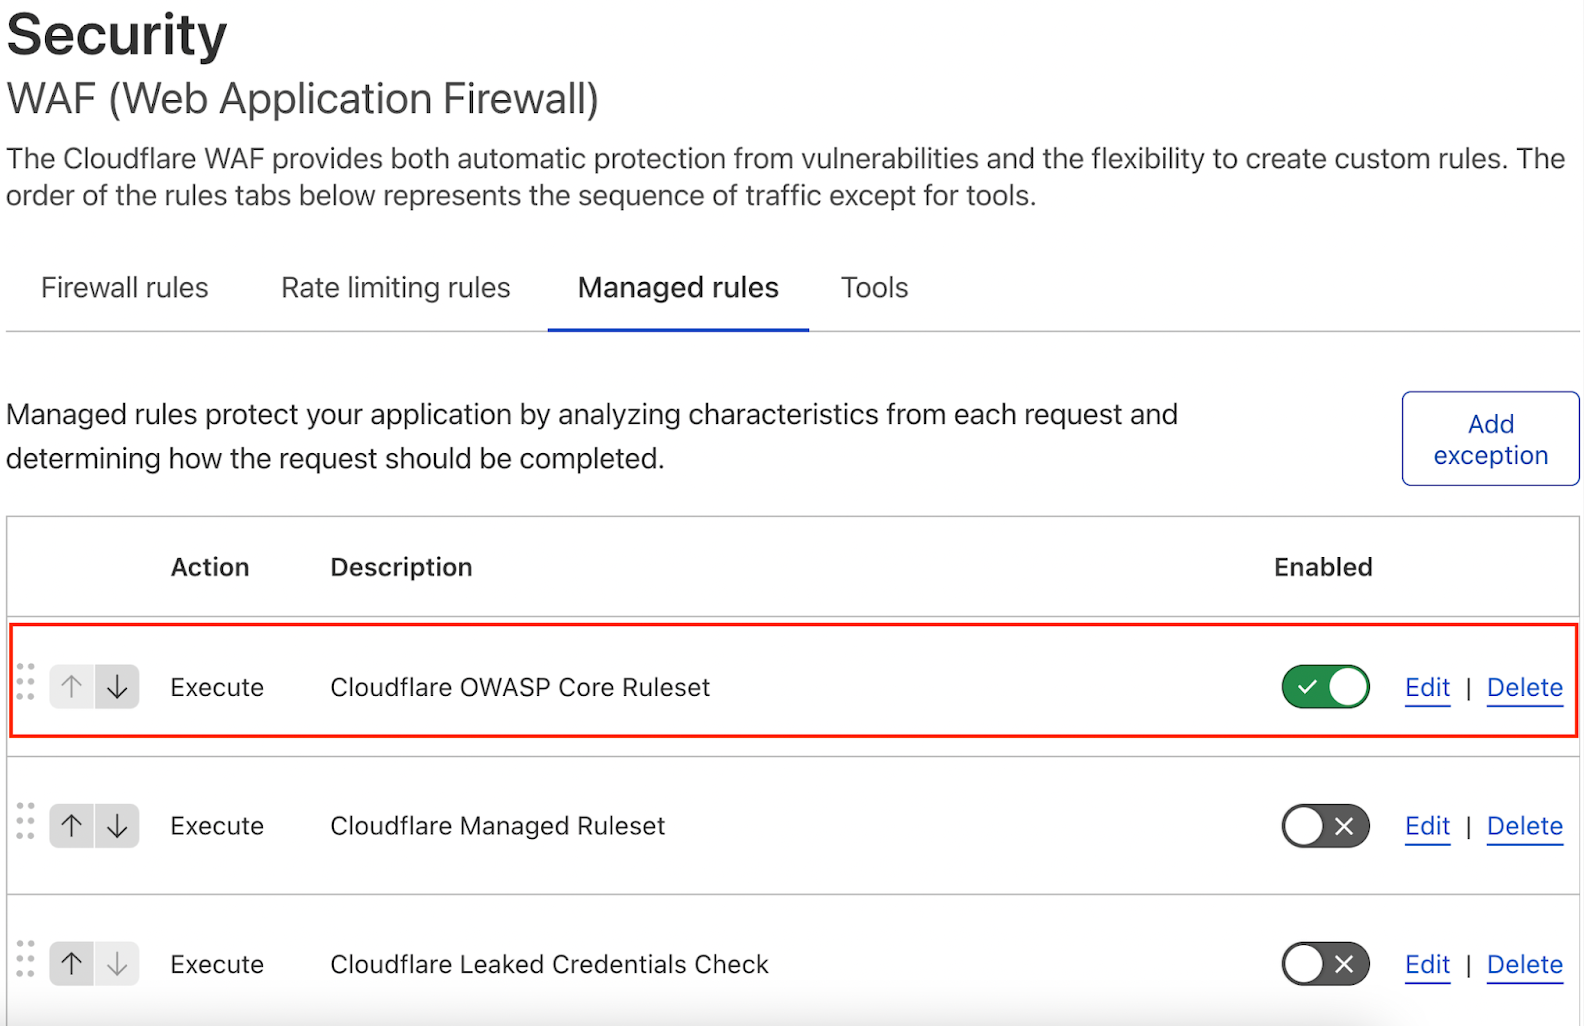
- Go to Security > WAF > Managed Rules. In most configurations, Cloudfare OWASP Core Ruleset is enabled by default.
- If Cloudfare OWASP Core Ruleset is disabled, make it enabled as in the figure below.

Step-by-step Instructions
Step 1: Create IP access rules
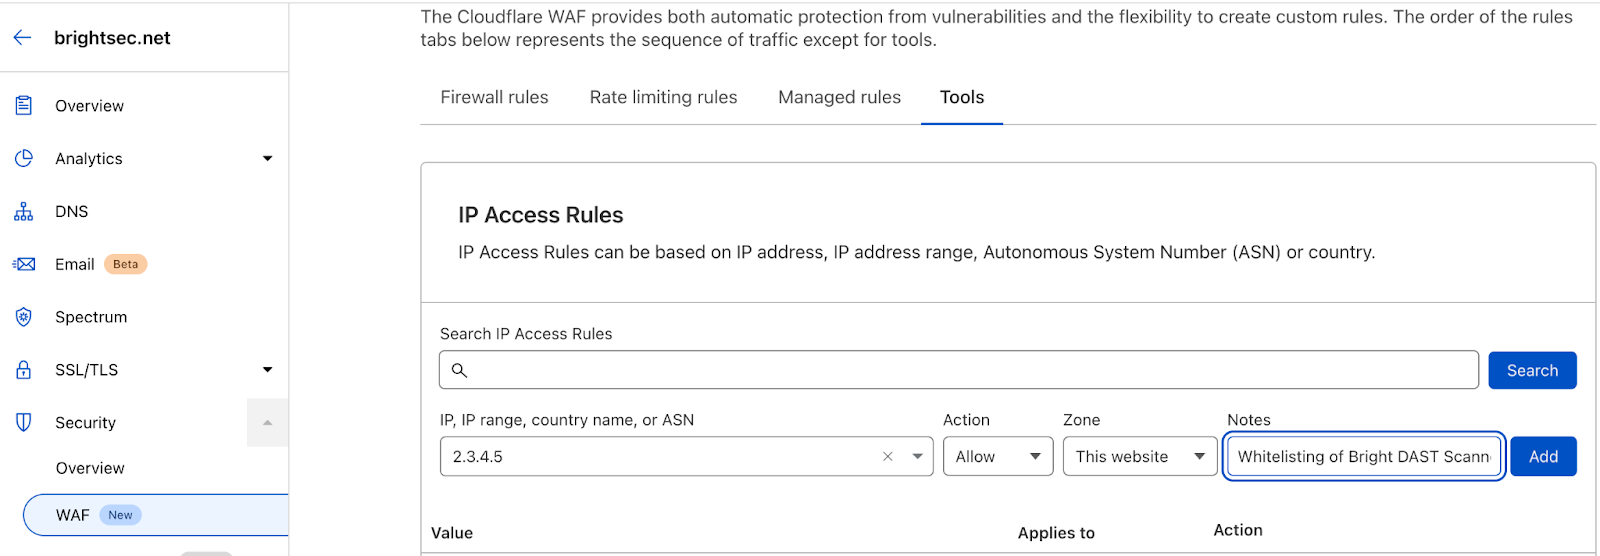
In the Cloudflare dashboard, go to Security > WAF. In the IP Access Rules pane, configure the necessary settings to add the Bright platform IP addresses to the allowlist (see instructions below). Consult your Customer Success or Sales Engineering team to get the right IP address(es) or IP ranges for the Bright DAST platform. There may be one or more IP addresses for each Bright Platform Cluster.
Adding an Allow Rule to IP Access Policy
- In the Cloudflare dashboard, go to Security > WAF > Tools > IP Access Rules.
- Click Create an IP Access Rule and give it a friendly name.

- In the IP, IP Range, country name or ASN option, enter the Bright platform IP Address. Repeat these steps to add every IP unless there is a range given to you which can be added with a network mask like 2.3.4.0/16.
- From the Action dropdown menu, select Allow.
- From the Zone dropdown menu, select a zone for a specific target/website/application or all websites
Сlick Add.
IP access rule is in effect now and Cloudflare will allow all requests from the configured source IP address without any inspection.
Step 2: Manage firewall rules
These rules should be used to bypass Cloudflare WAF for all application actions including WAF Managed Rules, Rate Limiting, and others.
Creating WAF bypass rules
This will allow Bright DAST Platform to circumvent Cloudflare's standard web application firewall protections and other managed rules that are already set.
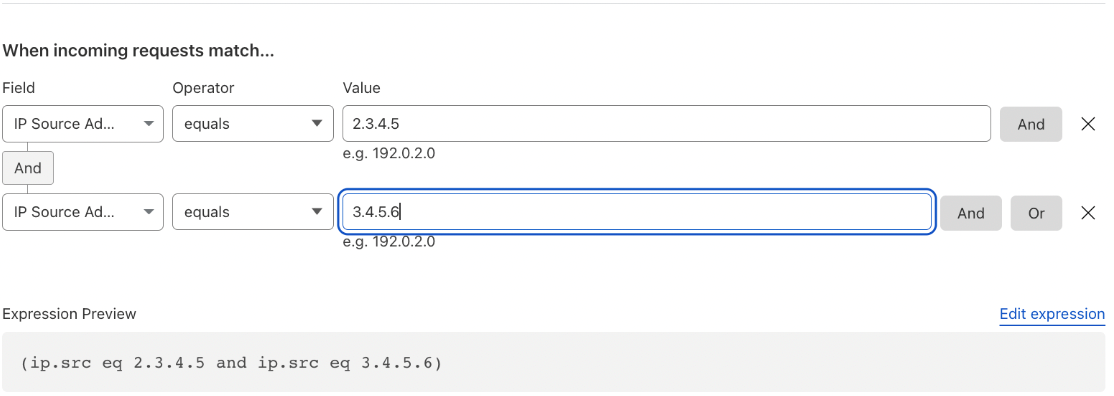
- In the Cloudflare dashboard, go to Security > WAF > Firewall Rules.
- Click Create a Firewall Rule to create another rule.

- From the Field dropdown menu, select IP Source Address.

- From the Operator dropdown menu, select equals (for one source IP) or is in (for multiple IPs).
- In the Value field, add all of the Bright platform’s DAST IP ranges or individual IP address/es. Make sure you rearrange the order of the IP ranges so that Cloudflare doesn't complain of duplication.
- From the Choose an action dropdown menu, select Bypass and add data as follows:
- WAF Managed Rules (this one is important)
- Browser Integrity Check
- User Agent Block
- Security Level
- Rate Limiting
- Zone Lockdown
- Click Save.

The Bright platform is now able to scan your Cloudflare-protected targets/hosts without any blocks or interference or rate-limiting rules for every configured source IP.
For more information, see Firewall Rules FAQ.
SuperBot fight mode
Pay attention to the information at the bottom of the Firewall Rule Configuration page of the Cloudflare platform (which is highlighted in red in the figure below).

The SuperBot Fight Mode is pretty automated using Machine Learning by Cloudflare. Therefore, it may detect the Bright platform as a Bot and start blocking it even if adding to the Bright DAST Platform addresses allowlist is configured according to the instructions above. The Bright team could not verify if there is a specific way to add the Bright platform as a verified Bot so that Cloudflare allows all actions besides adding to the allowlist.
For more information, see the Cloudflare KB articles below or consult your Cloudflare administrator.
- https://developers.cloudflare.com/bots/bot-analytics/biz-and-ent/
- https://support.cloudflare.com/hc/en-us/articles/360035387431
NoteThe Bright team is working with Cloudflare to add the Bright DAST platform as a verified Bot. There is no estimated completion date for this effort but if the Bright platform is added to Cloudflare’s verified Bots list, this document will be updated accordingly.
If after adding the Bright platform IPs to the allowlist and bypassing WAF rules of Cloudflare Platform the Bright Team is suggesting disabling Super Bot Fight Mode (and you see that Cloudflare Bot is blocking the Bright platform in Cloudflare Analytics), you can disable the Super Bot Fight Mode.
NoteThe Super Bot Fight Mode is a global configuration and will affect your entire protection of all Cloudflare configurations. Consult your Cloudflare administrator first on whether this step is required.
To disable Super Bot Fight Mode, follow the instructions below.
Verifying bot-related actions
Go to Security > Overview.
Any requests challenged by a specific product will be labeled as Bot Fight Mode in the Service field. This allows you to observe, analyze, and follow trends in your bot traffic over time.
Disabling Bot Fight mode
- Log in to the Cloudflare dashboard and select your account and domain.
- Go to Security > Bots.
- For Bot Fight Mode, select Off.
Updated 2 months ago
