Azure DevOps Integration
The Azure DevOps (ADO) integration allows users to automatically run CI/CD processes using Bright's engine. The provided YAML example illustrates a straightforward and expandable workflow for DAST scans within the CI pipeline.
Bright web app Settings
To create an Organization API key, do the following:
- Open Organization tab → Scroll down to the Manage your Organization API keys section
- Click +Create API key
- Enter Name and select the Expiration date (optional)
- Select these scopes to provide valid permissions:
botdiscoveriesdiscoveries:readdiscoveries:deletediscoveries:rundiscoveries:managediscoveries:stopentry-pointsentry-points:manageentry-points:readfiles:readfiles:writegroups:admingroups:readgroups:deletegroups:manage
- Click Create and copy a key for further steps
Configuration File Settings
Next, you need to upload the pipeline configuration file provided below to one of the services supported by Azure DevOps for further use:
- Azure Repos Git
- Bitbucket Cloud
- Github
- Github Enterprise Server
- Other Git (any generic Git repository)
- Subversion
This guide will cover the method using Github. The steps for other services may slightly differ.
Here's the pipeline configuration file:
trigger:
- main

pool:
  vmImage: 'ubuntu-latest'

parameters:
- name: apiToken
  displayName: 'API Token'
  type: string
  default: ''
- name: hostname
  displayName: 'Hostname'
  type: string
  default: 'app.brightsec.com'
- name: shouldStopScan
  displayName: 'Stop Scan After Completion'
  type: boolean
  default: false
- name: waitForSeverity
  displayName: 'Minimum Severity to Wait For'
  type: string
  default: 'Any'
  values:
   - 'Any'
   - 'Medium'
   - 'High'
   - 'Critical'
- name: scanName
  displayName: 'Scan Name'
  type: string
  default: 'BC Focus - ADO'
- name: scanCrawlerUrl
  displayName: 'Scan Crawler URL'
  type: string
  default: 'https://brokencrystals.com/api/config'

variables:
  baseUrl: 'https://${{ parameters.hostname }}'
  sarifFilePath: 'NeuraLegion_ScanReport.sarif'

steps:
# Start NeuraLegion Scan
- script: |
    response=$(curl -X POST "$(baseUrl)/api/v1/scans" \
      -H "Content-Type: application/json" \
      -H "Authorization: Api-Key ${{ parameters.apiToken }}" \
      -d '{"name": "${{ parameters.scanName }}", "crawlerUrls": ["${{ parameters.scanCrawlerUrl }}"], "discoveryTypes": ["crawler"], "tests": ["header_security", "cookie_security", "full_path_disclosure", "open_database"] }')
    echo "$response"
    scanId=$(echo "$response" | jq -r '.id')
    echo "##vso[task.setvariable variable=scanId]$scanId"

# Poll for Scan Completion and Check for Findings.
- script: |
    status=""
    while [ "$status" != "done" ] && [ "$status" != "stopped" ]; do
      response=$(curl -s "$(baseUrl)/api/v1/scans/$(scanId)" \
        -H "Authorization: Api-Key ${{ parameters.apiToken }}")
      status=$(echo "$response" | jq -r '.status')
      echo "Current status: $status"
      if [ "$status" = "failed" ] || [ "$status" = "disrupted" ]; then
        echo "##vso[task.logissue type=error]Scan $status"
        exit 1
      fi
      if [[ "${{ parameters.waitForSeverity }}" == "Any" ]]; then
        issues=$(echo "$response" | jq '[.numberOfHighSeverityIssues, .numberOfMediumSeverityIssues, .numberOfLowSeverityIssues] | add // 0')
      else
        # Dynamically construct the jq query based on waitForSeverity
        jqQuery=".numberOf${{ parameters.waitForSeverity }}SeverityIssues // 0"
        issues=$(echo "$response" | jq -r "$jqQuery")
      fi
      if [ "$issues" -gt 0 ]; then
        echo "##vso[task.logissue type=error]Found $issues issues of ${{ parameters.waitForSeverity }} severity"
        exit 1
      fi
      sleep 30
    done
  condition: and(succeeded(), ne(variables.scanId, ''))

# Download SARIF Report
- script: |
    curl -X GET "$(baseUrl)/api/v1/scans/$(scanId)/reports/sarif" \
      -H "Authorization: Api-Key ${{ parameters.apiToken }}" \
      -o $(sarifFilePath).gz
      gzip -d $(sarifFilePath).gz
      sarifFileText=$(cat NeuraLegion_ScanReport.sarif)
      echo "sarif file text: $sarifFileText"
  condition: and(failed(), ne(variables.scanId, ''))

# Check if SARIF file exists and set a variable
- script: |
    if [ -f "$(sarifFilePath)" ]; then
      echo "##vso[task.setvariable variable=isSarifPresent]true"
    else
      echo "##vso[task.setvariable variable=isSarifPresent]false"
    fi
  condition: and(failed(), ne(variables.scanId, ''))

# Publish SARIF Report as Pipeline Artifact
- task: PublishPipelineArtifact@1
  inputs:
    targetPath: '$(sarifFilePath)'
    artifact: 'CodeAnalysisLogs'
    publishLocation: 'pipeline'
  condition: and(failed(), eq(variables.isSarifPresent, 'true'))

# Stop Scan if Requested
- script: |
    curl -X POST "$(baseUrl)/api/v1/scans/$(scanId)/stop" \
      -H "Authorization: Api-Key ${{ parameters.apiToken }}"
  condition: and(failed(), eq('${{ parameters.shouldStopScan }}', 'true'), ne(variables.scanId, ''))
Azure DevOps Settings
To create a new project, do the following
- Click the +New project button on the main Azure DevOps page:

- Once your project is created, go to the Pipelines tab and click New Pipeline
- Select Github and provide access to your account
- Choose a repository with the uploaded configuration file
- Select Existing Azure Pipelines YAML file option
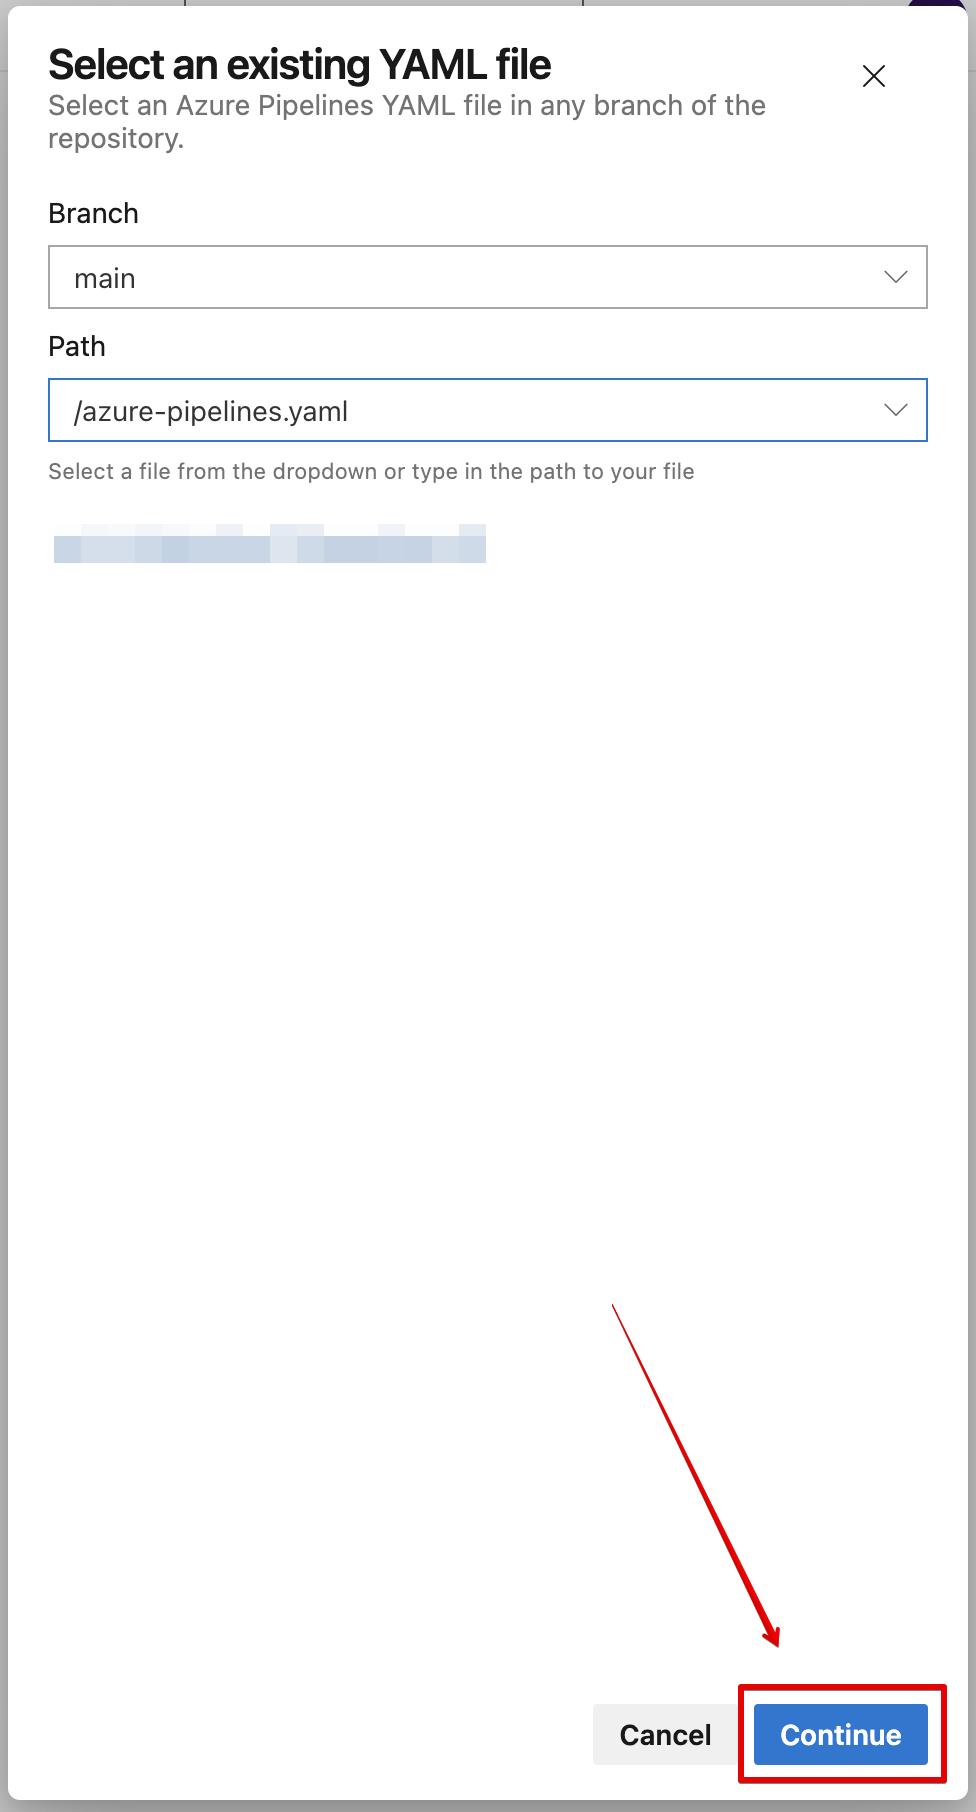
- Specify a branch and a path with the uploaded configuration file, and click Continue

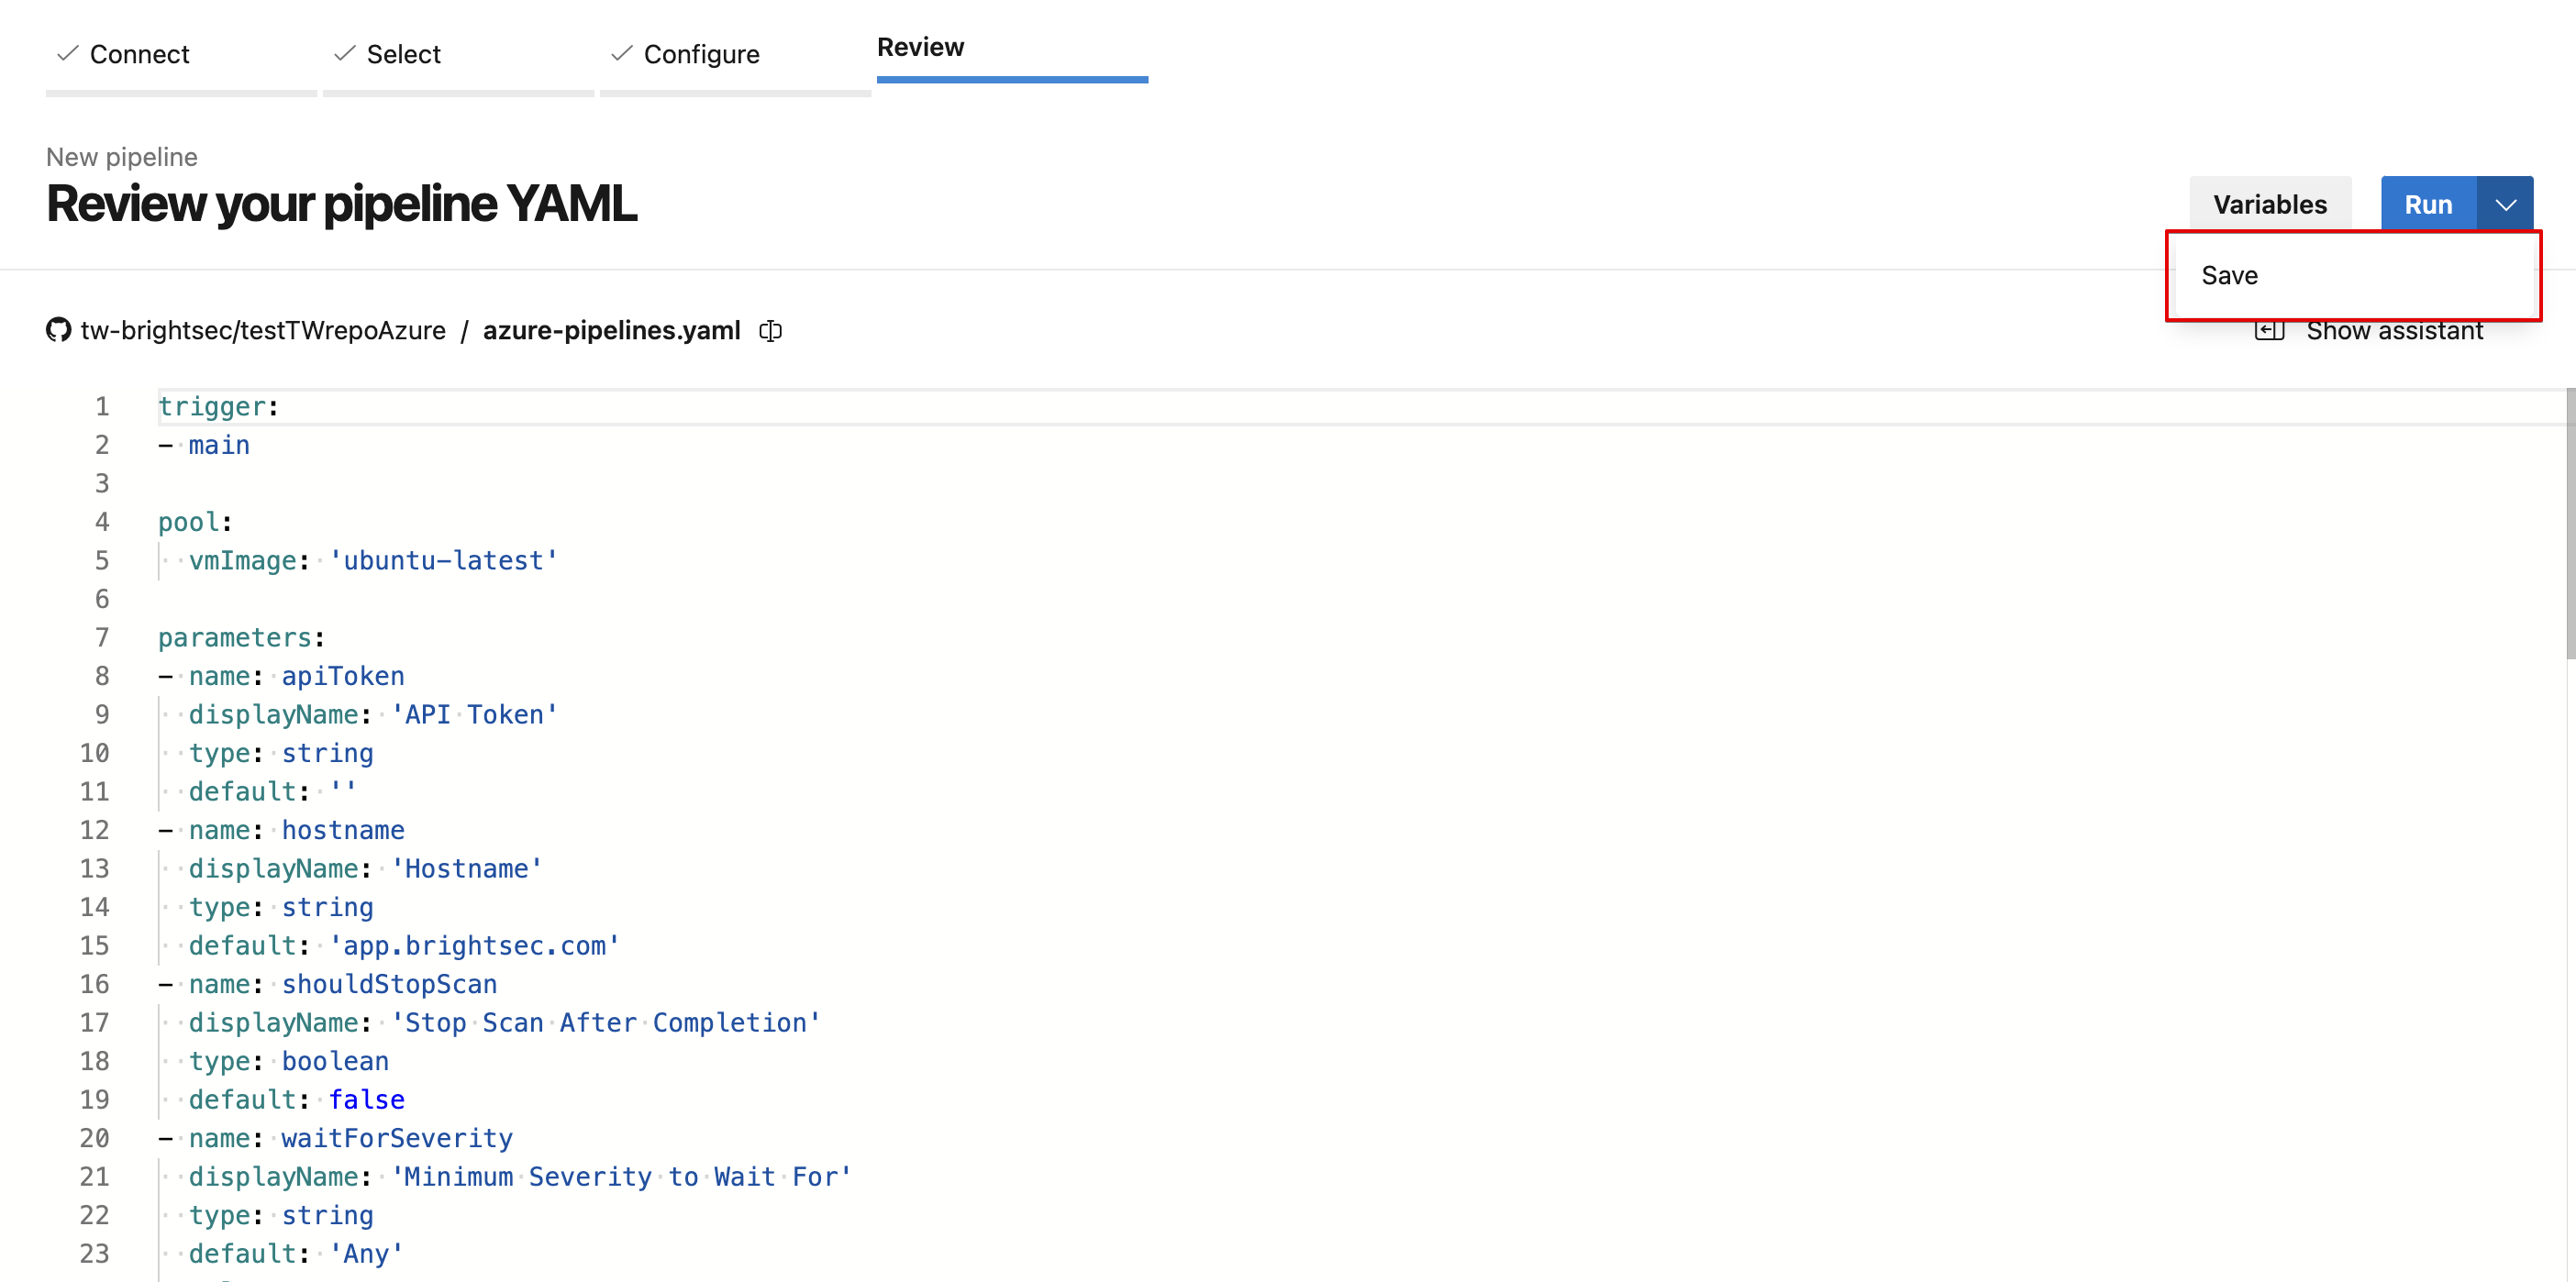
- The editor with the configuration file will appear. Save the pipeline as it showed on the screenshot:

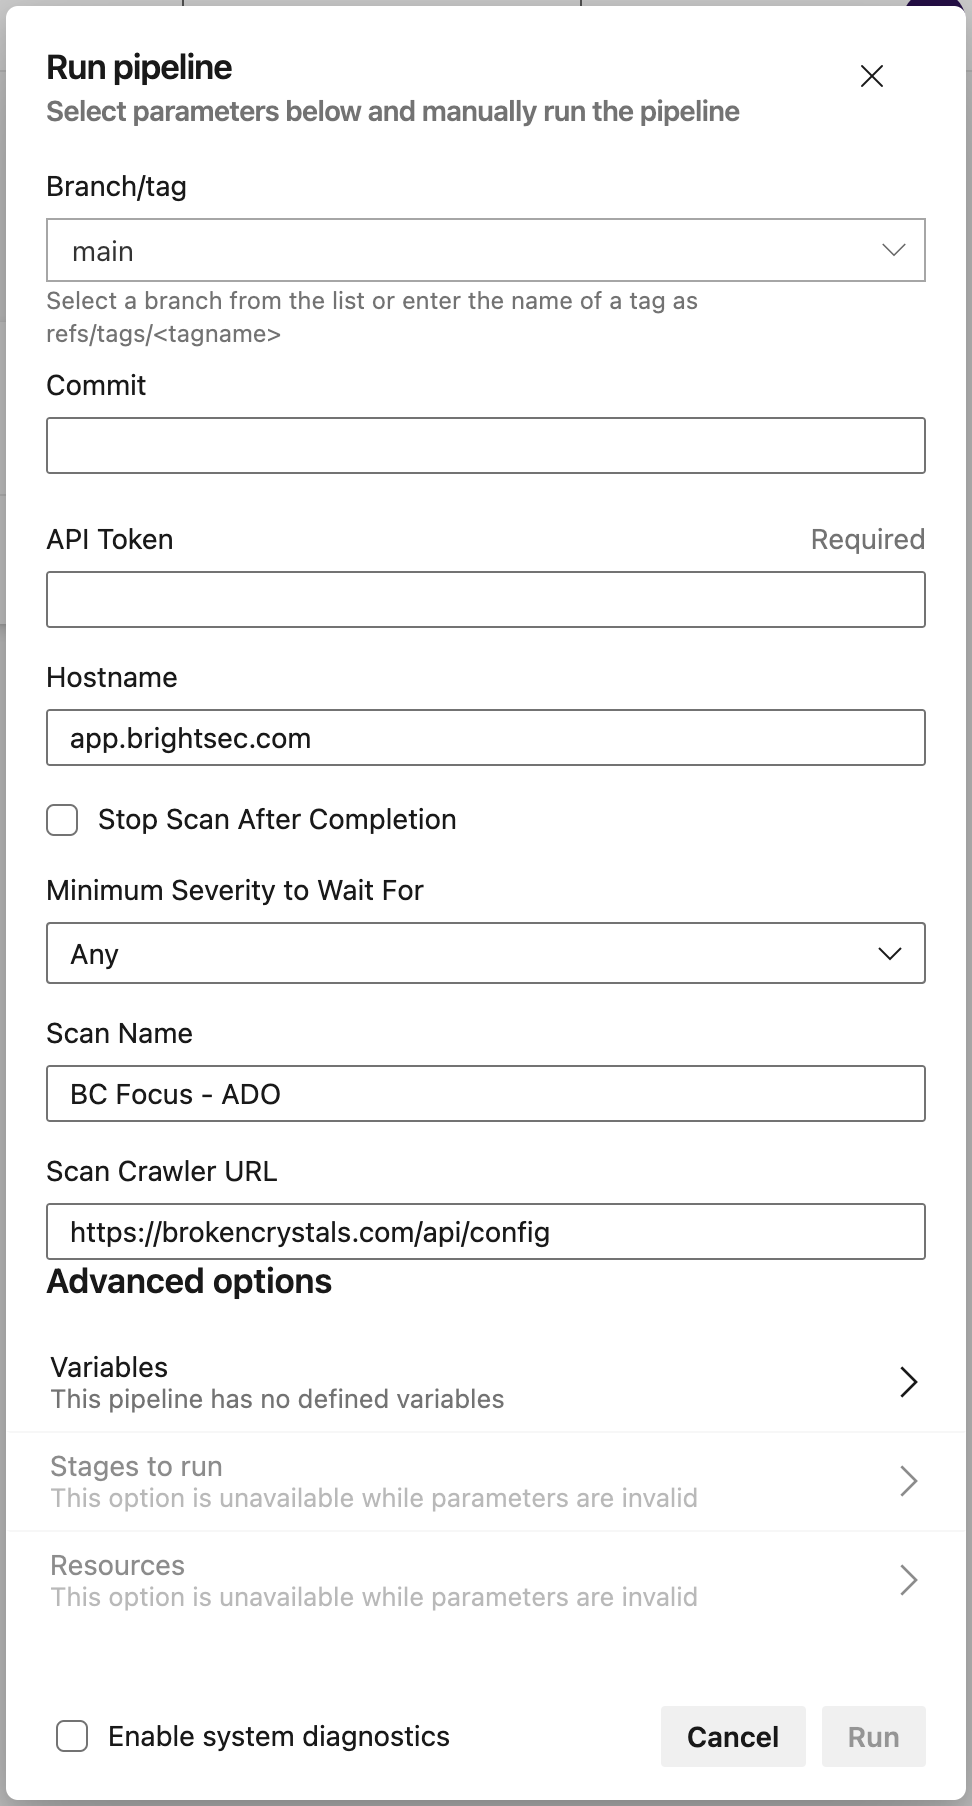
- On the page that appears, click Run Pipeline to open the settings:

Options and fields to adjust:
- API token: paste an Organization API key from the Bright web app.
- Minimum Severety to Wait For: severity threshold at which, in case of vulnerability detection, the scan will stop and show all information about the found vulnerability.
- Click Run to initiate the pipeline
Results
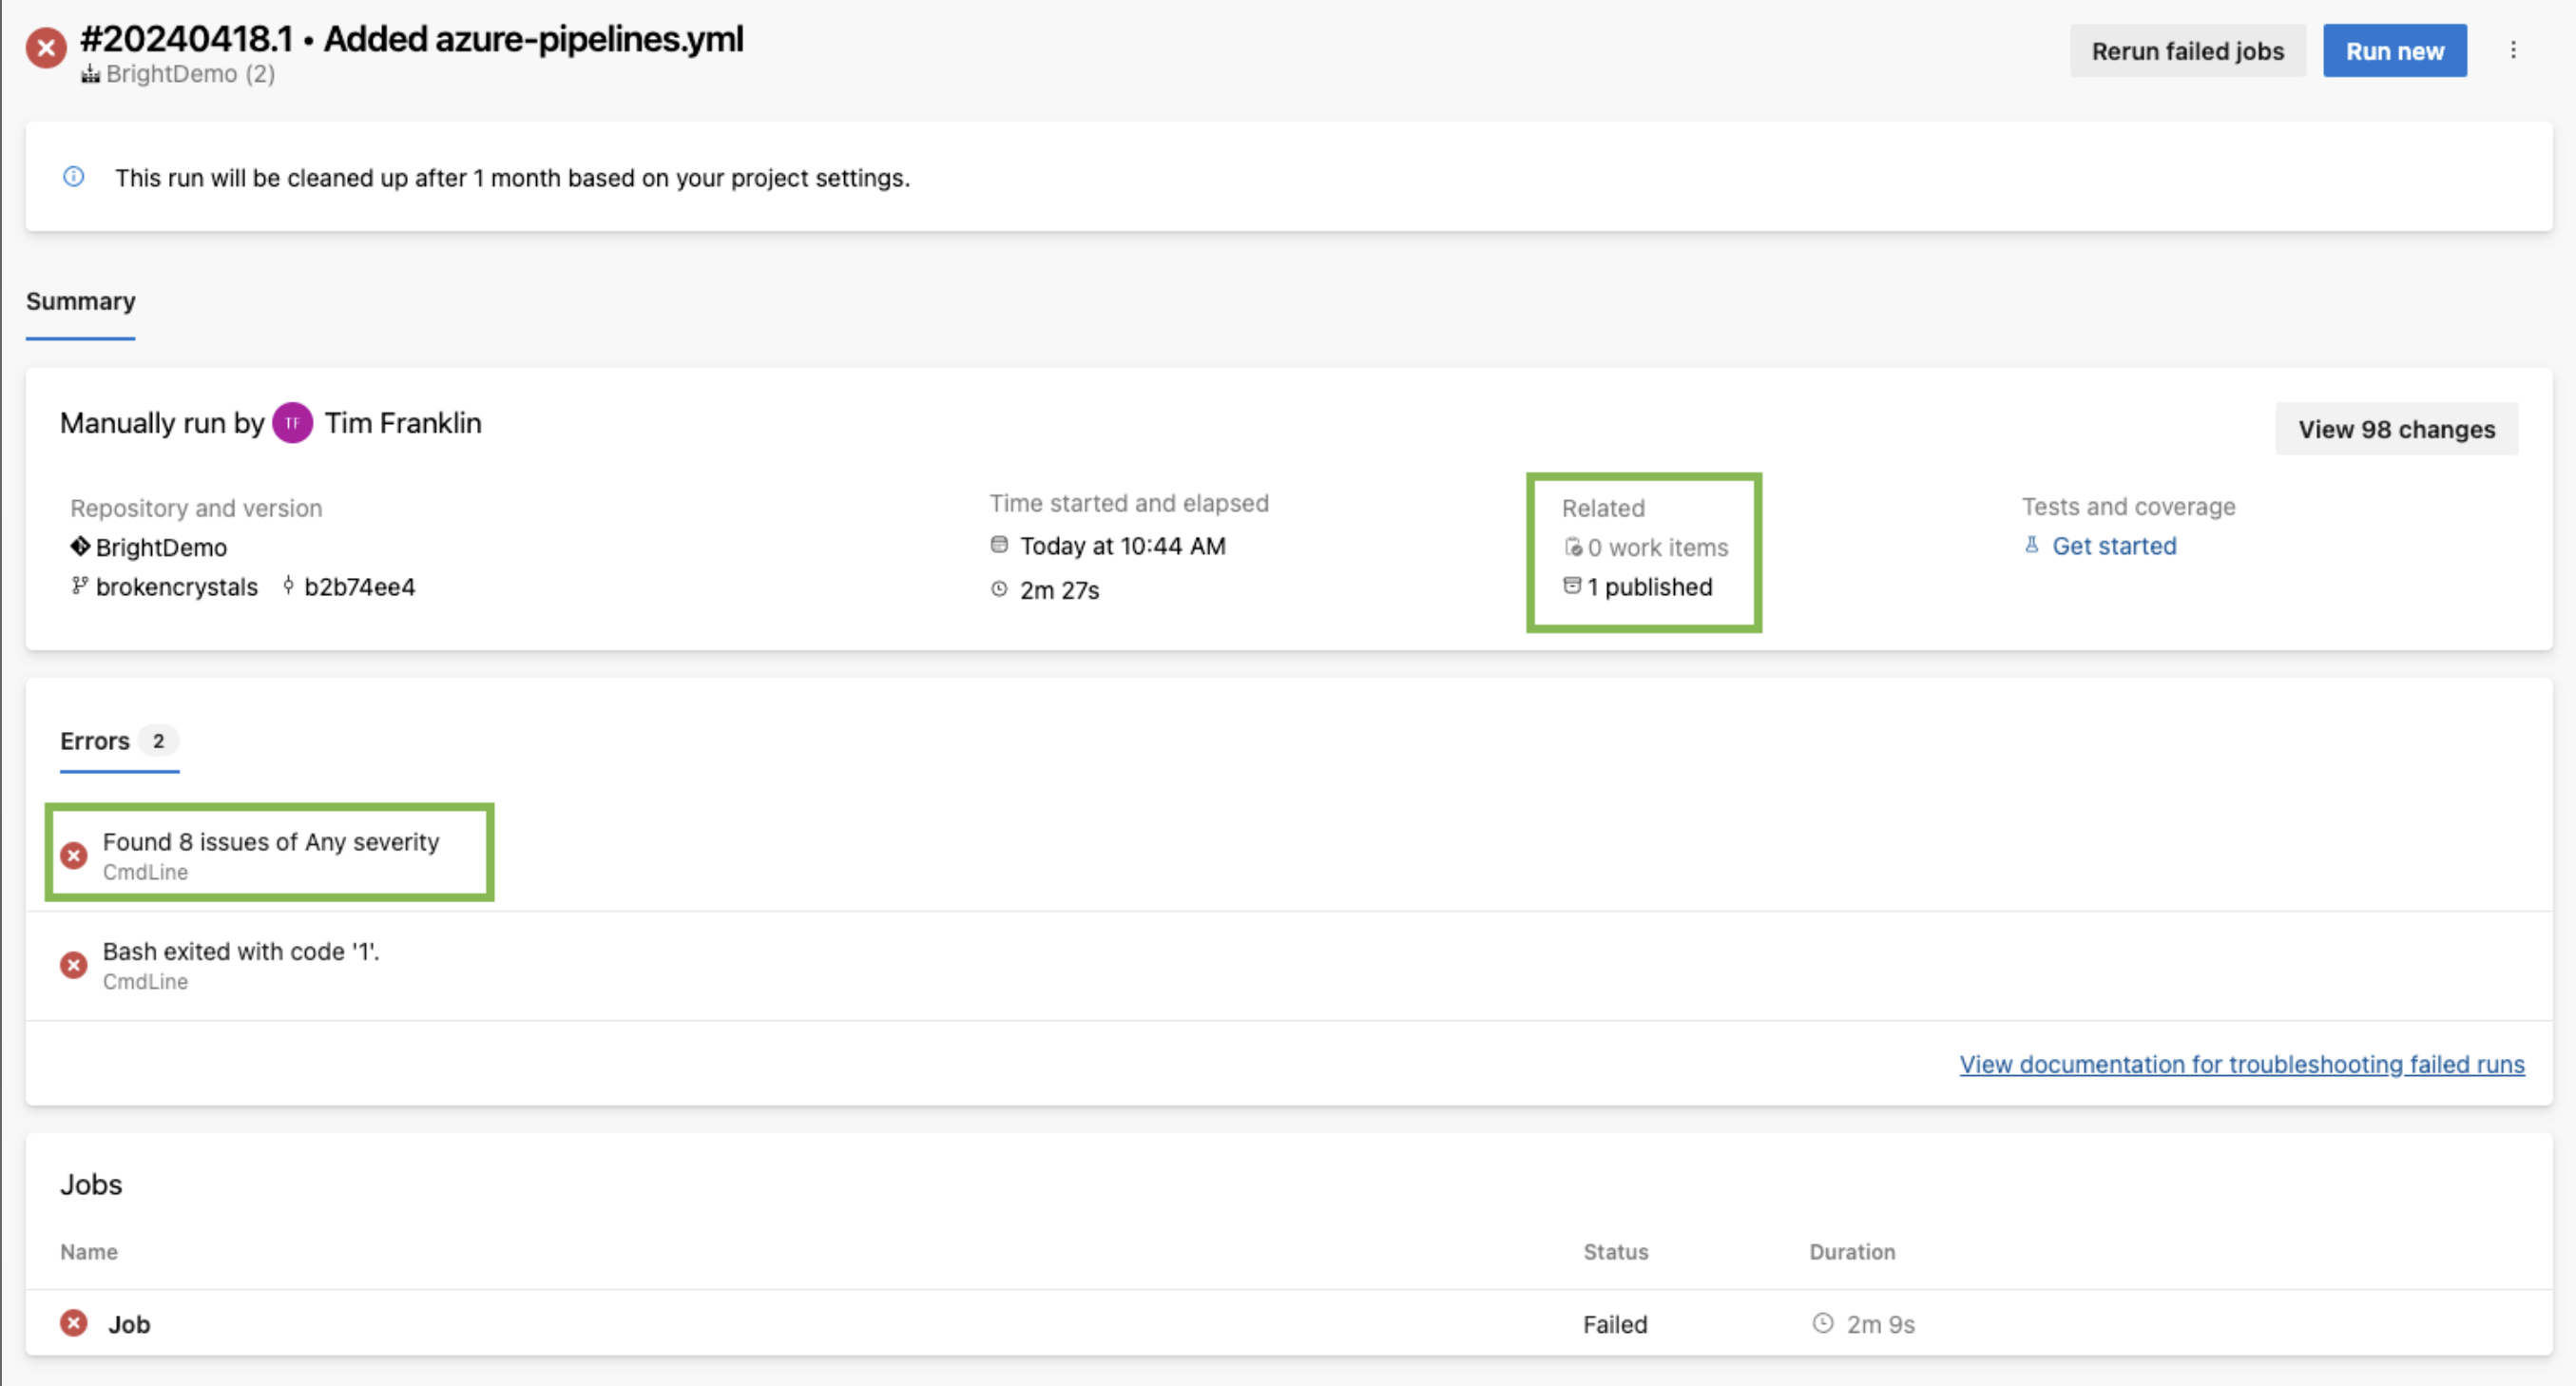
When a vulnerability is found, the scan will stop and you will see this window:

If there are any vulnerabilities found during the scan, the SARIF file will be uploaded to the published artifacts folder. Microsoft pulls results from this folder and uploads them into a central view of Microsoft Defender:

Updated 2 months ago