Authentication
Introduction
The Bright authentication capabilities allow you to scan all the login-protected resources within your target application or API. If you need to scan an application or API with some authenticated pages, you first need to configure Bright with the correct authentication method(s) and valid credentials, so that it can easily reach each of them when running a scan.
By creating an authentication object, you enable Bright to reach complete scan coverage of the target application or API during the security testing. The authentication setup enables you to test access to the authenticated resources covered by the created object before using it in a scan, easily determine the configuration failures and fix them.
Note:Before following the instructions below, ensure that your application and authenticated resources are accessible to the Bright engine, either directly from the Internet or via a Repeater.
You can enable Bright to get access to an authenticated resource by using any of the following authentication options:
- Recorded browser-based form authentication is a quick and visual way of creating authentication flows. It allows uploading an authentication flow which was prerecorded with the Chrome recorder and using it as authentication with Bright.
- Header authentication - the most straightforward method of authentication, used for static header authentication tokens that are generated outside of Bright and will not expire during a scan.
- OpenID Connect (OAuth) - the authentication method used to configure the standard OAuth 2.0 flow, which requires the use of client or user secrets. This authentication method relies on the authentication performed by an OpenID Connect Provider to verify the identity of a user.
- Custom API authentication call - the authentication method used for the configuration of a custom authentication object. Easily create a single or multi-stage authentication flow to enable the Bright engine to access the authenticated resources. During the authentication object configuration, you can also create templates to extract dynamic information from the previous steps, easily performed by using the String Interpolation Syntax.
- NTLM authentication - the authentication method used to establish a connection between a user’s workstation and a corresponding network which uses the NTLM protocol.
Deprecated methods
- Browser-based form authentication - is a simplified option of the form authentication method. Simply specify the relevant fields on login pages with the corresponding valid credentials to be entered in to those fields. Using this data, Bright automatically completes the form in the same way you would to gain access to the protected pages. You are also able to configure a browser-based authentication object for multi-step login forms.
- API call - one of the most flexible methods of authentication, used for multiple API requests that include customized request queries, headers, and bodies, requiring the use of dynamic information between steps (such as CSRF tokens).
- Form authentication - the default method of authentication, used for authentication requests with the content type set as
application/x-www-form-urlencoded.
Note:If you need to get access to a scan target via a Repeater using the HMAC authorization, see Using Repeater Scripts.
Setup
To create an authentication object in the Bright App by using any of the available authentication options, you will need to get valid parameters and values required for a successful authentication setup, the specific parameters depend on the required authentication flow. You can find them in the browser DevTools of your application. To do that, follow these steps:
- Open the DevTools in your application.
- In the DevTools, select the Network tab.
TipMake sure that the Preserve log checkbox is selected.
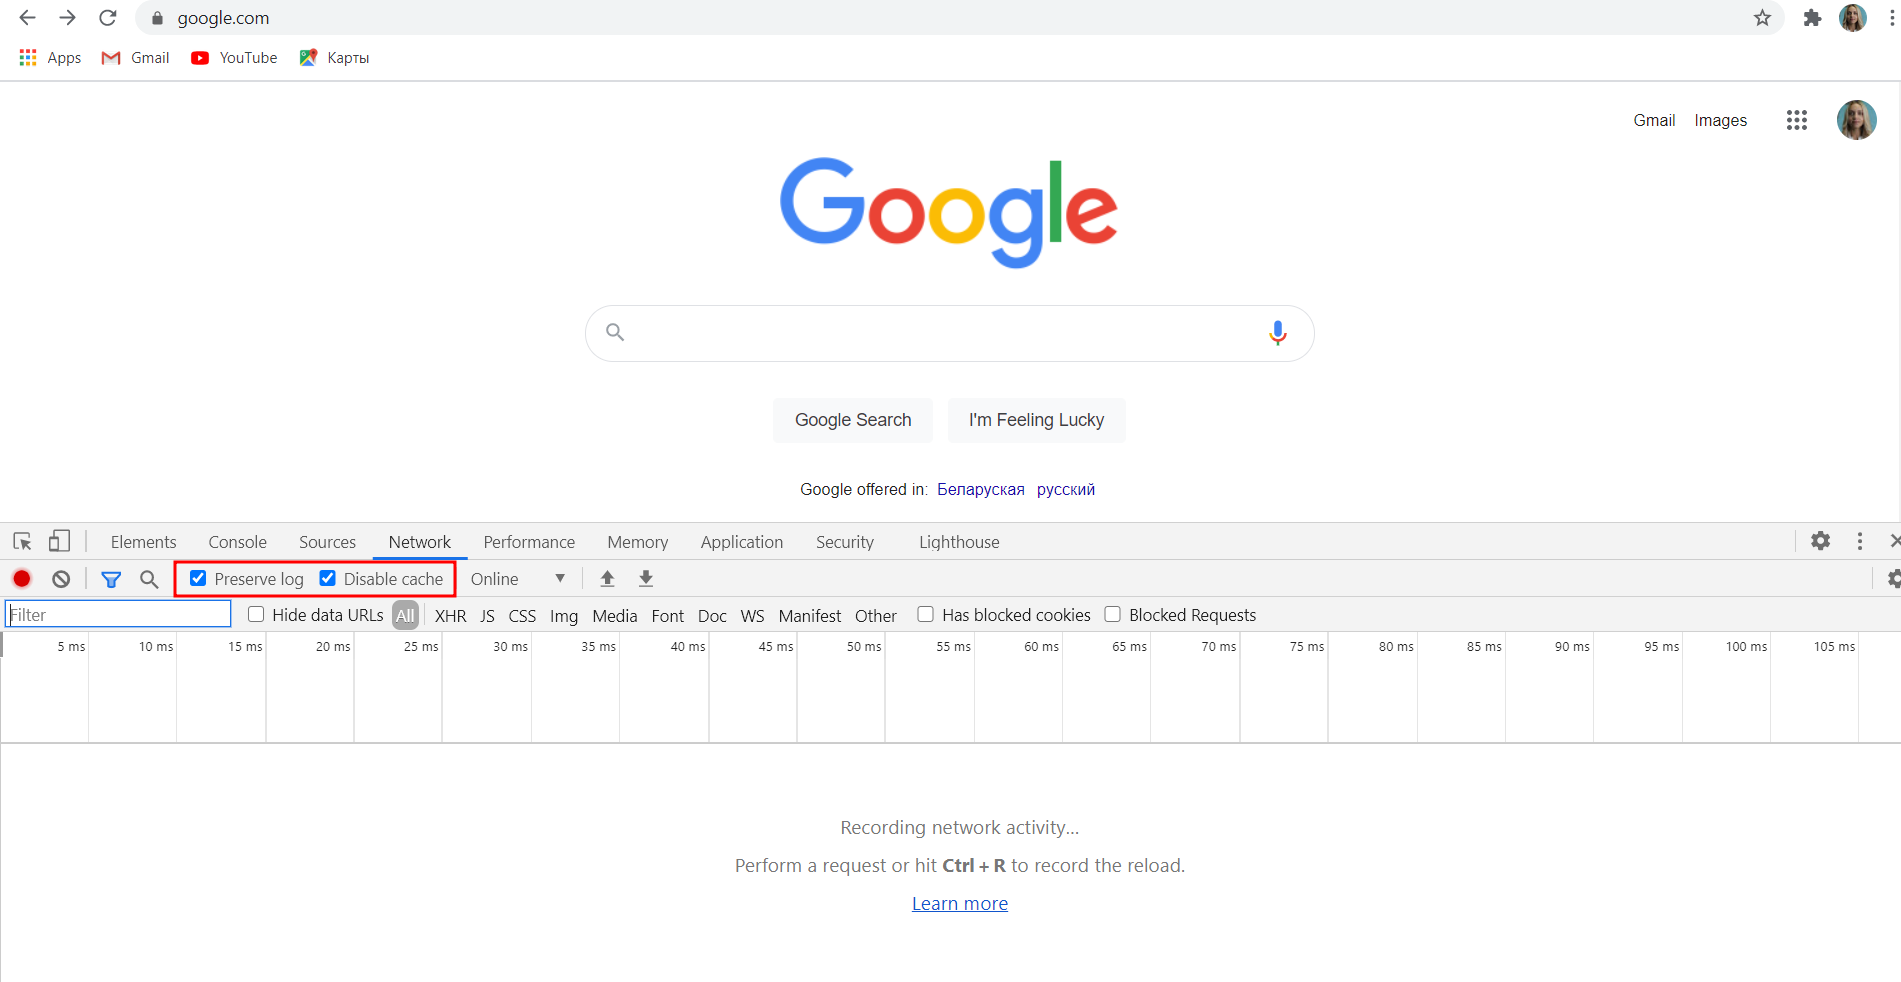
- Perform a request by submitting the login call.
- Use the data of the relevant login request when completing the authentication setup fields.
NoteIt is important to select the actual login request from the overall list to pass the authentication setup successfully.
When starting a new scan, you can select any authentication objects you previously created in the Bright app. This will allow the Bright engine to perform the re-authentication automatically during the scan.
Step-by-step guide
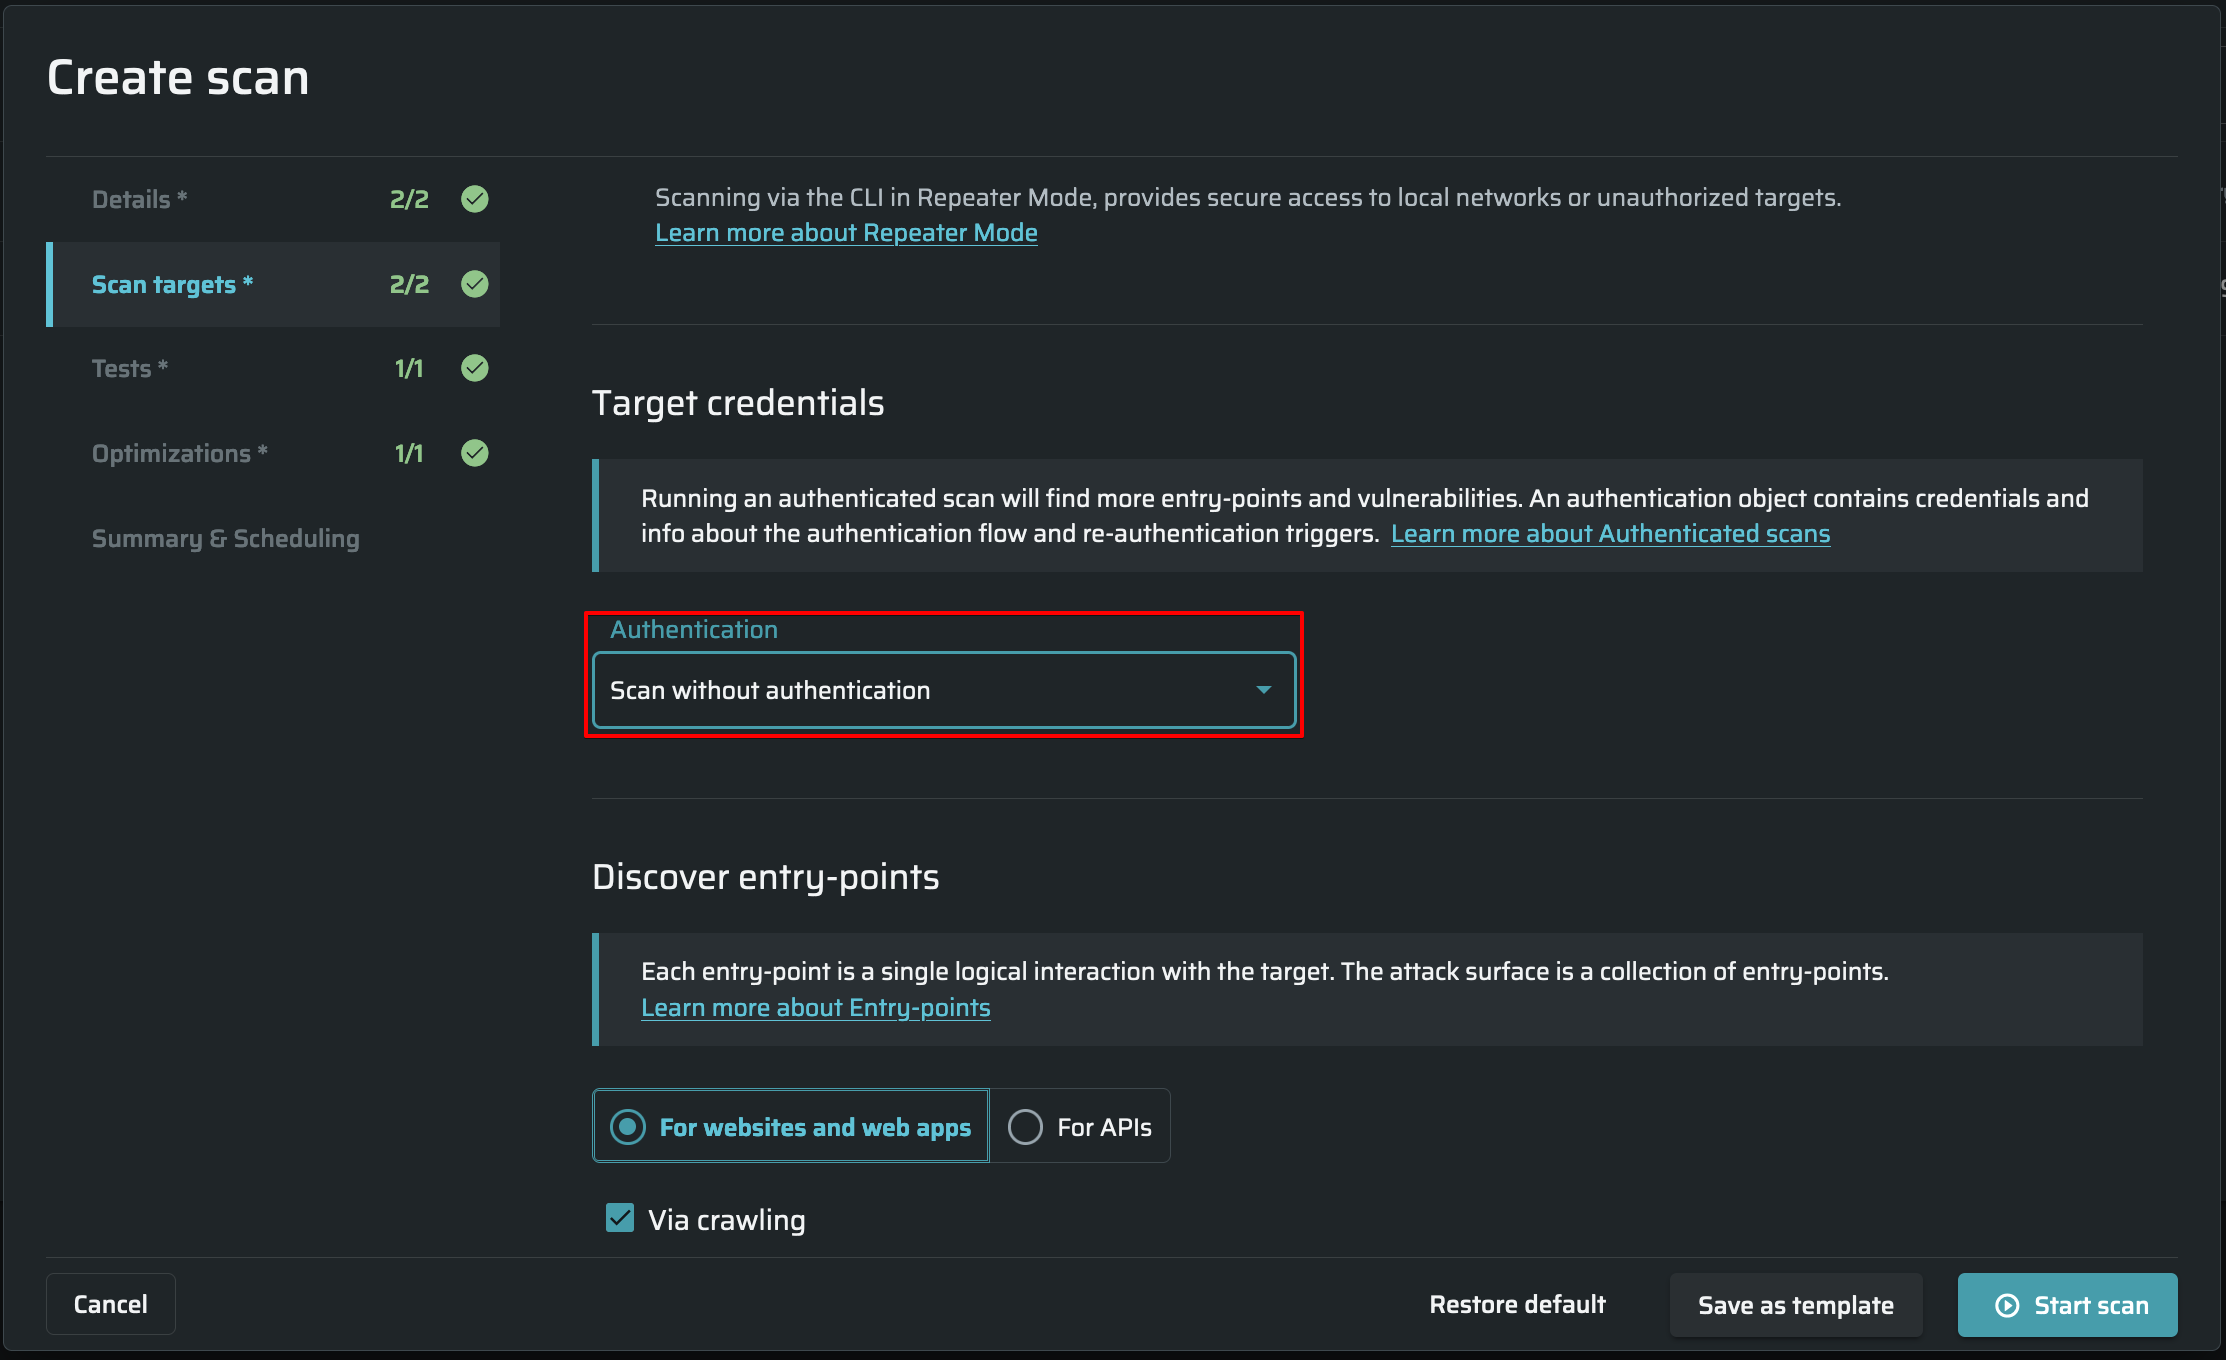
- In the Application Settings tab, select Authentication object.
- From the Authentication dropdown list, select the required object.
Configuring authentication
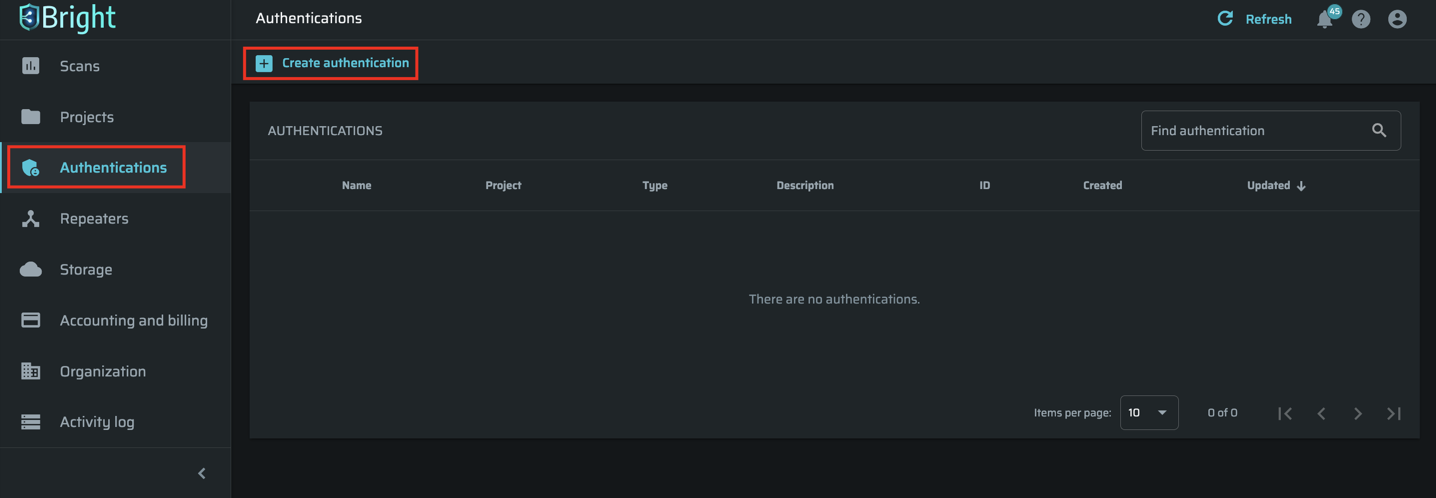
- From the menu in the left pane of the Bright app, select Authentications.
- In the Authentications pane, click + Create Authentication.
- In the Create authentication dialog, fill in the fields as described below.
- After filling in all the necessary fields, in the right-bottom corner of the Create Authentication dialog, click Create.
Note:
- The Create authentication window contains three tabs: Details, Setup, and Logout Indicators. Use the menu in the right pane of the dialog to switch between the tabs.
- All mandatory fields are marked with an asterisk (*).
- Bright allows testing a scan before saving it. For details, see the Testing Authentication section below.
The Details tab
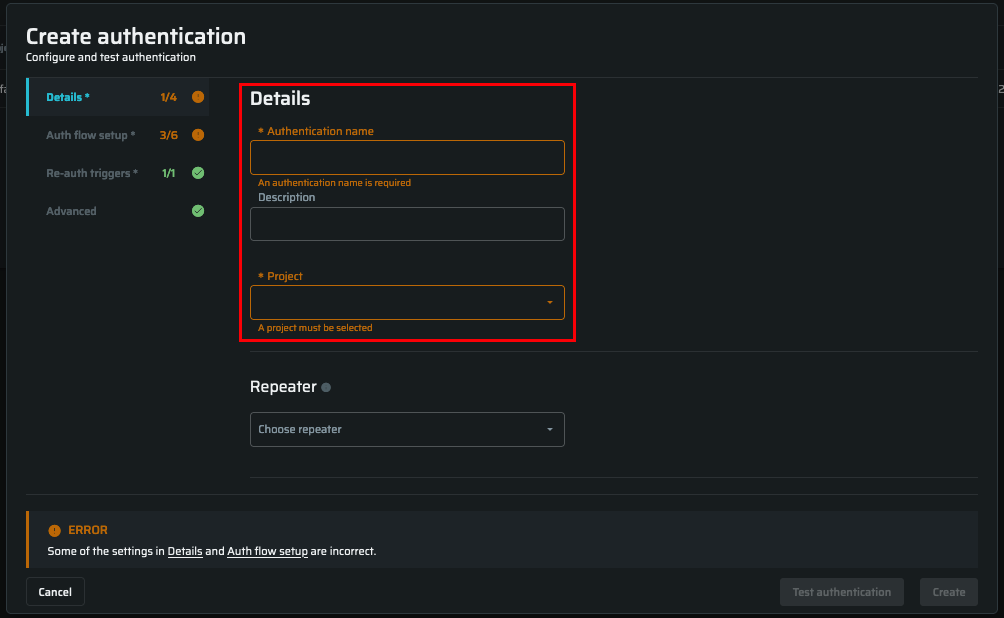
Specify the details of the Authentication Object you want to create.
| Field | Guidelines |
|---|---|
| Authentication name | Enter the authentication object name |
| Description | Enter the authentication object description. For example, you can specify the application type or other information that helps you distinguish your created object. |
| Project | Select the project to attach an Authentication Object |
Protected resource details
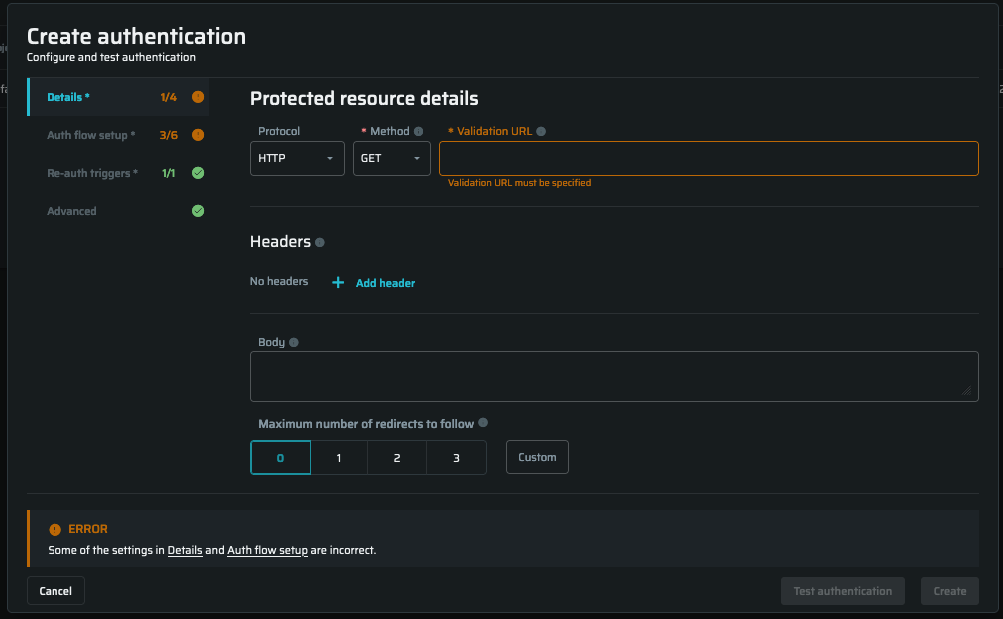
Provide the details of the authentication-protected resource.
Field | Guidelines |
|---|---|
Protocol | From the dropdown list, select the HTTPS protocol to be used for authentication |
Method | Select the HTTP method of an active tester end-point (authenticated resource) |
Validation URL | Enter the URL of the authenticated (protected) resource to test if the authentication scenario is configured correctly. The validation URL should be different from the authentication URL. |
Merge Strategy | Select whether the specified header must be replaced or appended with the provided value before sending each request |
Name | Select an additional header to be replaced or appended before sending each request, for example, Authorization |
Value | Enter the header value |
Body | Enter the HTTP request body to be sent in the request sent, for example: |
Maximum number of redirects to follow | Enter the maximum number of redirections that Bright should follow during the authentication process
|
Repeater | If you use a local Repeater to reach the scan target, select it from the dropdown list to connect it to the scan. |
The Auth flow setup tab
This tab allows setting authentication details.
From the Authentication type dropdown list, select the necessary authentication type, and then proceed to the authentication details. For information on how to fill in the fields for the selected authentication type, follow the relevant link below.
Valid authentication types
- Recorded browser-based form authentication
- Header authentication
- OpenID connect (OAuth)
- Custom API authentication call
- NTLM authentication
Deprecated authentication types
The Re-auth triggers tab
This section contains the options to be used during the application scanning to determine if the authentication flow is no longer valid and the authenticated resources cannot be reached. The options define how the application responds in case the authentication flow fails.
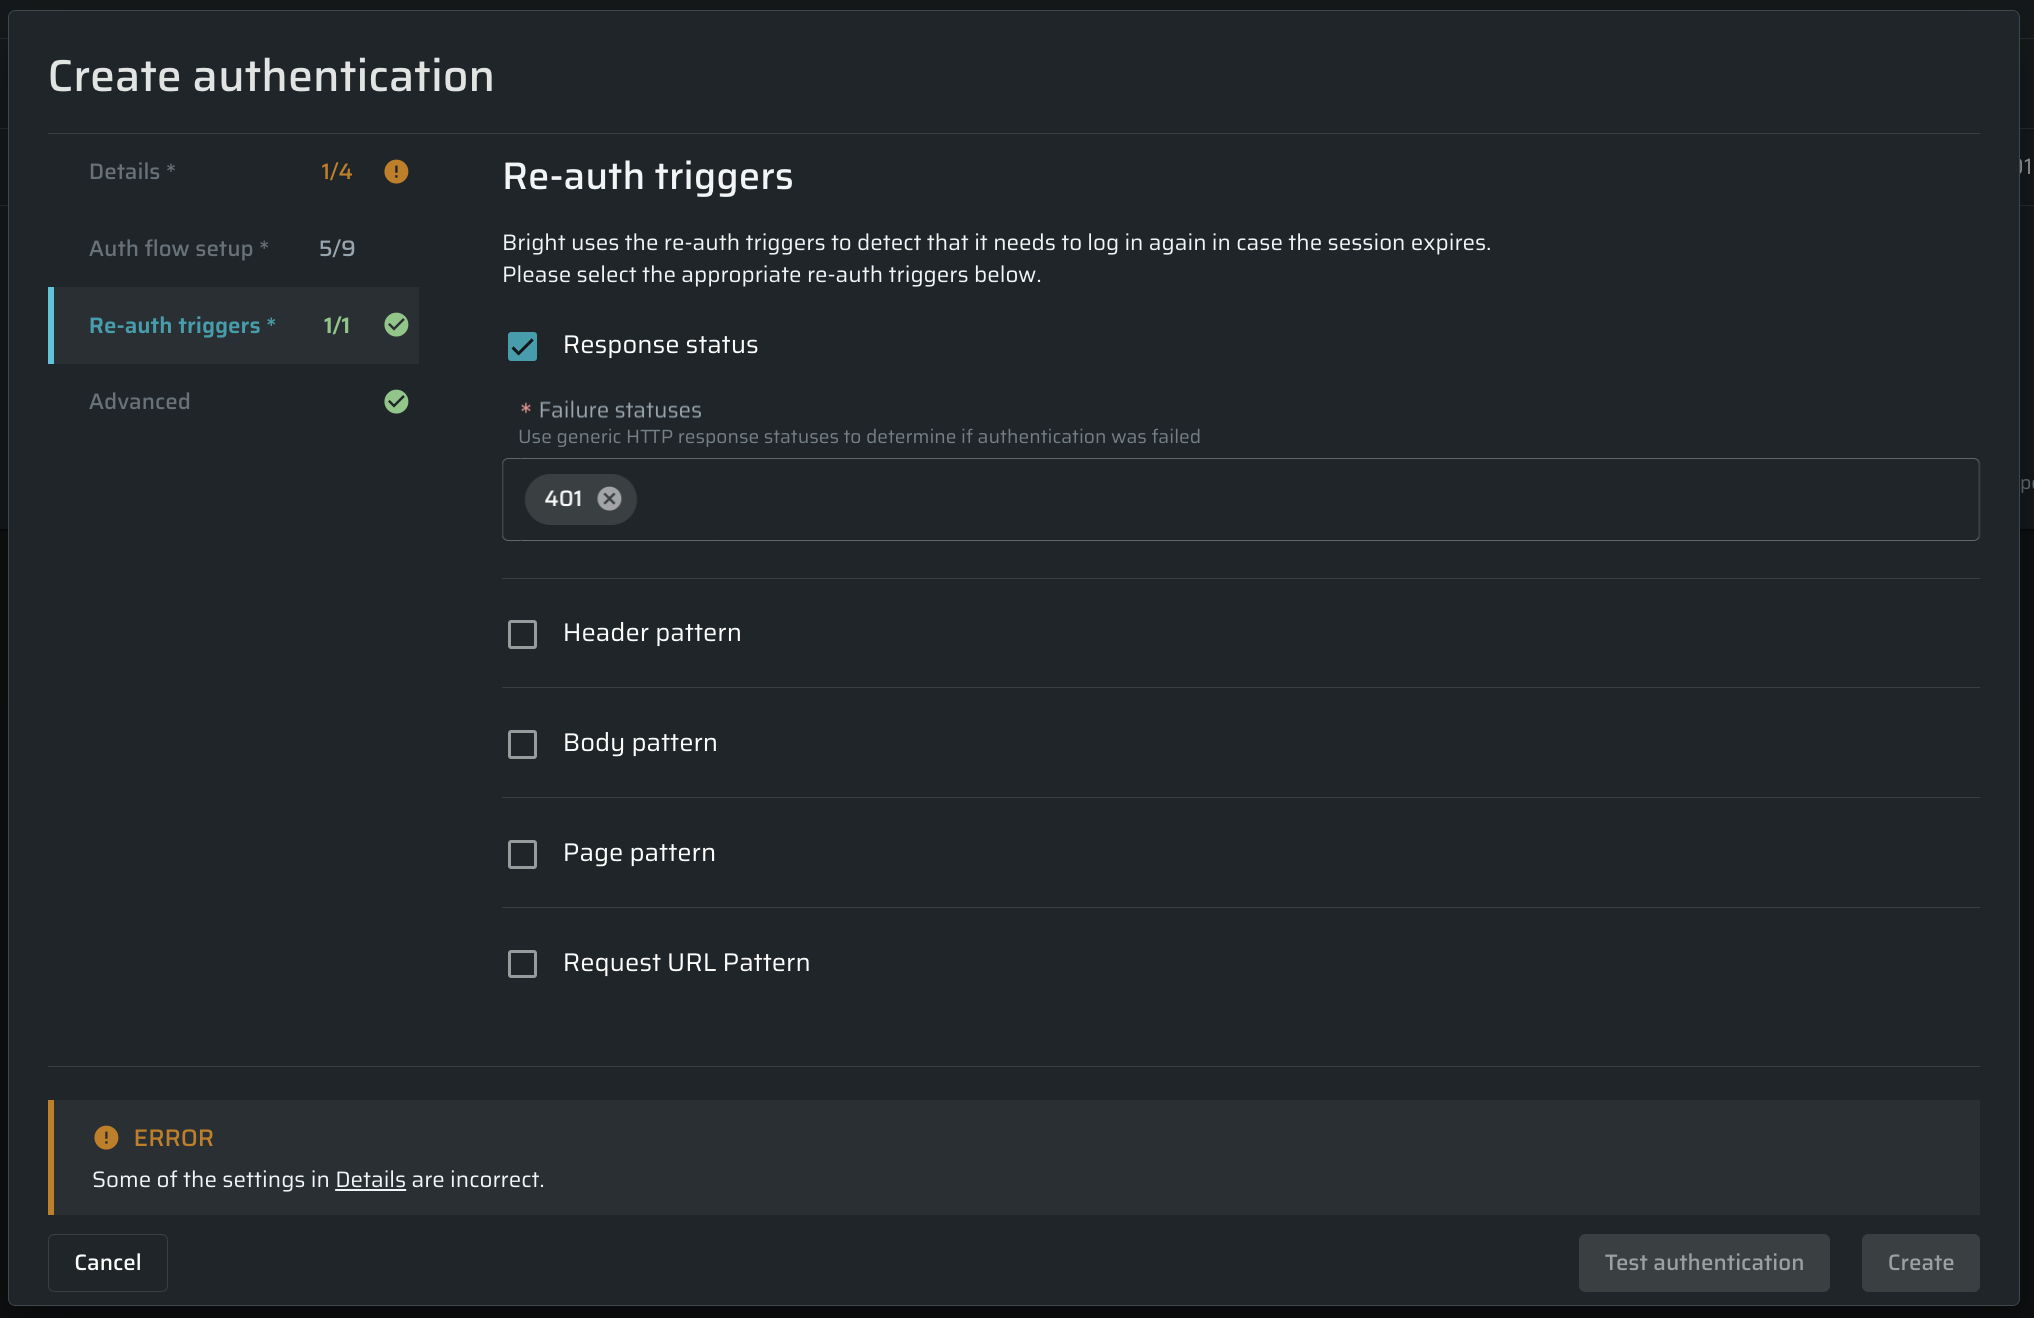
| Field | Guidelines |
|---|---|
| Response status | Select the checkbox and then enter the HTTP response status that will tell you about the authentication failure. |
| Header pattern | Select the checkbox and then enter the header name and Regex pattern that will help you identify the authentication failure. For example, you can use a simple Regex pattern, such as index. |
| Bode pattern | Select the checkbox and then enter the body pattern that will help you identify the authentication failure. For example, this Regex pattern detects a body looking for a UUID in a sessionId parameter: sessionId: \"\\b(uuid:){0,1}\\s_([a-f0-9\\-]_){1}\\s\*\". |
| Page pattern | Select the checkbox and then specify CSS selector(s) or inner text selector(s) that match page element(s) to be used as logout indicator(s). |
| Request URL pattern | Select the checkbox and then enter the URL pattern that will help you identify the authentication failure. |
The Advanced tab
OTP-generation settings
OTP is a reliable way to increase the security of an application by adding one-time passwords. It is often used in combination with a regular password as an additional tool for user authorization. Bright provides the possibility to use a Time-Based One-Time Password (TOTP) and a Hash-Based One-Time Password (HOTP) in the authentication flow.
Note:This tab is only available for Browser-Based Form Authentication , Custom API authentication flow and Recorded Browser-Based Form Authentication.
To configure an OTP correctly, follow the steps below:
- Create an Authentication Object using Browser-Based Form Authentication , Custom API authentication flow or Recorded Browser-Based Form Authentication.
- Open the Auth flow setup tab and insert the
{{otpToken}}to all places needed. The Bright engine will interpret this placeholder into an existing token.- Bright allows users to add this token to the following fields:
- URL
- Body
- Header Value
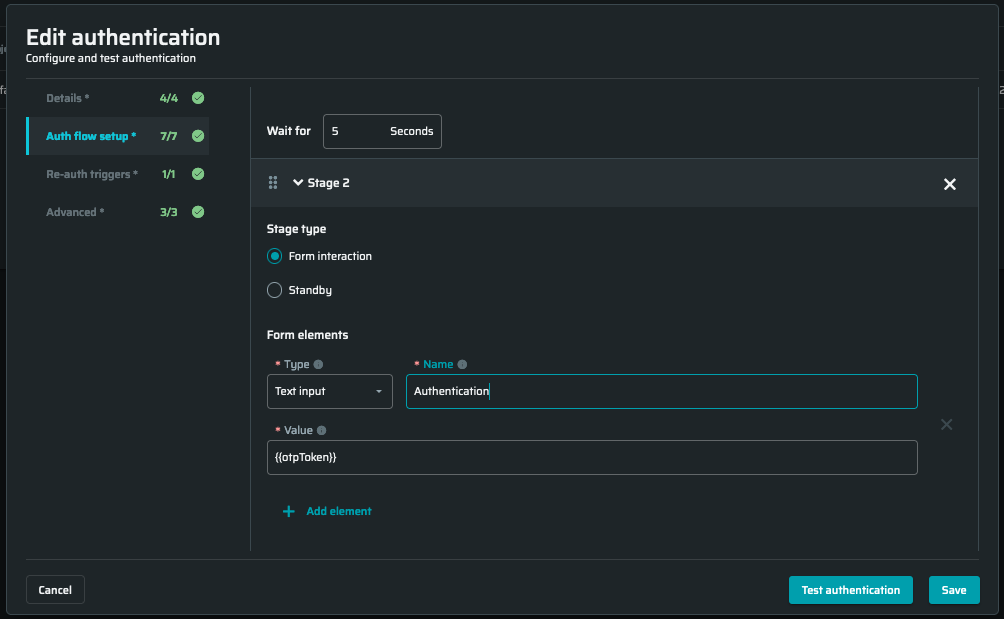
- For Browser-Based form Authentication it is allowed to put the
{{otpToken}}into the Value field. The Name field should match your example.
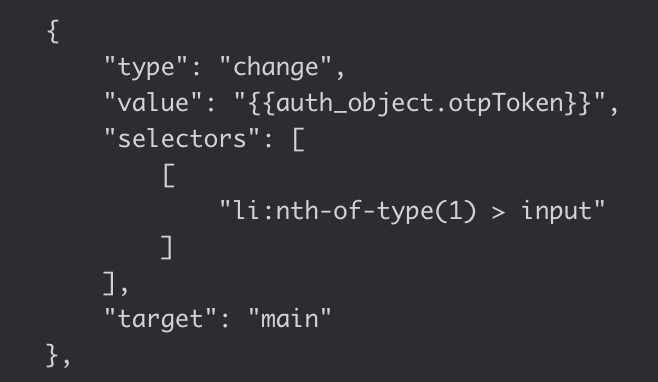
- For Recorded Browser-Based form Authentication, open the recorded JSON-file in a text editor, and change the data in the value line to this:
{{auth_object.otpToken}}.
Code example:
- Bright allows users to add this token to the following fields:
- Go to the Advanced tab and select one of the OTP options:
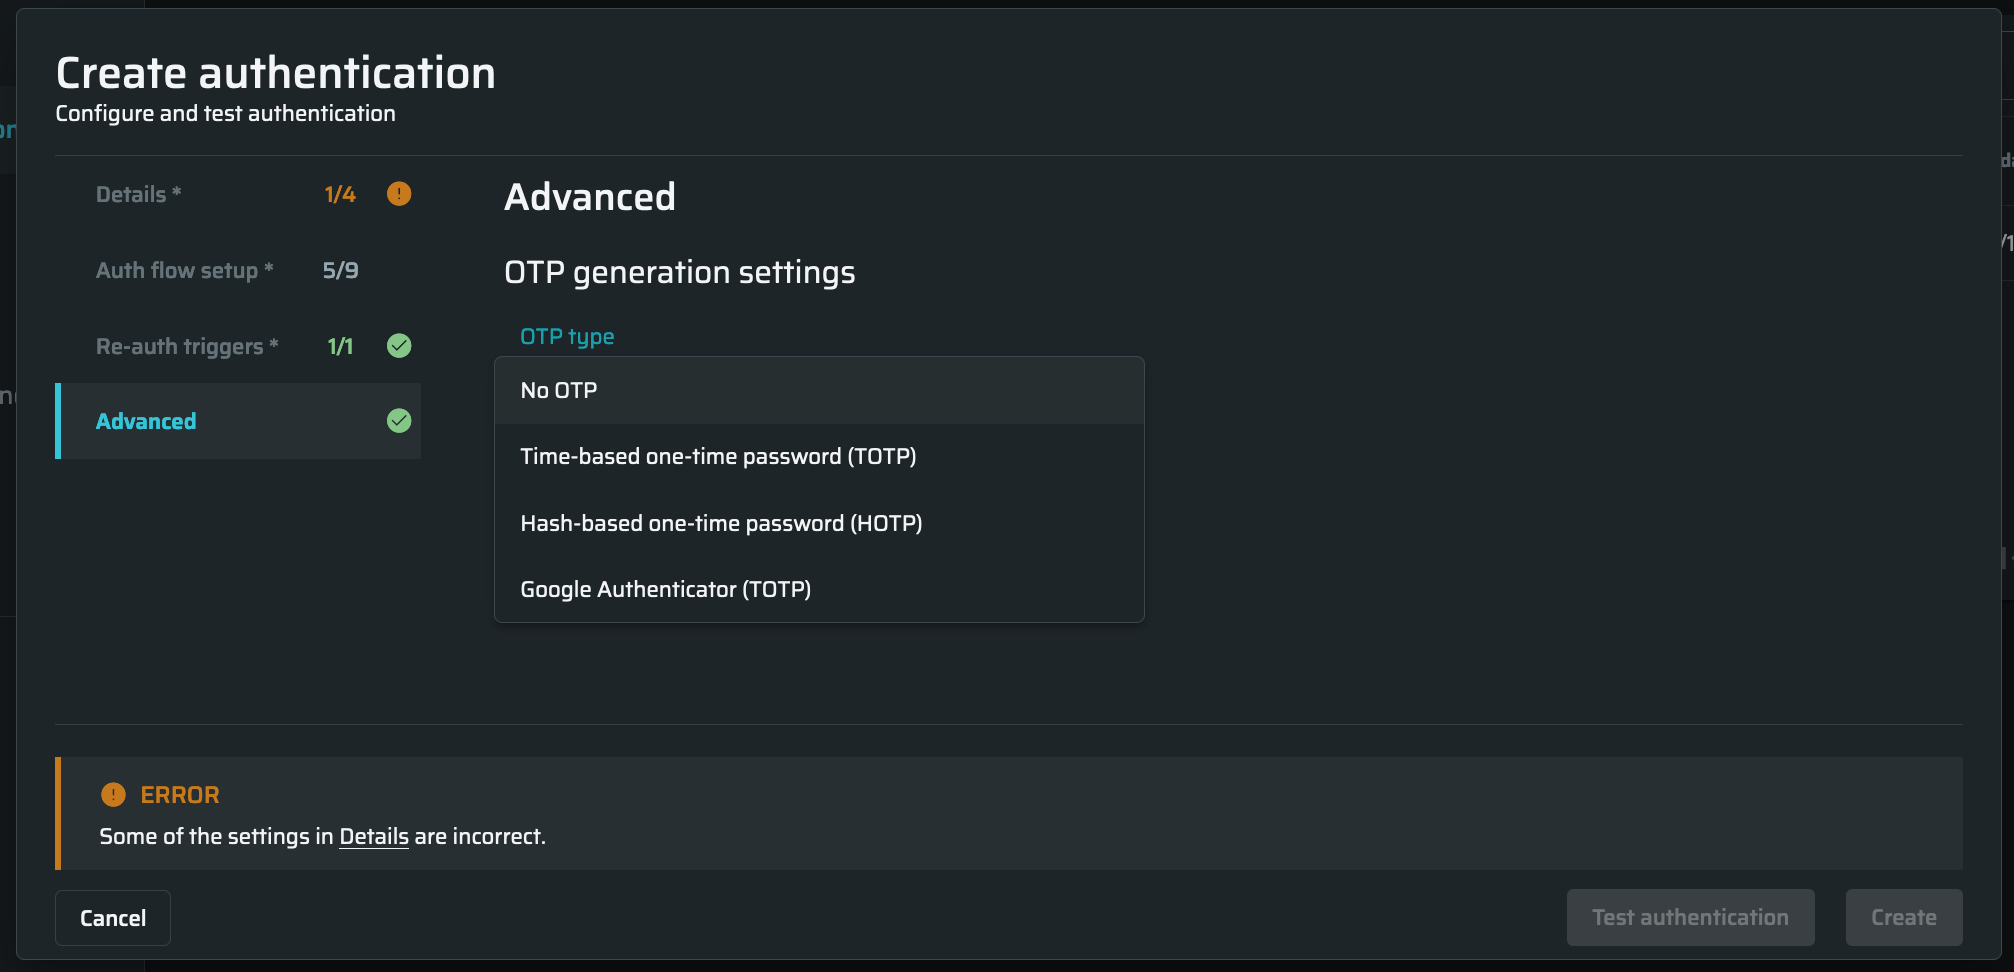
- No OTP - no OTP is selected, set by default
- Time-based one-time password (TOTP) - a temporary passcode generated by an algorithm that uses the current time of day as one of its authentication factors
- Hash-based one-time password (HOTP) - Hash-based message authentication code, based on a counter. See the Troubleshooting page to learn how to adjust the HOTP server.
- Google Authenticator (TOTP) - time-based one-time password is a time-based OTP, the most popular algorithm used by Google Authenticator.
- Enter the following parameters to continue:
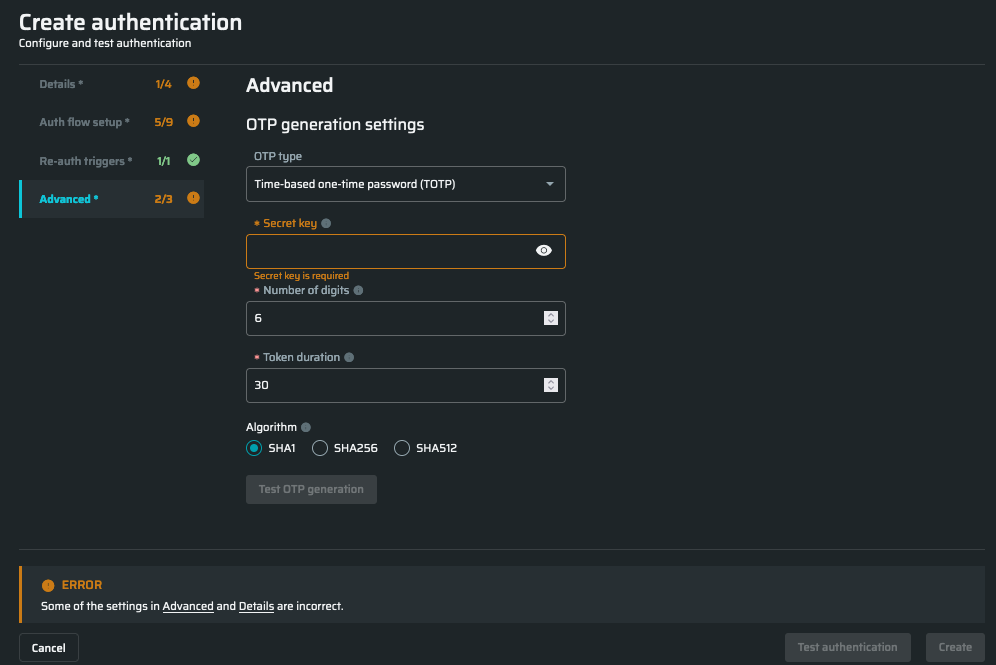
- Secret key - a key that is provided by the target website and used to generate the OTP
Note:
When configuring the Google Authenticator OTP, the input key is often separeted by spaces. These spaces must be deleted before inserting the key in the Secret key field.
- Number of digits - a number of digits (from 1 to 8) used to generate the OTP's length
- Token duration - a time (in seconds) after which an OTP is regenerated (this option is only available when TOTP is selected)
- Algorithm - an encryption algorithm, that contains three types of the cryptographic hash function, which produces a 160-bit, 256-bit, and 512-bit hash value accordingly.
Once everything is done, click on Test OTP generation to check everything is set up correctly. Generated code can be used for OTP adjustment on a target site/service.
Testing authentication
Preliminary authentication testing helps you verify if the authentication object has been configured correctly. This allows you to reveal the configuration issues timely, before running a scan.
To test your authentication object, at the bottom of the Create authentication dialog, click Test authentication.
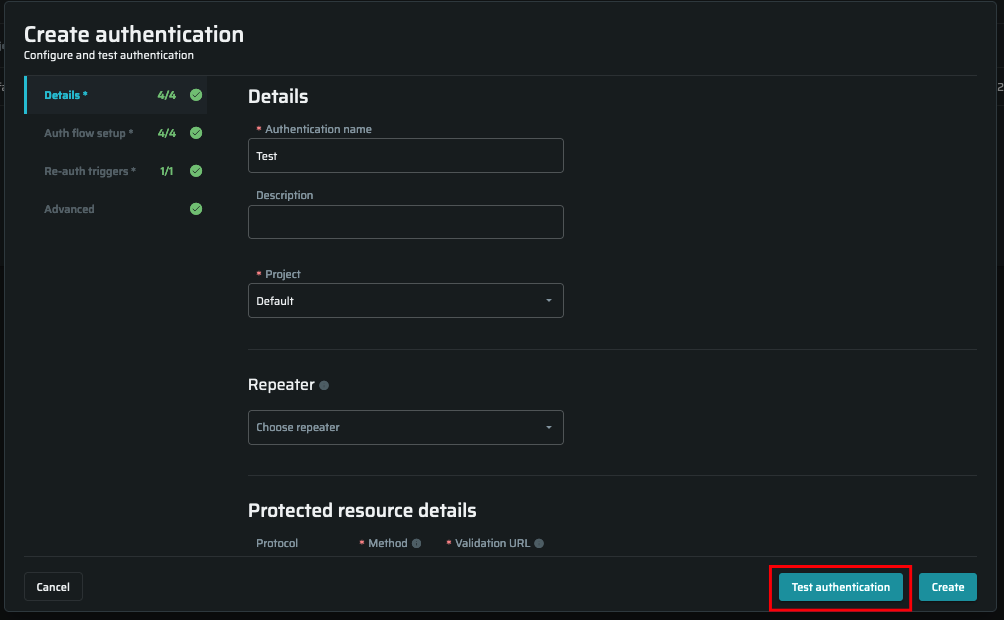
The application displays the test results in a separate Test results tab.
- A valid authentication object returns three success messages indicated in the relevant Test results sections:
- Test Authentication Triggers provides the test request and response data.
- Authentication call (fillForm #) provides a screenshot of the form filled by the engine per stage.
- Authentication call (submitForm #) provides a screenshot of the authenticated page as evidence of the successful login.
- Authentication call (Check Post-Login URL) provides a screenshot of the post-login URL as evidence of the successful login.
- Access Protected Resource provides the test request and response data.
In this case, you can save the configured object and add it to your scans.
- If the test results include a failure message, go back to the object configurations and verify their correctness. Use the test request/response data to find a certain failure and fix it.
Note:The Bright engine only supports the
set-cookieheaders that are less than 4097 bytes. If the received header exceeds this limit, the engine will ignore the header and will not include it in the request/response data. Breaking the limit may also cause authentication object failure.
Updated about 2 months ago
